
적 공격 방어 星海爭霸地圖集
收集了已註冊「적 공격 방어」標籤的地圖。請以難易度與特徵等單靠類型難以尋找的遊玩方式為中心,比較熱門地圖與最新地圖。
- 已註冊地圖
- 3個
- 累計下載
- 0
- 累計瀏覽
- 172
人氣地圖
這是下載與瀏覽熱度都很高的地圖。
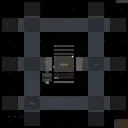
썬크 디펜스 10-웨이 V9.11 (Sunken Defense 10-Way V9.11)
스타크래프트 브루드워의 대표적인 디펜스 유즈맵인 ‘썬크 디펜스 10-웨이 V9.11’은 우주 테마의 넓은 맵 위에서 적의 끊임없는 공격을 방어하는 재미와 긴장감을 동시에 느낄 수 있는 작품이다. 맵 중앙의 기지 주변으로 펼쳐진 넓은 공간은 적의 침공을 막아내며 자원을 확보하는 전략적 선택의 중요성을 강조하며, 특히 10방향에서 동시에 몰려오는 적들을 상대해야 한다는 점에서 초보자부터 숙련자까지 두루 즐길 수 있는Balance를 갖추고 있다. 맵의 특징인 ‘10-웨이’는 맵 외곽을 따라 배치된 10개의 주요 방어 지점에서 적의 공격을 받게 되며, 각 지점마다의 방어 전략과 자원 분배가 승패를 좌우한다는 점에서 전략적 깊이가 돋보인다. 또한 맵의 규모가 크고 타일 수가 많아 세밀한 건물 배치와 유닛 컨트롤이 요구되는 만큼, 플레이어는 맵의 구조를 미리 숙지하고fficient한 방어선을 구축해야 한다. 맵의 진행은 비교적 명확한 승리 조건을 갖고 있으며, 방어에 성공해 적의 공격을 모두 막아내거나, 반대로 공격 측이 기지를 파괴하는 방식으로 진행된다. 추천하는 플레이 인원은 6명으로, 팀전보다는 개인 또는 소규모 협동 플레이에 최적화되어 있으며, 예상 플레이 시간은 맵의 규모와 난이도에 따라 30분에서 1시간 내외로 예상된다. 초보자의 경우 맵의 구조와 방어 루틴을 익히기 위해 쉬운 난이도부터 도전하는 것이 좋으며, 숙련자의 경우 적의 패턴을 분석해 최적의 방어 전략을 구사하는 재미를 느낄 수 있다. 특히 우주 테마의 맵 디자인과 함께 제공되는 사운드 효과는 몰입감을 높이는 요소로 작용하며, 맵의 세부적인 밸런스가 잘 조율되어 있어 반복 플레이를 하더라도 지루하지 않은 구조를 갖추고 있다. 플레이 전에는 맵의 주요 방어 지점과 자원 위치, 적의 침공 루트를 반드시 확인하고, 방어 건물과 유닛의 조합을 미리 계획해 두는 것이 좋다. 또한, 맵의 버전별 차이를 고려해 자신에게 맞는 난이도를 선택하는 것도 중요한 포인트다. StarCraft: Brood War's iconic defense custom map, *Sunken Defense 10-Way V9.11*, offers a thrilling blend of fun and tension as players defend against relentless enemy attacks across a vast space-themed map. The expansive area surrounding the central base highlights the critical importance of strategic choices in securing resources while blocking invasions, and its 10-directional assault system ensures balanced gameplay for both beginners and experts. The map's signature "10-way" design forces players to defend against waves of enemies attacking from 10 key outpost positions around the perimeter, where the success or failure of each defense point hinges on smart resource allocation and tactical planning. Given the map's large scale and high tile count, precise building placement and unit control are essential—players should familiarize themselves with the layout and establish an efficient defensive line early on. The victory conditions are straightforward: either successfully fend off all enemy waves or allow the attacking side to destroy your base. Recommended for 6 players, the map is best suited for solo or small-team cooperative play, with typical sessions lasting between 30 minutes to an hour depending on difficulty and map scale. Beginners should start with easier difficulties to learn the map's structure and defense routines, while experienced players can enjoy analyzing enemy patterns to optimize their strategies. The immersive space-themed design and atmospheric sound effects enhance the experience, and the well-balanced mechanics ensure replayability without monotony. Before playing, check the key defense points, resource locations, and enemy invasion routes, and plan your building and unit compositions in advance. It’s also wise to consider version differences to select the difficulty that best suits your skill level.
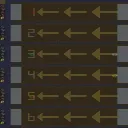
디펜스 F v2.5 (Defence F v2.5)
스타크래프트 브루드워의 유즈맵 ‘디펜스 F v2.5’는 디펜스 장르의 대표적인 유즈맵으로, 적의 끊임없는 공격을 방어해야 하는 긴장감 넘치는 플레이가 특징이다. 맵은 중앙에 플레이어 기지(건물)가 배치되어 있으며, 사방에서 몰려오는 적 유닛을 상대로 건물을 보호하는 것이 주요 목표로 보인다. 적의 공격 패턴은 무작위로 생성되는 듯하며, 플레이어는 제한된 자원으로 방어 시설을 보강하거나 유닛을 생산해 대응해야 한다. 맵의 구조는 방어선을 중심으로 삼아 세로로 긴 형태를 띠고 있으며, 좌우로 넓은 공간이 확보되어 있어 적의 접근을 용이하게 한다. 특히, 맵의 가장자리에 위치한 방어 건물들은 적의 공격을 직접 받아내는 핵심 포인트로, 이곳을 얼마나 효율적으로 관리하느냐가 승패를 좌우할 것이다. UI 상에는 미네랄과 가스가 표시되어 있지 않지만, 내부적으로 자원 관리가 포함되어 있을 것으로 추정된다. 여러 플레이어가 동시에 방어에 참여할 수 있도록 설계되어 있으며, 팀 플레이를 강조하는 요소도 포함되어 있는 것으로 보인다. 초보자도 쉽게 접근할 수 있는 구조이지만, 적의 공격 패턴이 복잡해질수록 난이도가 급격히 상승할 수 있어 전략적 사고가 요구된다. 방어 시설을 강화를 위한 아이템이나 특수 능력이 추가되어 있다면 더욱 흥미로운 플레이가 가능할 것이다. 이 맵은 디펜스 장르의 기본 틀을 따르면서도, 적의 공격 타이밍과 패턴을 예측하며 유닛을 배치하는 재미가 쏠쏠하다. 특히, 다수의 플레이어가 참여할 수 있도록 설계된 만큼, 친구들과의 협동 플레이가 추천된다. 플레이 전에는 맵의 방어 포인트와 주요 통로, 그리고 적의 공격 루트를 미리 파악해 두는 것이 좋다. 또한, 방어 건물이 파괴되지 않도록 센티널을 배치하거나, 필요 시 자원을 모아 강력한 유닛을 생산하는 전략을 세워두면 좋다. StarCraft: Brood War's custom map *Defense F v2.5* is a standout title in the defense genre, offering a thrilling experience where players must fend off relentless enemy assaults. The map centers around a player base (buildings) surrounded by waves of incoming enemy units, with the primary objective being to protect your structures. The enemy's attack patterns appear random, forcing players to reinforce defenses or produce units with limited resources. The map's layout is vertically elongated, with wide lateral spaces that allow enemies easy access, while defensive structures along the edges serve as critical chokepoints—efficient management of these areas often determines victory or defeat. Although the UI doesn't display minerals or gas, the map likely incorporates internal resource management. Designed for multiplayer cooperation, it emphasizes teamwork while remaining accessible to beginners, though difficulty escalates sharply as enemy patterns grow more complex, demanding strategic foresight. Additional items or special abilities for fortifying defenses could further enhance the experience. While adhering to classic defense mechanics, the map shines in its unpredictability, rewarding players who anticipate enemy timings and adapt their unit placements. Given its multiplayer focus, cooperative play with friends is highly recommended. Before diving in, scout the map's defensive hotspots, key pathways, and enemy approach routes. Placing sentinels to guard structures or strategizing to pool resources for powerful units can turn the tide in critical moments.
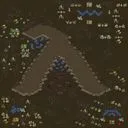
Common
스타크래프트 브루드워의 유즈맵 'Common'은 단독 플레이를 전제로 한 디펜스 장르의 유즈맵으로, 플레이어는 적의 끊임없는 공격을 방어하면서 생존을 유지해야 한다. 맵은 황무지 타일셋을 기반으로 조성된 언덕 지형이 특징으로, 중앙에 위치한 안전한 구역을 중심으로 적들이 끊임없이 몰려드는 구조를 가지고 있는 것으로 보인다. 내부 맵 설명에서 'grove'가 아닌 'grave'를 언급한 점은 맵의 분위기를 암시하며, 플레이어에게 긴장감을 부여하는 요소로 작용할 가능성이 크다. 적의 공격 패턴이나 방어 구조는 맵 이미지에서 명확히 확인되지 않지만, 언덕과 협곡을 활용한 입구막기 방식의 디펜스가 예상된다. 맵의 난이도는 방어 포지션의 배치와 적의 공격 빈도에 따라 달라질 수 있으며, 초보 플레이어는 방어 포인트를 신중히 배치하고 자원 관리에 주의를 기울여야 할 것이다. 추천 대상은 단독 플레이를 선호하는 유저나 디펜스 장르에 익숙한 플레이어로, 지속적인 전략적 사고와 긴장감을 요구하는 플레이 경험을 제공할 것으로 보인다. 플레이 전에는 맵의 입구와 방어 포인트를 미리 확인하고, 적의 공격 루트를 예상하여 준비를 마치는 것이 중요하다. 맵의 제목 'Common'은 다소 평범해 보일 수 있지만, 내부 설명의 'grave'라는 단어가 주는 묘한 분위기와 조화를 이룰 가능성이 있다. 이 맵은 디펜스 장르에 익숙한 플레이어에게는 흥미로운 도전 과제가 될 수 있으며, 특히 입구막기 디펜스를 선호하는 유저들에게 추천할 만한 작품이다. Common is a user-created defense map from StarCraft: Brood War designed for solo play, where the player must survive by continuously defending against relentless enemy attacks. The map features a hillside terrain based on a wasteland tileset, with a central safe zone that enemies constantly swarm toward. The internal map description’s use of “grave” instead of “grove” hints at the eerie atmosphere and likely adds to the tension players feel. While the exact attack patterns and defensive structures aren’t clearly visible in the map image, the design suggests a defense focused on blocking entrances using hills and ravines. Difficulty varies depending on the placement of defensive positions and the frequency of enemy attacks, so new players should carefully arrange their defenses and manage resources wisely. This map is best suited for those who enjoy solo play or are familiar with the defense genre, offering a tense, strategically demanding experience. Before starting, it’s important to scout the entrances and defensive points, then prepare by anticipating enemy attack routes. Though the title “Common” may seem ordinary, it may harmonize with the subtle, unsettling mood created by the word “grave” in the description. For players experienced with defense maps, this could be an engaging challenge, especially for those who favor entrance-blocking defense strategies.
最近註冊的地圖
查看最新新增的檔案與版本。
Common
스타크래프트 브루드워의 유즈맵 'Common'은 단독 플레이를 전제로 한 디펜스 장르의 유즈맵으로, 플레이어는 적의 끊임없는 공격을 방어하면서 생존을 유지해야 한다. 맵은 황무지 타일셋을 기반으로 조성된 언덕 지형이 특징으로, 중앙에 위치한 안전한 구역을 중심으로 적들이 끊임없이 몰려드는 구조를 가지고 있는 것으로 보인다. 내부 맵 설명에서 'grove'가 아닌 'grave'를 언급한 점은 맵의 분위기를 암시하며, 플레이어에게 긴장감을 부여하는 요소로 작용할 가능성이 크다. 적의 공격 패턴이나 방어 구조는 맵 이미지에서 명확히 확인되지 않지만, 언덕과 협곡을 활용한 입구막기 방식의 디펜스가 예상된다. 맵의 난이도는 방어 포지션의 배치와 적의 공격 빈도에 따라 달라질 수 있으며, 초보 플레이어는 방어 포인트를 신중히 배치하고 자원 관리에 주의를 기울여야 할 것이다. 추천 대상은 단독 플레이를 선호하는 유저나 디펜스 장르에 익숙한 플레이어로, 지속적인 전략적 사고와 긴장감을 요구하는 플레이 경험을 제공할 것으로 보인다. 플레이 전에는 맵의 입구와 방어 포인트를 미리 확인하고, 적의 공격 루트를 예상하여 준비를 마치는 것이 중요하다. 맵의 제목 'Common'은 다소 평범해 보일 수 있지만, 내부 설명의 'grave'라는 단어가 주는 묘한 분위기와 조화를 이룰 가능성이 있다. 이 맵은 디펜스 장르에 익숙한 플레이어에게는 흥미로운 도전 과제가 될 수 있으며, 특히 입구막기 디펜스를 선호하는 유저들에게 추천할 만한 작품이다. Common is a user-created defense map from StarCraft: Brood War designed for solo play, where the player must survive by continuously defending against relentless enemy attacks. The map features a hillside terrain based on a wasteland tileset, with a central safe zone that enemies constantly swarm toward. The internal map description’s use of “grave” instead of “grove” hints at the eerie atmosphere and likely adds to the tension players feel. While the exact attack patterns and defensive structures aren’t clearly visible in the map image, the design suggests a defense focused on blocking entrances using hills and ravines. Difficulty varies depending on the placement of defensive positions and the frequency of enemy attacks, so new players should carefully arrange their defenses and manage resources wisely. This map is best suited for those who enjoy solo play or are familiar with the defense genre, offering a tense, strategically demanding experience. Before starting, it’s important to scout the entrances and defensive points, then prepare by anticipating enemy attack routes. Though the title “Common” may seem ordinary, it may harmonize with the subtle, unsettling mood created by the word “grave” in the description. For players experienced with defense maps, this could be an engaging challenge, especially for those who favor entrance-blocking defense strategies.
썬크 디펜스 10-웨이 V9.11 (Sunken Defense 10-Way V9.11)
스타크래프트 브루드워의 대표적인 디펜스 유즈맵인 ‘썬크 디펜스 10-웨이 V9.11’은 우주 테마의 넓은 맵 위에서 적의 끊임없는 공격을 방어하는 재미와 긴장감을 동시에 느낄 수 있는 작품이다. 맵 중앙의 기지 주변으로 펼쳐진 넓은 공간은 적의 침공을 막아내며 자원을 확보하는 전략적 선택의 중요성을 강조하며, 특히 10방향에서 동시에 몰려오는 적들을 상대해야 한다는 점에서 초보자부터 숙련자까지 두루 즐길 수 있는Balance를 갖추고 있다. 맵의 특징인 ‘10-웨이’는 맵 외곽을 따라 배치된 10개의 주요 방어 지점에서 적의 공격을 받게 되며, 각 지점마다의 방어 전략과 자원 분배가 승패를 좌우한다는 점에서 전략적 깊이가 돋보인다. 또한 맵의 규모가 크고 타일 수가 많아 세밀한 건물 배치와 유닛 컨트롤이 요구되는 만큼, 플레이어는 맵의 구조를 미리 숙지하고fficient한 방어선을 구축해야 한다. 맵의 진행은 비교적 명확한 승리 조건을 갖고 있으며, 방어에 성공해 적의 공격을 모두 막아내거나, 반대로 공격 측이 기지를 파괴하는 방식으로 진행된다. 추천하는 플레이 인원은 6명으로, 팀전보다는 개인 또는 소규모 협동 플레이에 최적화되어 있으며, 예상 플레이 시간은 맵의 규모와 난이도에 따라 30분에서 1시간 내외로 예상된다. 초보자의 경우 맵의 구조와 방어 루틴을 익히기 위해 쉬운 난이도부터 도전하는 것이 좋으며, 숙련자의 경우 적의 패턴을 분석해 최적의 방어 전략을 구사하는 재미를 느낄 수 있다. 특히 우주 테마의 맵 디자인과 함께 제공되는 사운드 효과는 몰입감을 높이는 요소로 작용하며, 맵의 세부적인 밸런스가 잘 조율되어 있어 반복 플레이를 하더라도 지루하지 않은 구조를 갖추고 있다. 플레이 전에는 맵의 주요 방어 지점과 자원 위치, 적의 침공 루트를 반드시 확인하고, 방어 건물과 유닛의 조합을 미리 계획해 두는 것이 좋다. 또한, 맵의 버전별 차이를 고려해 자신에게 맞는 난이도를 선택하는 것도 중요한 포인트다. StarCraft: Brood War's iconic defense custom map, *Sunken Defense 10-Way V9.11*, offers a thrilling blend of fun and tension as players defend against relentless enemy attacks across a vast space-themed map. The expansive area surrounding the central base highlights the critical importance of strategic choices in securing resources while blocking invasions, and its 10-directional assault system ensures balanced gameplay for both beginners and experts. The map's signature "10-way" design forces players to defend against waves of enemies attacking from 10 key outpost positions around the perimeter, where the success or failure of each defense point hinges on smart resource allocation and tactical planning. Given the map's large scale and high tile count, precise building placement and unit control are essential—players should familiarize themselves with the layout and establish an efficient defensive line early on. The victory conditions are straightforward: either successfully fend off all enemy waves or allow the attacking side to destroy your base. Recommended for 6 players, the map is best suited for solo or small-team cooperative play, with typical sessions lasting between 30 minutes to an hour depending on difficulty and map scale. Beginners should start with easier difficulties to learn the map's structure and defense routines, while experienced players can enjoy analyzing enemy patterns to optimize their strategies. The immersive space-themed design and atmospheric sound effects enhance the experience, and the well-balanced mechanics ensure replayability without monotony. Before playing, check the key defense points, resource locations, and enemy invasion routes, and plan your building and unit compositions in advance. It’s also wise to consider version differences to select the difficulty that best suits your skill level.
디펜스 F v2.5 (Defence F v2.5)
스타크래프트 브루드워의 유즈맵 ‘디펜스 F v2.5’는 디펜스 장르의 대표적인 유즈맵으로, 적의 끊임없는 공격을 방어해야 하는 긴장감 넘치는 플레이가 특징이다. 맵은 중앙에 플레이어 기지(건물)가 배치되어 있으며, 사방에서 몰려오는 적 유닛을 상대로 건물을 보호하는 것이 주요 목표로 보인다. 적의 공격 패턴은 무작위로 생성되는 듯하며, 플레이어는 제한된 자원으로 방어 시설을 보강하거나 유닛을 생산해 대응해야 한다. 맵의 구조는 방어선을 중심으로 삼아 세로로 긴 형태를 띠고 있으며, 좌우로 넓은 공간이 확보되어 있어 적의 접근을 용이하게 한다. 특히, 맵의 가장자리에 위치한 방어 건물들은 적의 공격을 직접 받아내는 핵심 포인트로, 이곳을 얼마나 효율적으로 관리하느냐가 승패를 좌우할 것이다. UI 상에는 미네랄과 가스가 표시되어 있지 않지만, 내부적으로 자원 관리가 포함되어 있을 것으로 추정된다. 여러 플레이어가 동시에 방어에 참여할 수 있도록 설계되어 있으며, 팀 플레이를 강조하는 요소도 포함되어 있는 것으로 보인다. 초보자도 쉽게 접근할 수 있는 구조이지만, 적의 공격 패턴이 복잡해질수록 난이도가 급격히 상승할 수 있어 전략적 사고가 요구된다. 방어 시설을 강화를 위한 아이템이나 특수 능력이 추가되어 있다면 더욱 흥미로운 플레이가 가능할 것이다. 이 맵은 디펜스 장르의 기본 틀을 따르면서도, 적의 공격 타이밍과 패턴을 예측하며 유닛을 배치하는 재미가 쏠쏠하다. 특히, 다수의 플레이어가 참여할 수 있도록 설계된 만큼, 친구들과의 협동 플레이가 추천된다. 플레이 전에는 맵의 방어 포인트와 주요 통로, 그리고 적의 공격 루트를 미리 파악해 두는 것이 좋다. 또한, 방어 건물이 파괴되지 않도록 센티널을 배치하거나, 필요 시 자원을 모아 강력한 유닛을 생산하는 전략을 세워두면 좋다. StarCraft: Brood War's custom map *Defense F v2.5* is a standout title in the defense genre, offering a thrilling experience where players must fend off relentless enemy assaults. The map centers around a player base (buildings) surrounded by waves of incoming enemy units, with the primary objective being to protect your structures. The enemy's attack patterns appear random, forcing players to reinforce defenses or produce units with limited resources. The map's layout is vertically elongated, with wide lateral spaces that allow enemies easy access, while defensive structures along the edges serve as critical chokepoints—efficient management of these areas often determines victory or defeat. Although the UI doesn't display minerals or gas, the map likely incorporates internal resource management. Designed for multiplayer cooperation, it emphasizes teamwork while remaining accessible to beginners, though difficulty escalates sharply as enemy patterns grow more complex, demanding strategic foresight. Additional items or special abilities for fortifying defenses could further enhance the experience. While adhering to classic defense mechanics, the map shines in its unpredictability, rewarding players who anticipate enemy timings and adapt their unit placements. Given its multiplayer focus, cooperative play with friends is highly recommended. Before diving in, scout the map's defensive hotspots, key pathways, and enemy approach routes. Placing sentinels to guard structures or strategizing to pool resources for powerful units can turn the tide in critical moments.
地圖選擇指南
태그는 맵의 핵심 특징을 빠르게 설명하지만 제작 버전마다 규칙이 다를 수 있습니다. 상세 설명에서 권장 인원, 난이도, 플레이 시간과 버전을 함께 확인한 뒤 다운로드하세요.