
스토리 디펜스 星海爭霸地圖集
收集了已註冊「스토리 디펜스」標籤的地圖。請以難易度與特徵等單靠類型難以尋找的遊玩方式為中心,比較熱門地圖與最新地圖。
- 已註冊地圖
- 2個
- 累計下載
- 0
- 累計瀏覽
- 37
人氣地圖
這是下載與瀏覽熱度都很高的地圖。
캐슬 디펜드 V2 (Castle Defend V2)
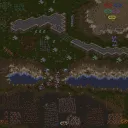
스타크래프트 브루드워의 대표적인 디펜스 장르 유즈맵인 <캐슬 디펜드 V2>는 성을 방어하며 왕의 귀환을 기다리는 중세 판타지 스토리가 인상적인 맵이다. 맵 제목에서부터 드러나듯, 플레이어는 성벽을 지키며 끊임없이 몰려오는 오크 군단의 공격을 막아내야 한다. 맵은 커다란 성을 중심으로 설계되어 있으며, 성문과 성벽, 그리고 내부 요새가 주요 방어 지점으로 보인다. 성벽에는 방어시설이 배치되어 있고, 성 내부에는 보급로를 통해 유닛을 생산하거나 보강할 수 있는 구조물이 배치되어 있는 것으로 추정된다. 오크 군단은 성문과 성벽을 집중 공격하며, 플레이어는 제한된 자원으로 방어선을 구축하고 유지해야 한다. 맵의 특징은 방어 포인트가 명확하다는 점이다. 성문과 성벽이 주요 타격점이며, 이들을 보호하지 못하면 오크 군단이 성내부로 진입해 방어에 치명적인 타격을 입힐 가능성이 크다. 또한, 왕의 귀환 시점이 존재해 오크 군단을 모두 물리치면 승리를 거두는 구조로 보인다. 이는 디펜스 맵이지만 단순한 방어뿐만 아니라 '기다림'과 '최후의 전투'라는 스토리적 요소가 결합된 점이 특징이다. 추천 대상은 디펜스 맵을 선호하는 플레이어이며, 특히 중세 판타지 배경과 스토리텔링이 매력적으로 느껴지는 유저에게 어울린다. 플레이 전에는 성벽과 성문, 보급로의 위치와 오크 군단의 공격 패턴을 미리 숙지하는 것이 중요하다. 또한, 방어에 필요한 자원의 배치와 생산 건물의 위치를 확인해 전략을 세우는 것이 관건이다. 맵의 디자인과 구조는 중세 성곽을 재현한 듯한 디테일이 돋보이지만, 오크 군단의 공격 루트는 다소 예측 가능할 수 있어 방어 전략의 다양성을 고려해야 한다. 이 맵은 디펜스 장르의 기본 틀을 유지하면서도 스토리적 깊이를 더한 점에서 주목할 만하다. 다만, 플레이 시간이 길어질수록 오크 군단의 공격 빈도가 높아질 가능성이 있어 체력과 전략적 집중력이 요구된다. 초보 플레이어는 방어 우선순위를 잘못 설정하거나 자원의 관리에서 실수를 범할 수 있으므로, 난이도를 '보통' 정도로 설정해 가볍게 도전하는 것이 좋다. 맵의 분위기는 중세 판타지풍으로 어두운 색감과 성곽 디자인이 어우러져 atmosferic한 느낌을 준다. 오크 군단의 공격은 성벽을 무너뜨릴 때마다 시야가 넓어지며, 성내부로 침투하는 연출이 있는 것으로 보인다. 이는 플레이어에게 긴장감을 더하는 요소로 작용한다. 전체적으로 <캐슬 디펜드 V2>는 디펜스 유즈맵의 정석을 따르면서도 스토리적 몰입도를 높인 작품으로, 중세 판타지를 좋아하는 유저라면 한 번쯤 도전해볼 만한 가치가 있다. 다만, 반복 플레이 시 오크 군단의 공격 패턴이 익숙해질 수 있어, 난이도나 변형 요소를 추가한 버전을 찾아보는 것도 좋은 방법이다. 이 맵은 디펜스 장르의 입문자에게는 훌륭한 튜토리얼 역할을 할 수 있으며, 숙련자에게는 전략적 깊이를 제공하는 도전 과제가 될 것이다. 성의 구조와 오크 군단의 공격 루트를 분석하며 최적의 방어 전략을 구상하는 재미가 쏠쏠한 작품이다. Castle Defend V2 is one of the most iconic defense genre custom maps in StarCraft: Brood War, featuring a medieval fantasy storyline where players must defend a castle until the king's return. The map is centered around a large castle structure, with defensive walls, gates, and internal fortifications serving as key strategic points. The layout suggests that players can establish supply routes and production buildings to reinforce their defenses. The Orc Legion continuously attacks the gates and walls, and failing to protect these areas allows them to breach the castle, leading to a potential loss. A unique aspect of this map is its narrative-driven structure: players must hold out until the king returns, after which a final battle ensues for victory. This blends classic defense mechanics with an engaging 'waiting' and 'last stand' storyline. The map is ideal for players who enjoy defense games, particularly those drawn to medieval fantasy themes and storytelling. Before playing, it's essential to familiarize yourself with the wall and gate positions, Orc attack patterns, and resource distribution. Strategic planning is crucial, as misplacing defenses or mismanaging resources can lead to failure. While the map excels in recreating a medieval fortress with detailed design, the Orc attack routes may feel predictable over time, limiting strategic variety. The map's atmosphere is enhanced by its dark medieval color palette and fortress architecture, with Orc incursions visually expanding the playable area as walls are breached. The tension builds as the Orcs penetrate deeper into the castle, adding immersion. Castle Defend V2 follows the defense genre's core mechanics while enriching the experience with narrative depth, making it a worthwhile challenge for medieval fantasy fans. Casual players may struggle with prioritizing defenses or resource management, so setting the difficulty to 'Medium' is recommended. Repeated plays might reveal familiar Orc attack patterns, but the map still offers strategic depth for seasoned players. For newcomers to defense maps, it serves as an excellent introduction, while veterans can refine their tactics by analyzing the castle structure and Orc attack routes. The blend of defensive strategy and immersive storytelling makes this a standout custom map worth trying at least once.
DBZ/GT 제네바의 공격 1.3 (DBZ/GT Janeba Attacks 1.3)
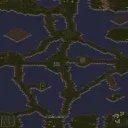
《DBZ/GT Janeba Attacks 1.3》는 드래곤볼 Z/GT 팬게임으로 유명한 ‘Jagged-Sabre’가 제작한 유즈맵이다. 이 맵은 지구를 침공한 ‘제네바’가 브로리를 배신했다는 스토리를 바탕으로 펼쳐지며, 플레이어는 지구를 지키기 위해 제네바와 맞서는 전투를 치르게 된다. 맵은 7인용으로 구성되어 있으며, 각 플레이어는 자신의 종족(자주, 테란, 프로토스, 저그 등)과 개성을 살린 유닛으로 전투를 펼친다. 특히 제네바는 강력한 보스급 유닛으로 등장하며, 브로리와의 배신 스토리 라인이 맵의 진행을 이끌어간다. 맵의 배경은 사막 타일셋으로 꾸며졌으며, 넓은 평야와 산악 지형이 조화를 이루며 전투의 무대를 제공한다. 전투는 다채로운 스킬과 연계 플레이가 요구되며, 제네바의 강력한 공격과 브로리의 이중Betrayal 스토리가 흥미로운 볼거리를 선사한다. 플레이어는 각자 맡은 역할을 충실히 수행해야 하며, 특히 제네바의 부활 타이밍이나 브로리의 배신 이벤트 등은 맵의 재미를 한층 높이는 요소로 작용한다. 이 맵은 드래곤볼 팬들에게는 익숙한 캐릭터와 스토리를 재현했다는 점에서 매력적이며, 전투와 전략이 조화를 이룬 UMS 유즈맵의 장점을 잘 살렸다. 단, 7인 동시 플레이가 가능하다는 점은 넓은 맵 크기와 복잡한 전투 시스템을 고려할 때 플레이어 간의 전략적 협력이 필수적이라는 점에서 난이도가 조금 높아질 수 있다. 초보자보다는 중급 이상의 플레이어에게 더 적합한 맵으로 보인다. 플레이 전에는 제네바의 스킬 타이밍, 브로리의 배신 이벤트 발생 조건, 그리고 각 종족의 유닛 밸런스를 사전에 숙지하는 것이 좋다. 특히 제네바의 강력한 공격력과 브로리의 배신으로 인한 전력 변화는 맵의 핵심 메커니즘이므로, 이를 중심으로 전략을 세워야 한다. This is a popular Dragon Ball Z/GT fan-made custom map titled 《DBZ/GT Janeba Attacks 1.3》, developed by the mapper ‘Jagged-Sabre’. The storyline revolves around Janemba’s invasion of Earth, his betrayal by Broly, and his subsequent vow for revenge—now targeting both Broly and the planet. The map supports up to 7 players, each controlling their respective races (Terran, Protoss, Zerg) with unique units and abilities. Janemba appears as a powerful boss unit, and the plot unfolds through his relentless attacks and Broly’s deceit, adding depth to the gameplay. The desert-themed map features vast plains and mountainous terrain, providing a dynamic battlefield. Combat emphasizes strategic teamwork, skill combos, and dynamic events like Janemba’s resurrection and Broly’s betrayal, which significantly impact the flow of battle. While the map offers rich storytelling and varied gameplay, its complexity—especially with 7 players—demands strong coordination and familiarity with each race’s strengths. It is best suited for intermediate to advanced players who enjoy UMS-style custom maps with narrative-driven mechanics. Before playing, it’s crucial to understand Janemba’s skill timing, Broly’s betrayal triggers, and the unit balance across races to build effective strategies. Mastery of these elements will enhance both survival and victory chances in this intense, story-rich experience.
最近註冊的地圖
查看最新新增的檔案與版本。
DBZ/GT 제네바의 공격 1.3 (DBZ/GT Janeba Attacks 1.3)
《DBZ/GT Janeba Attacks 1.3》는 드래곤볼 Z/GT 팬게임으로 유명한 ‘Jagged-Sabre’가 제작한 유즈맵이다. 이 맵은 지구를 침공한 ‘제네바’가 브로리를 배신했다는 스토리를 바탕으로 펼쳐지며, 플레이어는 지구를 지키기 위해 제네바와 맞서는 전투를 치르게 된다. 맵은 7인용으로 구성되어 있으며, 각 플레이어는 자신의 종족(자주, 테란, 프로토스, 저그 등)과 개성을 살린 유닛으로 전투를 펼친다. 특히 제네바는 강력한 보스급 유닛으로 등장하며, 브로리와의 배신 스토리 라인이 맵의 진행을 이끌어간다. 맵의 배경은 사막 타일셋으로 꾸며졌으며, 넓은 평야와 산악 지형이 조화를 이루며 전투의 무대를 제공한다. 전투는 다채로운 스킬과 연계 플레이가 요구되며, 제네바의 강력한 공격과 브로리의 이중Betrayal 스토리가 흥미로운 볼거리를 선사한다. 플레이어는 각자 맡은 역할을 충실히 수행해야 하며, 특히 제네바의 부활 타이밍이나 브로리의 배신 이벤트 등은 맵의 재미를 한층 높이는 요소로 작용한다. 이 맵은 드래곤볼 팬들에게는 익숙한 캐릭터와 스토리를 재현했다는 점에서 매력적이며, 전투와 전략이 조화를 이룬 UMS 유즈맵의 장점을 잘 살렸다. 단, 7인 동시 플레이가 가능하다는 점은 넓은 맵 크기와 복잡한 전투 시스템을 고려할 때 플레이어 간의 전략적 협력이 필수적이라는 점에서 난이도가 조금 높아질 수 있다. 초보자보다는 중급 이상의 플레이어에게 더 적합한 맵으로 보인다. 플레이 전에는 제네바의 스킬 타이밍, 브로리의 배신 이벤트 발생 조건, 그리고 각 종족의 유닛 밸런스를 사전에 숙지하는 것이 좋다. 특히 제네바의 강력한 공격력과 브로리의 배신으로 인한 전력 변화는 맵의 핵심 메커니즘이므로, 이를 중심으로 전략을 세워야 한다. This is a popular Dragon Ball Z/GT fan-made custom map titled 《DBZ/GT Janeba Attacks 1.3》, developed by the mapper ‘Jagged-Sabre’. The storyline revolves around Janemba’s invasion of Earth, his betrayal by Broly, and his subsequent vow for revenge—now targeting both Broly and the planet. The map supports up to 7 players, each controlling their respective races (Terran, Protoss, Zerg) with unique units and abilities. Janemba appears as a powerful boss unit, and the plot unfolds through his relentless attacks and Broly’s deceit, adding depth to the gameplay. The desert-themed map features vast plains and mountainous terrain, providing a dynamic battlefield. Combat emphasizes strategic teamwork, skill combos, and dynamic events like Janemba’s resurrection and Broly’s betrayal, which significantly impact the flow of battle. While the map offers rich storytelling and varied gameplay, its complexity—especially with 7 players—demands strong coordination and familiarity with each race’s strengths. It is best suited for intermediate to advanced players who enjoy UMS-style custom maps with narrative-driven mechanics. Before playing, it’s crucial to understand Janemba’s skill timing, Broly’s betrayal triggers, and the unit balance across races to build effective strategies. Mastery of these elements will enhance both survival and victory chances in this intense, story-rich experience.
캐슬 디펜드 V2 (Castle Defend V2)
스타크래프트 브루드워의 대표적인 디펜스 장르 유즈맵인 <캐슬 디펜드 V2>는 성을 방어하며 왕의 귀환을 기다리는 중세 판타지 스토리가 인상적인 맵이다. 맵 제목에서부터 드러나듯, 플레이어는 성벽을 지키며 끊임없이 몰려오는 오크 군단의 공격을 막아내야 한다. 맵은 커다란 성을 중심으로 설계되어 있으며, 성문과 성벽, 그리고 내부 요새가 주요 방어 지점으로 보인다. 성벽에는 방어시설이 배치되어 있고, 성 내부에는 보급로를 통해 유닛을 생산하거나 보강할 수 있는 구조물이 배치되어 있는 것으로 추정된다. 오크 군단은 성문과 성벽을 집중 공격하며, 플레이어는 제한된 자원으로 방어선을 구축하고 유지해야 한다. 맵의 특징은 방어 포인트가 명확하다는 점이다. 성문과 성벽이 주요 타격점이며, 이들을 보호하지 못하면 오크 군단이 성내부로 진입해 방어에 치명적인 타격을 입힐 가능성이 크다. 또한, 왕의 귀환 시점이 존재해 오크 군단을 모두 물리치면 승리를 거두는 구조로 보인다. 이는 디펜스 맵이지만 단순한 방어뿐만 아니라 '기다림'과 '최후의 전투'라는 스토리적 요소가 결합된 점이 특징이다. 추천 대상은 디펜스 맵을 선호하는 플레이어이며, 특히 중세 판타지 배경과 스토리텔링이 매력적으로 느껴지는 유저에게 어울린다. 플레이 전에는 성벽과 성문, 보급로의 위치와 오크 군단의 공격 패턴을 미리 숙지하는 것이 중요하다. 또한, 방어에 필요한 자원의 배치와 생산 건물의 위치를 확인해 전략을 세우는 것이 관건이다. 맵의 디자인과 구조는 중세 성곽을 재현한 듯한 디테일이 돋보이지만, 오크 군단의 공격 루트는 다소 예측 가능할 수 있어 방어 전략의 다양성을 고려해야 한다. 이 맵은 디펜스 장르의 기본 틀을 유지하면서도 스토리적 깊이를 더한 점에서 주목할 만하다. 다만, 플레이 시간이 길어질수록 오크 군단의 공격 빈도가 높아질 가능성이 있어 체력과 전략적 집중력이 요구된다. 초보 플레이어는 방어 우선순위를 잘못 설정하거나 자원의 관리에서 실수를 범할 수 있으므로, 난이도를 '보통' 정도로 설정해 가볍게 도전하는 것이 좋다. 맵의 분위기는 중세 판타지풍으로 어두운 색감과 성곽 디자인이 어우러져 atmosferic한 느낌을 준다. 오크 군단의 공격은 성벽을 무너뜨릴 때마다 시야가 넓어지며, 성내부로 침투하는 연출이 있는 것으로 보인다. 이는 플레이어에게 긴장감을 더하는 요소로 작용한다. 전체적으로 <캐슬 디펜드 V2>는 디펜스 유즈맵의 정석을 따르면서도 스토리적 몰입도를 높인 작품으로, 중세 판타지를 좋아하는 유저라면 한 번쯤 도전해볼 만한 가치가 있다. 다만, 반복 플레이 시 오크 군단의 공격 패턴이 익숙해질 수 있어, 난이도나 변형 요소를 추가한 버전을 찾아보는 것도 좋은 방법이다. 이 맵은 디펜스 장르의 입문자에게는 훌륭한 튜토리얼 역할을 할 수 있으며, 숙련자에게는 전략적 깊이를 제공하는 도전 과제가 될 것이다. 성의 구조와 오크 군단의 공격 루트를 분석하며 최적의 방어 전략을 구상하는 재미가 쏠쏠한 작품이다. Castle Defend V2 is one of the most iconic defense genre custom maps in StarCraft: Brood War, featuring a medieval fantasy storyline where players must defend a castle until the king's return. The map is centered around a large castle structure, with defensive walls, gates, and internal fortifications serving as key strategic points. The layout suggests that players can establish supply routes and production buildings to reinforce their defenses. The Orc Legion continuously attacks the gates and walls, and failing to protect these areas allows them to breach the castle, leading to a potential loss. A unique aspect of this map is its narrative-driven structure: players must hold out until the king returns, after which a final battle ensues for victory. This blends classic defense mechanics with an engaging 'waiting' and 'last stand' storyline. The map is ideal for players who enjoy defense games, particularly those drawn to medieval fantasy themes and storytelling. Before playing, it's essential to familiarize yourself with the wall and gate positions, Orc attack patterns, and resource distribution. Strategic planning is crucial, as misplacing defenses or mismanaging resources can lead to failure. While the map excels in recreating a medieval fortress with detailed design, the Orc attack routes may feel predictable over time, limiting strategic variety. The map's atmosphere is enhanced by its dark medieval color palette and fortress architecture, with Orc incursions visually expanding the playable area as walls are breached. The tension builds as the Orcs penetrate deeper into the castle, adding immersion. Castle Defend V2 follows the defense genre's core mechanics while enriching the experience with narrative depth, making it a worthwhile challenge for medieval fantasy fans. Casual players may struggle with prioritizing defenses or resource management, so setting the difficulty to 'Medium' is recommended. Repeated plays might reveal familiar Orc attack patterns, but the map still offers strategic depth for seasoned players. For newcomers to defense maps, it serves as an excellent introduction, while veterans can refine their tactics by analyzing the castle structure and Orc attack routes. The blend of defensive strategy and immersive storytelling makes this a standout custom map worth trying at least once.
地圖選擇指南
태그는 맵의 핵심 특징을 빠르게 설명하지만 제작 버전마다 규칙이 다를 수 있습니다. 상세 설명에서 권장 인원, 난이도, 플레이 시간과 버전을 함께 확인한 뒤 다운로드하세요.