
타일셋:황무지 스타크래프트 맵 모음
'타일셋:황무지' 태그가 등록된 맵을 모았습니다. 장르 하나로 찾기 어려운 플레이 방식, 난이도와 특징을 중심으로 인기 맵과 최신 맵을 비교해 보세요.
- 등록 맵
- 2개
- 누적 다운로드
- 0
- 누적 조회
- 43
인기 맵
다운로드와 조회 반응이 높은 맵입니다.
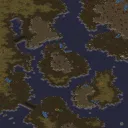
T7) Biting the Bullet (격렬한 저항)
스타크래프트 브루드워의 유즈맵 'T7) Biting the Bullet'은 단일 플레이어를 위한 디펜스 장르의 유즈맵으로, 복합적인 방어 전략과 긴장감 넘치는 전투가 특징이다. 맵은 황무지 타일셋을 기반으로 제작되었으며, 넓은 평지 중앙에 주요 방어 거점이 배치되어 있다. 플레이어는 지속적으로 몰려오는 적군을 막아내며 생존하는 것이 목표로 보이며, 맵 곳곳에 숨겨진 자원이나 방어 시설이 배치되어 있는 것으로 추정된다. 전체적인 맵 구조는 대칭형으로 설계되어 있으며, 중앙 평지 주변으로 언덕과 협곡이 배치되어 있어 적군의 접근 경로를 제한하는 전략적 이점을 제공한다. 맵 상단과 하단에는 고지대가 있어 시야 확보가 용이한 지점이 있으며, 이곳을 중심으로 방어 진지를 구축하는 것이 중요해 보인다. 또한, 맵 좌측 하단과 우측 상단에는 소규모의 추가 자원이 배치되어 있어 자원 관리와 생산력 확충을 위한 기회가 제공된다. 플레이어는 초반부터 끊임없이 밀려오는 적군을 상대해야 하며, 방어 시설의 배치와 자원 관리, 유닛의 효율적인 운영이 승리의 열쇠가 될 것으로 보인다. 맵 내에 숨겨진 비밀 거점이나 특수 유닛 생산 시설이 있는지는 명확하지 않지만, 맵 제목과 내부 설명에서 'Secret Staging Area'라는 문구가 등장하는 점으로 보아 특정 조건 하에서 숨겨진 기능이 활성화될 가능성도 배제할 수 없다. 전체적으로는 긴장감 넘치는 디펜스 유즈맵으로, 단일 플레이어의 전략적 감각과 실시간 대응력을 시험하는 구조로 설계된 것으로 보인다. 이 맵을 즐기기 위해서는 방어 시설의 배치와 유닛 관리, 자원 확보를 균형 있게 진행할 수 있는 능력이 필요하며, 초보자는 난이도가 상당히 높을 것으로 추정된다. 또한, 맵의 대칭성과 접근 경로의 제한을 잘 활용하여 방어 라인을 구축하는 것이 중요하다. 맵을 플레이하기 전에는 중앙 평지의 시야 확보와 고지대의 활용 가능성을 먼저 확인하는 것이 좋다. 특히, 맵 내에 숨겨진 자원이나 특수 시설이 있을 경우 이를 적극 활용하여 방어력을 강화하는 전략이 유용할 것이다. This StarCraft: Brood War custom map, 'T7) Biting the Bullet,' is a single-player defense-oriented UMS designed for intense strategic gameplay and survival against relentless enemy waves. Built on a barren wasteland tileset, the map features a large central plain surrounded by strategic high ground and chokepoints, creating natural defensive bottlenecks that players must leverage to survive. The symmetrical layout provides balanced vantage points from elevated positions at both the top and bottom, allowing for early enemy detection and area control. Hidden resource clusters near the bottom-left and top-right corners offer opportunities for resource expansion and base strengthening, though their exact locations require exploration. The map’s title and internal description mentioning 'Secret Staging Area' suggest potential hidden mechanics or special units that may activate under specific conditions, adding an element of unpredictability. Gameplay revolves around constant enemy pressure, requiring players to balance base expansion, resource gathering, and unit production efficiently. The challenge lies in optimizing defensive structures and managing limited starting resources to withstand prolonged assaults. While the map does not explicitly state victory conditions, the core objective appears to be surviving multiple waves until a decisive victory or until the player’s base is overrun. Players should prioritize scouting the central plain’s visibility and high-ground accessibility before committing to a defensive build. The map rewards strategic foresight, such as anticipating enemy paths and securing resource-rich areas early. Beginners may find the difficulty steep due to the need for precise unit control and adaptability, but experienced UMS players will appreciate the map’s tactical depth and balanced challenge.
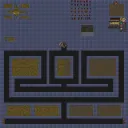
지역 방어 (Area Defence)
스타크래프트 브루드워의 유즈맵 중 하나인 〈Area Defence〉는 디펜스 장르에 속하는 맵으로, 플레이어가 일정 구역을 지키며 끊임없이 몰려드는 적의 공격을 방어하는 것이 핵심 목표다. 맵은 7명의 플레이어가 각자 자신의 구역을 맡아 방어전을 펼치는 구조로, 중앙의 요새나 주요 건물을 지키거나 특정 구역을 침범하지 못하게 막는 플레이 방식이 보인다. 이미지를 보면 각 플레이어의 시작 지점이 시각적으로 구분되어 있으며, 적의 웨이브가 일정 시간 간격으로 공격해 오는 디자인으로 추정된다. 맵의 전체적인 분위기는 황무지 타일셋을 기반으로 하여 황량하고 전투적인 느낌을 준다. 방어 위주의 플레이가 주를 이루지만, 개별 구역의 전략적 배치나 방어 시설의 구축 여부에 따라 게임의 난이도와 재미가 크게 달라질 것으로 예상된다. 초보자는 기본 방어 라인을 구축하는 데 중점을 두고, 숙련자는 적의 패턴을 분석해 보다 효율적인 방어 시스템을 설계하는 데 도전할 수 있다. 추천 대상은 디펜스 장르를 선호하는 플레이어이며, 특히 팀 플레이보다는 개인 방어 능력이 중요한 맵으로 보인다. 플레이 전에는 자신의 시작 구역과 주요 방어 포인트를 미리 파악하고, 적의 공격 루트를 예상해 방어 건물이나 유닛을 배치하는 전략을 세워야 한다. 맵의 난이도는 맵 배치와 적의 공격 패턴에 따라 달라지므로, 초심자라면 쉬운 난이도부터, 숙련자는 어려운 난이도로 도전해 보는 것도 좋다. 맵의 특징상 지속적인 집중력과 전략적 판단이 요구되며, 한 번의 실수로 인해 방어선이 무너질 수 있으므로 신중한 플레이가 필요하다. Area Defence, a custom map in StarCraft: Brood War, falls under the defense genre, where players must protect a designated area from relentless enemy waves. The map is structured for seven players, each responsible for defending their own zone, with common objectives including safeguarding central fortresses or preventing enemies from breaching specific sections. Visual cues indicate distinct starting positions for each player, and the design suggests waves of enemies attacking at regular intervals. The overall aesthetic leans into a desolate, battle-worn theme using a wasteland tileset. While the core gameplay revolves around defense, the strategic placement of individual zones and defensive structures significantly impacts both difficulty and enjoyment. Beginners should focus on establishing basic defensive lines, while experienced players can challenge themselves by analyzing enemy patterns to build more efficient defensive systems. This map is ideal for those who favor defense-focused gameplay, particularly since individual defensive skills matter more than team coordination. Before playing, it’s crucial to familiarize yourself with your starting zone and key defensive points, then strategize by anticipating enemy attack routes to position buildings and units effectively. Difficulty varies depending on map layout and enemy patterns, so beginners may want to start with easier settings, while veterans can test their skills against tougher challenges. Due to its nature, the map demands constant focus and strategic decision-making—one mistake can collapse your defenses, making careful play essential.
최근 등록된 맵
새로 추가된 파일과 버전을 확인하세요.
지역 방어 (Area Defence)
스타크래프트 브루드워의 유즈맵 중 하나인 〈Area Defence〉는 디펜스 장르에 속하는 맵으로, 플레이어가 일정 구역을 지키며 끊임없이 몰려드는 적의 공격을 방어하는 것이 핵심 목표다. 맵은 7명의 플레이어가 각자 자신의 구역을 맡아 방어전을 펼치는 구조로, 중앙의 요새나 주요 건물을 지키거나 특정 구역을 침범하지 못하게 막는 플레이 방식이 보인다. 이미지를 보면 각 플레이어의 시작 지점이 시각적으로 구분되어 있으며, 적의 웨이브가 일정 시간 간격으로 공격해 오는 디자인으로 추정된다. 맵의 전체적인 분위기는 황무지 타일셋을 기반으로 하여 황량하고 전투적인 느낌을 준다. 방어 위주의 플레이가 주를 이루지만, 개별 구역의 전략적 배치나 방어 시설의 구축 여부에 따라 게임의 난이도와 재미가 크게 달라질 것으로 예상된다. 초보자는 기본 방어 라인을 구축하는 데 중점을 두고, 숙련자는 적의 패턴을 분석해 보다 효율적인 방어 시스템을 설계하는 데 도전할 수 있다. 추천 대상은 디펜스 장르를 선호하는 플레이어이며, 특히 팀 플레이보다는 개인 방어 능력이 중요한 맵으로 보인다. 플레이 전에는 자신의 시작 구역과 주요 방어 포인트를 미리 파악하고, 적의 공격 루트를 예상해 방어 건물이나 유닛을 배치하는 전략을 세워야 한다. 맵의 난이도는 맵 배치와 적의 공격 패턴에 따라 달라지므로, 초심자라면 쉬운 난이도부터, 숙련자는 어려운 난이도로 도전해 보는 것도 좋다. 맵의 특징상 지속적인 집중력과 전략적 판단이 요구되며, 한 번의 실수로 인해 방어선이 무너질 수 있으므로 신중한 플레이가 필요하다. Area Defence, a custom map in StarCraft: Brood War, falls under the defense genre, where players must protect a designated area from relentless enemy waves. The map is structured for seven players, each responsible for defending their own zone, with common objectives including safeguarding central fortresses or preventing enemies from breaching specific sections. Visual cues indicate distinct starting positions for each player, and the design suggests waves of enemies attacking at regular intervals. The overall aesthetic leans into a desolate, battle-worn theme using a wasteland tileset. While the core gameplay revolves around defense, the strategic placement of individual zones and defensive structures significantly impacts both difficulty and enjoyment. Beginners should focus on establishing basic defensive lines, while experienced players can challenge themselves by analyzing enemy patterns to build more efficient defensive systems. This map is ideal for those who favor defense-focused gameplay, particularly since individual defensive skills matter more than team coordination. Before playing, it’s crucial to familiarize yourself with your starting zone and key defensive points, then strategize by anticipating enemy attack routes to position buildings and units effectively. Difficulty varies depending on map layout and enemy patterns, so beginners may want to start with easier settings, while veterans can test their skills against tougher challenges. Due to its nature, the map demands constant focus and strategic decision-making—one mistake can collapse your defenses, making careful play essential.
T7) Biting the Bullet (격렬한 저항)
스타크래프트 브루드워의 유즈맵 'T7) Biting the Bullet'은 단일 플레이어를 위한 디펜스 장르의 유즈맵으로, 복합적인 방어 전략과 긴장감 넘치는 전투가 특징이다. 맵은 황무지 타일셋을 기반으로 제작되었으며, 넓은 평지 중앙에 주요 방어 거점이 배치되어 있다. 플레이어는 지속적으로 몰려오는 적군을 막아내며 생존하는 것이 목표로 보이며, 맵 곳곳에 숨겨진 자원이나 방어 시설이 배치되어 있는 것으로 추정된다. 전체적인 맵 구조는 대칭형으로 설계되어 있으며, 중앙 평지 주변으로 언덕과 협곡이 배치되어 있어 적군의 접근 경로를 제한하는 전략적 이점을 제공한다. 맵 상단과 하단에는 고지대가 있어 시야 확보가 용이한 지점이 있으며, 이곳을 중심으로 방어 진지를 구축하는 것이 중요해 보인다. 또한, 맵 좌측 하단과 우측 상단에는 소규모의 추가 자원이 배치되어 있어 자원 관리와 생산력 확충을 위한 기회가 제공된다. 플레이어는 초반부터 끊임없이 밀려오는 적군을 상대해야 하며, 방어 시설의 배치와 자원 관리, 유닛의 효율적인 운영이 승리의 열쇠가 될 것으로 보인다. 맵 내에 숨겨진 비밀 거점이나 특수 유닛 생산 시설이 있는지는 명확하지 않지만, 맵 제목과 내부 설명에서 'Secret Staging Area'라는 문구가 등장하는 점으로 보아 특정 조건 하에서 숨겨진 기능이 활성화될 가능성도 배제할 수 없다. 전체적으로는 긴장감 넘치는 디펜스 유즈맵으로, 단일 플레이어의 전략적 감각과 실시간 대응력을 시험하는 구조로 설계된 것으로 보인다. 이 맵을 즐기기 위해서는 방어 시설의 배치와 유닛 관리, 자원 확보를 균형 있게 진행할 수 있는 능력이 필요하며, 초보자는 난이도가 상당히 높을 것으로 추정된다. 또한, 맵의 대칭성과 접근 경로의 제한을 잘 활용하여 방어 라인을 구축하는 것이 중요하다. 맵을 플레이하기 전에는 중앙 평지의 시야 확보와 고지대의 활용 가능성을 먼저 확인하는 것이 좋다. 특히, 맵 내에 숨겨진 자원이나 특수 시설이 있을 경우 이를 적극 활용하여 방어력을 강화하는 전략이 유용할 것이다. This StarCraft: Brood War custom map, 'T7) Biting the Bullet,' is a single-player defense-oriented UMS designed for intense strategic gameplay and survival against relentless enemy waves. Built on a barren wasteland tileset, the map features a large central plain surrounded by strategic high ground and chokepoints, creating natural defensive bottlenecks that players must leverage to survive. The symmetrical layout provides balanced vantage points from elevated positions at both the top and bottom, allowing for early enemy detection and area control. Hidden resource clusters near the bottom-left and top-right corners offer opportunities for resource expansion and base strengthening, though their exact locations require exploration. The map’s title and internal description mentioning 'Secret Staging Area' suggest potential hidden mechanics or special units that may activate under specific conditions, adding an element of unpredictability. Gameplay revolves around constant enemy pressure, requiring players to balance base expansion, resource gathering, and unit production efficiently. The challenge lies in optimizing defensive structures and managing limited starting resources to withstand prolonged assaults. While the map does not explicitly state victory conditions, the core objective appears to be surviving multiple waves until a decisive victory or until the player’s base is overrun. Players should prioritize scouting the central plain’s visibility and high-ground accessibility before committing to a defensive build. The map rewards strategic foresight, such as anticipating enemy paths and securing resource-rich areas early. Beginners may find the difficulty steep due to the need for precise unit control and adaptability, but experienced UMS players will appreciate the map’s tactical depth and balanced challenge.
맵 선택 가이드
태그는 맵의 핵심 특징을 빠르게 설명하지만 제작 버전마다 규칙이 다를 수 있습니다. 상세 설명에서 권장 인원, 난이도, 플레이 시간과 버전을 함께 확인한 뒤 다운로드하세요.