
지형 싸움 스타크래프트 맵 모음
'지형 싸움' 태그가 등록된 맵을 모았습니다. 장르 하나로 찾기 어려운 플레이 방식, 난이도와 특징을 중심으로 인기 맵과 최신 맵을 비교해 보세요.
- 등록 맵
- 2개
- 누적 다운로드
- 0
- 누적 조회
- 74
인기 맵
다운로드와 조회 반응이 높은 맵입니다.
Whirlwind
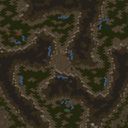
‘Whirlwind’는 스타크래프트 브루드워에서 만나볼 수 있는 컴팩트한 밀리 맵으로, 2~3인 플레이를 권장하는 이 맵은 사막 테마의 넓은 평지와 굴곡진 언덕이 특징이다. 맵中央에는 소규모의 돌출 지형이 있으며, 양측 멀티 지역은 비교적 평평한 구조로 펼쳐져 있어 초반 자원 확보와 멀티 기지 건설이 수월하다. 그러나 지형상 언덕을 활용한 병력 진형 싸움이나 오버로드 시야 싸움에서 유리한 위치를 차지하기가 쉽지 않으며, 중앙 돌출 지형을 사이에 두고 벌어지는 전투는 조밀한 지형 때문에 컨트롤과 컨벤션스가 중요한 포인트로 작용한다. 맵의 이름 ‘Whirlwind’는Central Mineral Field’ 주변의 소용돌이치는 듯한 언덕과 바위 지형을 연상시키며, 이는 전투 시 시야 싸움의 중요성을 강조하는 요소로 작용한다. 플레이어는 초반부터 중앙 자원 지대와 본진 멀티를 빠르게 확보하는 전략을 고민해야 하며, 언덕을 오르내리는 병력의 이동 속도 차이를 고려한 전투 계획이 필요하다는 점에서 전략적 깊이가 느껴진다. 또한, 맵의 크기가 4096×3072로 비교적 큰 편이지만, 맵의 굴곡과 언덕이 많아 실제 전투 지역은 좁은 편이어서 빠른 전투와Resource Denial(자원 봉쇄)이 승패를 가를 가능성이 높다. 특히, 테란의 경우 시즈 탱크와 벌처를 활용한 언덕 시즈전, 저그의 경우 뮤탈리스크와 러커를 통한 중앙 장악, 프로토스의 경우 질럿과 드라군의 조합으로 언덕을 넘는 전투가 관전 포인트로 보인다. 이 맵은 초보 유저에게는 지형 이해와 이동 경로 파악이 다소 어려울 수 있으나, 밀리 맵으로서의 기본적인 밸런스는 갖추고 있는 편이다. 또한, 2~3인 플레이를 권장하는 만큼 플레이어 간의 경쟁이 치열해질 가능성이 높으며, 맵의 굴곡이 주는 전략적 재미는 밀리 유저라면 한 번쯤 도전해볼 만한 요소다. 다만, 맵의 전체적인 구도가 넓기 때문에 자원 채취 효율이나 멀티 타이밍을 잘못 잡으면 쉽게 밀릴 수 있으니, 자원 관리와 멀티 기지 운영에 신경을 쓰는 것이 중요하다. Whirlwind는 단순히 넓은 맵이 아니라, 지형의 굴곡을 활용한 전략적 전투가 가능한 맵으로, 밀리 유저라면 한번쯤 플레이해볼 가치가 충분하다. 특히, 언덕과 돌출 지형을 활용한 전투가 가능한 맵을 선호하는 유저라면 이 맵이 제격일 것이다. ‘Whirlwind’ is a compact melee map in *StarCraft: Brood War* designed for 2–3 players, featuring a desert theme with wide plains and rugged hills. At the center lies a small protruding terrain, while both sides’ starting bases are built on relatively flat ground, making early resource collection and expansion easier. However, the terrain’s hills make it difficult to secure advantageous positions for troop formations or Overlord scouting, and battles over the central protrusion demand precise control and coordination due to the tight space. The map’s name, *Whirlwind*, reflects the swirling hills and rocky formations around the *Central Mineral Field*, highlighting the importance of vision control in combat. Players must quickly secure the central resources and their main base expansions while accounting for the speed differences of units moving up and down hills, adding strategic depth. Though the map size is relatively large at 4096×3072, its uneven terrain and hills create narrow combat zones, where fast engagements and resource denial often decide the outcome. For Terran, key moments include siege tank and Vulture battles on the hills; for Zerg, Mutalisks and Lurkers dominating the center; and for Protoss, Zealots and Dragoons fighting uphill. While the terrain may be tricky for beginners to navigate, the map maintains solid melee balance. With 2–3 players competing closely, the strategic depth from the uneven terrain makes it worth trying for melee enthusiasts. Still, the large overall layout means poor resource management or mistimed expansions can quickly lead to defeat, so players must focus on efficient gathering and base operations. *Whirlwind* isn’t just a wide map—it’s a battlefield where terrain advantages shape combat, making it a great choice for those who enjoy maps with hills and protrusions.
핫 존 (Hot Zone)
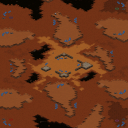
스타크래프트 브루드워의 ‘Hot Zone’은 2~4명의 플레이어가 참여하는 밀리 전용 맵으로, 좁고 복잡한 지형이 특징이다. 맵 중앙에는 높지 않은 언덕과 좁은 통로가 있으며, 곳곳에 바위와 잔해가 배치되어 있어 시야를 가리는 요소로 작용한다. 이러한 구조는 소규모 전투에서 자리 싸움과 기습이 중요해지는 ‘핫 존’을 형성하며, 플레이어는 좁은 통로를 활용한 견제와 후방 타격으로 상대를 제압해야 한다. 특히 맵 중앙의 높은 지대와 좁은 길목은 시야 싸움과 컨트롤을 요구하기 때문에, 초보자는 실전 감각을 익히기에 적합하고 숙련자는 전략적 플레이로 승리를 노릴 수 있는 밸런스를 갖추고 있다. 맵의 난이도는 맵의 복잡성보다는 플레이어의 미세한 컨트롤과 판단에 따라 좌우되며, 짧은 플레이 시간 동안 치열한 전투가 펼쳐질 가능성이 높아 타임어택이나 스피드전을 즐기는 유저들에게도 추천할 만하다. 다만, 맵의 지형 특성상 초반 자원 확보가 중요하며, 상대의 움직임을 읽고 먼저 공격을 가하는 플레이가 승률을 높이는 핵심 포인트가 된다. 4인용으로 설계되었지만 2~3명의 경우에도 전투 집중력이 높아지고, 팀전보다는 개인전 또는 듀오로 플레이하는 것이 더 재미를 느낄 수 있다. 맵을 플레이하기 전에는 중앙 언덕과 좁은 길목의 위치를 숙지하고, 상대의 진영 배치와 자원 라인을 빠르게 분석하는 것이 중요하다. 또한, 시야 확보와 도망 루트를 미리 예상해 두면 예기치 못한 기습으로부터 벗어날 수 있다. 이 맵은 ‘핫 존’의 특성을 살려 근접전과 거리 싸움을 즐기는 플레이어에게 특히 매력적이며, 브루드워 밀리의 기본기와 전략적 사고를 동시에 연마할 수 있는 좋은 연습용 맵으로도 손색이 없다. 자원 밸런스는 적당히 배치되어 있어Cole의 부재나 초반 러시도 효과적으로 대응할 수 있는 구조로 보인다. 다만, 맵의 복잡성 때문에 미네랄과 가스의 확보가 다소 지연될 수 있으며, 이는 초보 플레이어에게는 부담으로 작용할 수 있다.尽管如此, 맵의 핵심은 바로 전투 자체에 있으므로, 전투 위주로 플레이하는 유저라면 큰 무리 없이 즐길 수 있을 것이다. Hot Zone in StarCraft: Brood War is a multiplayer-only map designed for 2 to 4 players, featuring a narrow and intricate terrain. The map is characterized by a central hill and tight passages, with scattered rocks and debris that obstruct vision. This layout creates a "hot zone" where small-scale battles emphasize positioning and ambushes, forcing players to control narrow corridors and strike from the rear to dominate opponents. The elevated central area and cramped pathways demand sharp vision management and precise control, making the map suitable for beginners to hone their instincts and for experienced players to execute strategic plays. The difficulty hinges more on fine control and decision-making than on the map's complexity, and its fast-paced nature makes it ideal for time-attack or speed matches. Given its terrain, securing early resources is crucial, and reading the opponent's movements to strike first is key to increasing win rates. Though designed for four players, it also excels in 2- or 3-player matches, where concentrated combat and individual or duo playstyles shine. Before playing, familiarize yourself with the central hill and narrow paths, quickly assess the opponent's base layout and resource lines, and prepare escape routes to avoid unexpected ambushes. The map particularly appeals to players who enjoy close-quarters combat and distance battles, serving as an excellent training ground for Brood War's fundamentals and strategic thinking. Resource distribution is balanced enough to handle early rushes or the absence of a probe, though the complexity may delay mineral and gas collection—potentially challenging for beginners. Ultimately, the map's essence lies in combat, so players focused on fighting will find it enjoyable without much difficulty.
최근 등록된 맵
새로 추가된 파일과 버전을 확인하세요.
Whirlwind
‘Whirlwind’는 스타크래프트 브루드워에서 만나볼 수 있는 컴팩트한 밀리 맵으로, 2~3인 플레이를 권장하는 이 맵은 사막 테마의 넓은 평지와 굴곡진 언덕이 특징이다. 맵中央에는 소규모의 돌출 지형이 있으며, 양측 멀티 지역은 비교적 평평한 구조로 펼쳐져 있어 초반 자원 확보와 멀티 기지 건설이 수월하다. 그러나 지형상 언덕을 활용한 병력 진형 싸움이나 오버로드 시야 싸움에서 유리한 위치를 차지하기가 쉽지 않으며, 중앙 돌출 지형을 사이에 두고 벌어지는 전투는 조밀한 지형 때문에 컨트롤과 컨벤션스가 중요한 포인트로 작용한다. 맵의 이름 ‘Whirlwind’는Central Mineral Field’ 주변의 소용돌이치는 듯한 언덕과 바위 지형을 연상시키며, 이는 전투 시 시야 싸움의 중요성을 강조하는 요소로 작용한다. 플레이어는 초반부터 중앙 자원 지대와 본진 멀티를 빠르게 확보하는 전략을 고민해야 하며, 언덕을 오르내리는 병력의 이동 속도 차이를 고려한 전투 계획이 필요하다는 점에서 전략적 깊이가 느껴진다. 또한, 맵의 크기가 4096×3072로 비교적 큰 편이지만, 맵의 굴곡과 언덕이 많아 실제 전투 지역은 좁은 편이어서 빠른 전투와Resource Denial(자원 봉쇄)이 승패를 가를 가능성이 높다. 특히, 테란의 경우 시즈 탱크와 벌처를 활용한 언덕 시즈전, 저그의 경우 뮤탈리스크와 러커를 통한 중앙 장악, 프로토스의 경우 질럿과 드라군의 조합으로 언덕을 넘는 전투가 관전 포인트로 보인다. 이 맵은 초보 유저에게는 지형 이해와 이동 경로 파악이 다소 어려울 수 있으나, 밀리 맵으로서의 기본적인 밸런스는 갖추고 있는 편이다. 또한, 2~3인 플레이를 권장하는 만큼 플레이어 간의 경쟁이 치열해질 가능성이 높으며, 맵의 굴곡이 주는 전략적 재미는 밀리 유저라면 한 번쯤 도전해볼 만한 요소다. 다만, 맵의 전체적인 구도가 넓기 때문에 자원 채취 효율이나 멀티 타이밍을 잘못 잡으면 쉽게 밀릴 수 있으니, 자원 관리와 멀티 기지 운영에 신경을 쓰는 것이 중요하다. Whirlwind는 단순히 넓은 맵이 아니라, 지형의 굴곡을 활용한 전략적 전투가 가능한 맵으로, 밀리 유저라면 한번쯤 플레이해볼 가치가 충분하다. 특히, 언덕과 돌출 지형을 활용한 전투가 가능한 맵을 선호하는 유저라면 이 맵이 제격일 것이다. ‘Whirlwind’ is a compact melee map in *StarCraft: Brood War* designed for 2–3 players, featuring a desert theme with wide plains and rugged hills. At the center lies a small protruding terrain, while both sides’ starting bases are built on relatively flat ground, making early resource collection and expansion easier. However, the terrain’s hills make it difficult to secure advantageous positions for troop formations or Overlord scouting, and battles over the central protrusion demand precise control and coordination due to the tight space. The map’s name, *Whirlwind*, reflects the swirling hills and rocky formations around the *Central Mineral Field*, highlighting the importance of vision control in combat. Players must quickly secure the central resources and their main base expansions while accounting for the speed differences of units moving up and down hills, adding strategic depth. Though the map size is relatively large at 4096×3072, its uneven terrain and hills create narrow combat zones, where fast engagements and resource denial often decide the outcome. For Terran, key moments include siege tank and Vulture battles on the hills; for Zerg, Mutalisks and Lurkers dominating the center; and for Protoss, Zealots and Dragoons fighting uphill. While the terrain may be tricky for beginners to navigate, the map maintains solid melee balance. With 2–3 players competing closely, the strategic depth from the uneven terrain makes it worth trying for melee enthusiasts. Still, the large overall layout means poor resource management or mistimed expansions can quickly lead to defeat, so players must focus on efficient gathering and base operations. *Whirlwind* isn’t just a wide map—it’s a battlefield where terrain advantages shape combat, making it a great choice for those who enjoy maps with hills and protrusions.
핫 존 (Hot Zone)
스타크래프트 브루드워의 ‘Hot Zone’은 2~4명의 플레이어가 참여하는 밀리 전용 맵으로, 좁고 복잡한 지형이 특징이다. 맵 중앙에는 높지 않은 언덕과 좁은 통로가 있으며, 곳곳에 바위와 잔해가 배치되어 있어 시야를 가리는 요소로 작용한다. 이러한 구조는 소규모 전투에서 자리 싸움과 기습이 중요해지는 ‘핫 존’을 형성하며, 플레이어는 좁은 통로를 활용한 견제와 후방 타격으로 상대를 제압해야 한다. 특히 맵 중앙의 높은 지대와 좁은 길목은 시야 싸움과 컨트롤을 요구하기 때문에, 초보자는 실전 감각을 익히기에 적합하고 숙련자는 전략적 플레이로 승리를 노릴 수 있는 밸런스를 갖추고 있다. 맵의 난이도는 맵의 복잡성보다는 플레이어의 미세한 컨트롤과 판단에 따라 좌우되며, 짧은 플레이 시간 동안 치열한 전투가 펼쳐질 가능성이 높아 타임어택이나 스피드전을 즐기는 유저들에게도 추천할 만하다. 다만, 맵의 지형 특성상 초반 자원 확보가 중요하며, 상대의 움직임을 읽고 먼저 공격을 가하는 플레이가 승률을 높이는 핵심 포인트가 된다. 4인용으로 설계되었지만 2~3명의 경우에도 전투 집중력이 높아지고, 팀전보다는 개인전 또는 듀오로 플레이하는 것이 더 재미를 느낄 수 있다. 맵을 플레이하기 전에는 중앙 언덕과 좁은 길목의 위치를 숙지하고, 상대의 진영 배치와 자원 라인을 빠르게 분석하는 것이 중요하다. 또한, 시야 확보와 도망 루트를 미리 예상해 두면 예기치 못한 기습으로부터 벗어날 수 있다. 이 맵은 ‘핫 존’의 특성을 살려 근접전과 거리 싸움을 즐기는 플레이어에게 특히 매력적이며, 브루드워 밀리의 기본기와 전략적 사고를 동시에 연마할 수 있는 좋은 연습용 맵으로도 손색이 없다. 자원 밸런스는 적당히 배치되어 있어Cole의 부재나 초반 러시도 효과적으로 대응할 수 있는 구조로 보인다. 다만, 맵의 복잡성 때문에 미네랄과 가스의 확보가 다소 지연될 수 있으며, 이는 초보 플레이어에게는 부담으로 작용할 수 있다.尽管如此, 맵의 핵심은 바로 전투 자체에 있으므로, 전투 위주로 플레이하는 유저라면 큰 무리 없이 즐길 수 있을 것이다. Hot Zone in StarCraft: Brood War is a multiplayer-only map designed for 2 to 4 players, featuring a narrow and intricate terrain. The map is characterized by a central hill and tight passages, with scattered rocks and debris that obstruct vision. This layout creates a "hot zone" where small-scale battles emphasize positioning and ambushes, forcing players to control narrow corridors and strike from the rear to dominate opponents. The elevated central area and cramped pathways demand sharp vision management and precise control, making the map suitable for beginners to hone their instincts and for experienced players to execute strategic plays. The difficulty hinges more on fine control and decision-making than on the map's complexity, and its fast-paced nature makes it ideal for time-attack or speed matches. Given its terrain, securing early resources is crucial, and reading the opponent's movements to strike first is key to increasing win rates. Though designed for four players, it also excels in 2- or 3-player matches, where concentrated combat and individual or duo playstyles shine. Before playing, familiarize yourself with the central hill and narrow paths, quickly assess the opponent's base layout and resource lines, and prepare escape routes to avoid unexpected ambushes. The map particularly appeals to players who enjoy close-quarters combat and distance battles, serving as an excellent training ground for Brood War's fundamentals and strategic thinking. Resource distribution is balanced enough to handle early rushes or the absence of a probe, though the complexity may delay mineral and gas collection—potentially challenging for beginners. Ultimately, the map's essence lies in combat, so players focused on fighting will find it enjoyable without much difficulty.
맵 선택 가이드
태그는 맵의 핵심 특징을 빠르게 설명하지만 제작 버전마다 규칙이 다를 수 있습니다. 상세 설명에서 권장 인원, 난이도, 플레이 시간과 버전을 함께 확인한 뒤 다운로드하세요.