
중앙 구조물 스타크래프트 맵 모음
'중앙 구조물' 태그가 등록된 맵을 모았습니다. 장르 하나로 찾기 어려운 플레이 방식, 난이도와 특징을 중심으로 인기 맵과 최신 맵을 비교해 보세요.
- 등록 맵
- 3개
- 누적 다운로드
- 1
- 누적 조회
- 105
인기 맵
다운로드와 조회 반응이 높은 맵입니다.
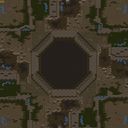
Octagon 1.0 SandBox
스타크래프트 브루드워의 유즈맵 'Octagon 1.0 SandBox'는 사각형의 맵 중앙에 거대한 거대 둥근 오각형 구조물이 자리 잡고 있는 독특한 디자인으로 주목받는 맵입니다. 맵의 가장 큰 특징은 중앙의 거대한 구멍으로, 플레이어들은 이 공간을 통해 자원을 채취하거나 전략적인 이동을 시도할 수 있습니다. 사막 타일셋을 기반으로 한 황량한 분위기는 맵의 전략적 깊이를 더하며, 중앙 구조물의 형태와 배치로 인해 다양한 전술이 가능한 샌드박스형 맵으로 분류됩니다. 이 맵은 4명의 플레이어가 동시에 참여할 수 있으며, 'Use Map Settings' 모드를 통해 맵의 환경을 자유롭게 설정할 수 있는 샌드박스 기능을 제공합니다. 제작자 주석에 따르면 버전 2.5.3까지 개발된 이 맵은 초기 디자인부터 사용자 정의가 가능한 요소들을 고려해 제작되었음을 알 수 있습니다. 중앙의 커다란 구멍은 단순히 시야를 가리는 역할뿐만 아니라, 자원 채취와 기지 방어, 또는突然间의 공격 루트로도 활용될 수 있어 전략적 선택의 폭을 넓혀줍니다. 플레이어들은 중앙 구조물의 외부와 내부를 오가며 자원을 확보하고, 상대방의 움직임을 방어하거나 공격할 수 있는 다채로운 플레이가 가능합니다. 특히 사막 지형의 황량한 분위기는 긴장감을 조성하며, 맵의 중앙 구조물은 단순히 장식적 요소가 아니라 전략적 요충지로 기능합니다. 샌드박스 모드에서 제공되는 맵 설정은 사용자마다 다른 환경을 경험할 수 있도록 하며, 이는 이 맵의 재플레이 가능성을 크게 높이는 요소입니다. 이 맵은 초보자부터 숙련자까지 모두 즐길 수 있는 유즈맵으로, 특히 전략적 사고와 적응력을 키우고자 하는 플레이어들에게 추천합니다. 맵의 구조상 중앙을 차지하는 것이 중요할 수 있으므로, 초기 자원 확보와 방어 전략을 신중히 계획해야 합니다. 또한 샌드박스 모드에서 제공되는 다양한 설정들을 활용해 자신에게 맞는 플레이 스타일을 찾아볼 수 있습니다. 이 맵을 플레이하기 전에는 중앙 구조물의 형태와 자원 배치, 그리고 샌드박스 설정을 미리 확인해 보는 것이 좋습니다. 맵의 중앙 구멍을 어떻게 활용할 것인지, 그리고 방어와 공격의 균형을 어떻게 맞출 것인지에 따라 게임의 결과가 크게 달라질 수 있습니다. 샌드박스 모드의 경우, 맵의 난이도와 자원량을 조정할 수 있으므로 자신에게 맞는 설정을 찾아보는 것도 중요합니다. Octagon 1.0 SandBox is a unique custom map for StarCraft: Brood War, featuring a massive pentagonal structure at the center of a square-shaped map. The most striking feature is the large circular hole in the middle, allowing players to gather resources or execute strategic movements. Based on the desert tile set, the barren atmosphere enhances the map's strategic depth, making it a versatile sandbox-style map where various tactics can be employed. Designed for four players, this map offers a sandbox mode where the environment can be customized through the 'Use Map Settings' feature. According to the creator's notes, the map has evolved up to version 2.5.3, incorporating elements that allow for user-defined settings from the outset. The central hole is not just a visual element but also serves as a critical strategic point for resource gathering, base defense, or sudden attacks. Players can move between the exterior and interior of the central structure to secure resources while defending against or attacking opponents. The desolate desert setting adds tension, and the central structure acts as more than just a decorative element—it is a key strategic point. The sandbox mode’s customizable settings enable each player to experience a unique environment, significantly enhancing the map’s replayability. This map is recommended for players of all skill levels, especially those looking to develop strategic thinking and adaptability. Securing the center is crucial, so careful planning of initial resource gathering and defense strategies is essential. Players can also explore different playstyles by utilizing the various settings provided in the sandbox mode. Before playing, it is advisable to familiarize yourself with the central structure’s layout, resource distribution, and sandbox settings. How you utilize the central hole for resources, defense, or attacks can greatly influence the game’s outcome. In sandbox mode, adjusting the map’s difficulty and resource quantity to suit your preferences is also important.
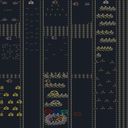
Medic 2. Bound 2.
「Medic 2. Bound 2.」는 스타크래프트 브루드워의 유즈맵으로, 6인용 디펜스 장르의 맵이다. 맵의 전체적인 구도는 중앙에 거대한 구조물이 자리 잡고 있으며, 그 주변으로 여러 개의 방어 거점이 배치되어 있다. 플레이어는 이 구조물을 보호하거나 파괴하는 임무를 수행하는 것으로 추정된다. 맵의 배경은 설원/얼음 타일셋을 사용해 차가운 분위기를 연출하며, 눈밭과 얼음 동굴 같은 지형이 눈에 띈다. 맵의 중앙 구조물은 붉은색과 노란색으로 강조되어 있어 시선이 집중되는 부분이다. 방어 거점은 맵 곳곳에 흩어져 있으며, 각 거점은 건물을 짓거나 방어 시설을 설치할 수 있는 공간으로 보인다. 맵의 좌측 하단과 우측 상단에는 플레이어 기지 역할을 하는 듯한 대형 건물이 배치되어 있어, 이 맵이 방어 요소를 중심으로 설계되었음을 알 수 있다. 맵의 난이도는 맵 상단에 표시된 'Bound 2'라는 명칭과 중앙 구조물의 복잡한 배치로 미루어보아 보통 이상의 수준일 것으로 예상된다. 플레이어는 적의 공격을 방어하면서 동시에 중앙 구조물을 관리하거나 공격해야 할 가능성이 크며, 이는 맵의 플레이 경험을 더욱 흥미롭게 만든다. 이 맵은 디펜스 장르에 익숙한 플레이어들에게 추천할 만한 작품으로 보인다. 특히 중앙 구조물의 관리와 방어 거점 간의 전략적 연계가 중요한 요소로 작용할 것이다. 또한, 맵의 얼음 타일셋은 시각적으로도 매력적이며, 플레이어들에게 차가운 분위기의 긴장감을 선사할 것이다. 플레이 전에는 맵의 중앙 구조물과 방어 거점의 위치를 정확히 파악하고, 각 거점에서 어떤 전략을 펼칠지 미리 계획하는 것이 중요할 것이다. 또한, 맵의 난이도가 보통 이상일 가능성이 크므로, 초보자보다는 어느 정도 경험이 있는 플레이어에게 더 적합할 것으로 보인다. This StarCraft: Brood War custom map, titled 「Medic 2. Bound 2.」, is a 6-player defense genre map set against a snowy/ice tileset background. The central focus is a large, prominently colored structure surrounded by scattered defensive outposts where players can construct buildings or defensive facilities. The layout suggests a strategic balance between protecting or assaulting this central structure, with player bases likely positioned in the bottom-left and top-right corners. The 'Bound 2' designation in the map name hints at a moderate-to-high difficulty level, reinforced by the complex arrangement of defensive points and potential multi-phase enemy waves. The icy theme enhances visual immersion, creating a tense atmosphere ideal for defense mechanics. Players should prioritize scouting the central structure's mechanics and outpost placements before deciding whether to focus on fortification or aggressive counterplay. Given the map's estimated difficulty, it is best suited for intermediate to advanced StarCraft players familiar with custom map mechanics and defensive strategies.
![옵저버 매드니스 [v4] (Observer Madness [v4]) 맵 미리보기](https://cdn-star-data.huzy.net/thumbnail_b1f1d690defa43c1815cfc83e8ff6704.jpg)
옵저버 매드니스 [v4] (Observer Madness [v4])
‘옵저버 매드니스 [v4]’는 스타크래프트 브루드워의 유즈맵으로,Observer Madness [v4]는 특히 옵저버(관찰자) 유닛을 중심으로 설계된 디펜스형 맵이다. 맵 중앙에 위치한 거대한 구조물 주변을 둘러싸는 듯한 배치와 적절한 리소스 분포가 특징이며, 플레이어는 이 구조물을 보호하거나 파괴하는 목표를 수행하게 된다. 맵의 디자인에서 가장 눈에 띄는 부분은 중앙의 거대한 건물로, 다양한 각도에서 접근할 수 있는 진입로가 제공되어 전략적 선택지가 넓다. 또한, 맵 곳곳에 배치된 미네랄과 가스 지역은 자원 확보의 중요성을 강조하며, 초반Resource gathering is crucial in this map as mineral and gas deposits are strategically placed around the central structure. The central area features multiple entry points, allowing for diverse tactical approaches. The volcanic tileset not only enhances the visual appeal but also creates a sense of urgency and intensity, which aligns well with the defensive or offensive objectives. Players must manage their forces carefully, balancing between expansion, defense, and direct assaults to secure victory. This map is recommended for those who enjoy challenging defensive strategies and dynamic combat scenarios. It is particularly suitable for experienced players due to its intricate layout and the need for quick decision-making. Beginners may find the central structure's multiple entry points overwhelming, but the map offers a rewarding experience once mastered. Before playing, check the resource distribution and the layout of the central building to plan your strategy effectively. The volcanic terrain also suggests potential lava hazards or environmental effects that could impact gameplay, so adaptability is key. Overall, Observer Madness [v4] stands out as a well-designed UMS map that tests both strategic planning and real-time execution.
최근 등록된 맵
새로 추가된 파일과 버전을 확인하세요.
Octagon 1.0 SandBox
스타크래프트 브루드워의 유즈맵 'Octagon 1.0 SandBox'는 사각형의 맵 중앙에 거대한 거대 둥근 오각형 구조물이 자리 잡고 있는 독특한 디자인으로 주목받는 맵입니다. 맵의 가장 큰 특징은 중앙의 거대한 구멍으로, 플레이어들은 이 공간을 통해 자원을 채취하거나 전략적인 이동을 시도할 수 있습니다. 사막 타일셋을 기반으로 한 황량한 분위기는 맵의 전략적 깊이를 더하며, 중앙 구조물의 형태와 배치로 인해 다양한 전술이 가능한 샌드박스형 맵으로 분류됩니다. 이 맵은 4명의 플레이어가 동시에 참여할 수 있으며, 'Use Map Settings' 모드를 통해 맵의 환경을 자유롭게 설정할 수 있는 샌드박스 기능을 제공합니다. 제작자 주석에 따르면 버전 2.5.3까지 개발된 이 맵은 초기 디자인부터 사용자 정의가 가능한 요소들을 고려해 제작되었음을 알 수 있습니다. 중앙의 커다란 구멍은 단순히 시야를 가리는 역할뿐만 아니라, 자원 채취와 기지 방어, 또는突然间의 공격 루트로도 활용될 수 있어 전략적 선택의 폭을 넓혀줍니다. 플레이어들은 중앙 구조물의 외부와 내부를 오가며 자원을 확보하고, 상대방의 움직임을 방어하거나 공격할 수 있는 다채로운 플레이가 가능합니다. 특히 사막 지형의 황량한 분위기는 긴장감을 조성하며, 맵의 중앙 구조물은 단순히 장식적 요소가 아니라 전략적 요충지로 기능합니다. 샌드박스 모드에서 제공되는 맵 설정은 사용자마다 다른 환경을 경험할 수 있도록 하며, 이는 이 맵의 재플레이 가능성을 크게 높이는 요소입니다. 이 맵은 초보자부터 숙련자까지 모두 즐길 수 있는 유즈맵으로, 특히 전략적 사고와 적응력을 키우고자 하는 플레이어들에게 추천합니다. 맵의 구조상 중앙을 차지하는 것이 중요할 수 있으므로, 초기 자원 확보와 방어 전략을 신중히 계획해야 합니다. 또한 샌드박스 모드에서 제공되는 다양한 설정들을 활용해 자신에게 맞는 플레이 스타일을 찾아볼 수 있습니다. 이 맵을 플레이하기 전에는 중앙 구조물의 형태와 자원 배치, 그리고 샌드박스 설정을 미리 확인해 보는 것이 좋습니다. 맵의 중앙 구멍을 어떻게 활용할 것인지, 그리고 방어와 공격의 균형을 어떻게 맞출 것인지에 따라 게임의 결과가 크게 달라질 수 있습니다. 샌드박스 모드의 경우, 맵의 난이도와 자원량을 조정할 수 있으므로 자신에게 맞는 설정을 찾아보는 것도 중요합니다. Octagon 1.0 SandBox is a unique custom map for StarCraft: Brood War, featuring a massive pentagonal structure at the center of a square-shaped map. The most striking feature is the large circular hole in the middle, allowing players to gather resources or execute strategic movements. Based on the desert tile set, the barren atmosphere enhances the map's strategic depth, making it a versatile sandbox-style map where various tactics can be employed. Designed for four players, this map offers a sandbox mode where the environment can be customized through the 'Use Map Settings' feature. According to the creator's notes, the map has evolved up to version 2.5.3, incorporating elements that allow for user-defined settings from the outset. The central hole is not just a visual element but also serves as a critical strategic point for resource gathering, base defense, or sudden attacks. Players can move between the exterior and interior of the central structure to secure resources while defending against or attacking opponents. The desolate desert setting adds tension, and the central structure acts as more than just a decorative element—it is a key strategic point. The sandbox mode’s customizable settings enable each player to experience a unique environment, significantly enhancing the map’s replayability. This map is recommended for players of all skill levels, especially those looking to develop strategic thinking and adaptability. Securing the center is crucial, so careful planning of initial resource gathering and defense strategies is essential. Players can also explore different playstyles by utilizing the various settings provided in the sandbox mode. Before playing, it is advisable to familiarize yourself with the central structure’s layout, resource distribution, and sandbox settings. How you utilize the central hole for resources, defense, or attacks can greatly influence the game’s outcome. In sandbox mode, adjusting the map’s difficulty and resource quantity to suit your preferences is also important.
옵저버 매드니스 [v4] (Observer Madness [v4])
‘옵저버 매드니스 [v4]’는 스타크래프트 브루드워의 유즈맵으로,Observer Madness [v4]는 특히 옵저버(관찰자) 유닛을 중심으로 설계된 디펜스형 맵이다. 맵 중앙에 위치한 거대한 구조물 주변을 둘러싸는 듯한 배치와 적절한 리소스 분포가 특징이며, 플레이어는 이 구조물을 보호하거나 파괴하는 목표를 수행하게 된다. 맵의 디자인에서 가장 눈에 띄는 부분은 중앙의 거대한 건물로, 다양한 각도에서 접근할 수 있는 진입로가 제공되어 전략적 선택지가 넓다. 또한, 맵 곳곳에 배치된 미네랄과 가스 지역은 자원 확보의 중요성을 강조하며, 초반Resource gathering is crucial in this map as mineral and gas deposits are strategically placed around the central structure. The central area features multiple entry points, allowing for diverse tactical approaches. The volcanic tileset not only enhances the visual appeal but also creates a sense of urgency and intensity, which aligns well with the defensive or offensive objectives. Players must manage their forces carefully, balancing between expansion, defense, and direct assaults to secure victory. This map is recommended for those who enjoy challenging defensive strategies and dynamic combat scenarios. It is particularly suitable for experienced players due to its intricate layout and the need for quick decision-making. Beginners may find the central structure's multiple entry points overwhelming, but the map offers a rewarding experience once mastered. Before playing, check the resource distribution and the layout of the central building to plan your strategy effectively. The volcanic terrain also suggests potential lava hazards or environmental effects that could impact gameplay, so adaptability is key. Overall, Observer Madness [v4] stands out as a well-designed UMS map that tests both strategic planning and real-time execution.
Medic 2. Bound 2.
「Medic 2. Bound 2.」는 스타크래프트 브루드워의 유즈맵으로, 6인용 디펜스 장르의 맵이다. 맵의 전체적인 구도는 중앙에 거대한 구조물이 자리 잡고 있으며, 그 주변으로 여러 개의 방어 거점이 배치되어 있다. 플레이어는 이 구조물을 보호하거나 파괴하는 임무를 수행하는 것으로 추정된다. 맵의 배경은 설원/얼음 타일셋을 사용해 차가운 분위기를 연출하며, 눈밭과 얼음 동굴 같은 지형이 눈에 띈다. 맵의 중앙 구조물은 붉은색과 노란색으로 강조되어 있어 시선이 집중되는 부분이다. 방어 거점은 맵 곳곳에 흩어져 있으며, 각 거점은 건물을 짓거나 방어 시설을 설치할 수 있는 공간으로 보인다. 맵의 좌측 하단과 우측 상단에는 플레이어 기지 역할을 하는 듯한 대형 건물이 배치되어 있어, 이 맵이 방어 요소를 중심으로 설계되었음을 알 수 있다. 맵의 난이도는 맵 상단에 표시된 'Bound 2'라는 명칭과 중앙 구조물의 복잡한 배치로 미루어보아 보통 이상의 수준일 것으로 예상된다. 플레이어는 적의 공격을 방어하면서 동시에 중앙 구조물을 관리하거나 공격해야 할 가능성이 크며, 이는 맵의 플레이 경험을 더욱 흥미롭게 만든다. 이 맵은 디펜스 장르에 익숙한 플레이어들에게 추천할 만한 작품으로 보인다. 특히 중앙 구조물의 관리와 방어 거점 간의 전략적 연계가 중요한 요소로 작용할 것이다. 또한, 맵의 얼음 타일셋은 시각적으로도 매력적이며, 플레이어들에게 차가운 분위기의 긴장감을 선사할 것이다. 플레이 전에는 맵의 중앙 구조물과 방어 거점의 위치를 정확히 파악하고, 각 거점에서 어떤 전략을 펼칠지 미리 계획하는 것이 중요할 것이다. 또한, 맵의 난이도가 보통 이상일 가능성이 크므로, 초보자보다는 어느 정도 경험이 있는 플레이어에게 더 적합할 것으로 보인다. This StarCraft: Brood War custom map, titled 「Medic 2. Bound 2.」, is a 6-player defense genre map set against a snowy/ice tileset background. The central focus is a large, prominently colored structure surrounded by scattered defensive outposts where players can construct buildings or defensive facilities. The layout suggests a strategic balance between protecting or assaulting this central structure, with player bases likely positioned in the bottom-left and top-right corners. The 'Bound 2' designation in the map name hints at a moderate-to-high difficulty level, reinforced by the complex arrangement of defensive points and potential multi-phase enemy waves. The icy theme enhances visual immersion, creating a tense atmosphere ideal for defense mechanics. Players should prioritize scouting the central structure's mechanics and outpost placements before deciding whether to focus on fortification or aggressive counterplay. Given the map's estimated difficulty, it is best suited for intermediate to advanced StarCraft players familiar with custom map mechanics and defensive strategies.
맵 선택 가이드
태그는 맵의 핵심 특징을 빠르게 설명하지만 제작 버전마다 규칙이 다를 수 있습니다. 상세 설명에서 권장 인원, 난이도, 플레이 시간과 버전을 함께 확인한 뒤 다운로드하세요.