
생산 스타크래프트 맵 모음
'생산' 태그가 등록된 맵을 모았습니다. 장르 하나로 찾기 어려운 플레이 방식, 난이도와 특징을 중심으로 인기 맵과 최신 맵을 비교해 보세요.
- 등록 맵
- 2개
- 누적 다운로드
- 0
- 누적 조회
- 83
인기 맵
다운로드와 조회 반응이 높은 맵입니다.
2vs2생산과 컨트롤
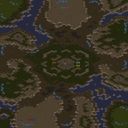
스타크래프트 브루드워 맵인 2vs2생산과 컨트롤(2vs2 Production and Control)은 전략과 유닛 조작 능력을 동시에 시험할 수 있도록 디자인된 독특한 유즈맵이다. 일반적인 밀리 전장의 틀에서 벗어나, 정해진 조건 속에서 팀원과의 협력을 바탕으로 생산 능력을 극대화하고 소수 병력의 세밀한 컨트롤을 겨루도록 구성되어 있다. 사막 타일셋을 바탕으로 중앙의 거점과 외곽의 자원 구역이 유기적으로 연결된 지형 구조를 보여주며, 플레이어들은 제한된 공간 속에서 효율적인 빌드와 실시간 전투 조작을 동시에 해내야 하는 도전적인 과제를 마주하게 된다. 미니게임 장르에 속하는 이 맵은 다수의 인원이 모여 가볍게 즐기기보다는, 팀 대항전 형태로 치밀한 전술을 나누며 승부를 가리기에 적합하다. 이 맵의 진행 방식은 기본적으로 자원 채취와 유닛 생산을 바탕으로 하되, 단순한 물량전보다는 개별 유닛의 움직임과 교전 타이밍에 집중하도록 유도한다. 맵 전체의 구조를 살펴보면 플레이어들이 배치되는 거점 주변으로 진입로와 방어 포인트가 나뉘어 있어, 상대 팀의 견제와 공격에 대비하는 동시에 아군과의 유기적인 동선 합의가 필수적이다. 특히 생산과 컨트롤이라는 제목의 직관적인 주제에 걸맞게, 자원을 최적으로 배분하면서 교전 시 손해를 최소화하는 유닛 운용 능력이 승패를 가르는 결정적인 요인으로 작용한다. 빠른 판단력과 손놀림을 요구하는 만큼, 평소 밀리 게임이나 컨트롤 연습용 유즈맵을 즐겨 찾는 플레이어들에게 색다른 재미를 선사한다. 이 맵을 플레이하기 전에는 팀원 간의 역할 분담과 전략적 방향성을 미리 조율하는 것이 매우 중요하다. 생산에 집중할 것인지, 혹은 초반 컨트롤 교전을 주도할 것인지에 따라 게임의 양상이 크게 달라지기 때문이다. 협동 플레이를 선호하고 친구들과 함께 손발을 맞춰가며 실력을 겨루고 싶은 유저들에게 추천할 만한 스타크래프트 맵이다. 정교한 컨트롤과 생산 타이밍이라는 두 가지 요소를 모두 잡아야 하는 만큼, 반복 플레이를 통해 자신만의 최적화된 빌드와 교전 노하우를 찾아가는 재미를 느낄 수 있을 것이다. 2vs2 Production and Control is a unique custom map designed to test strategy and unit micro-management skills simultaneously in StarCraft: Brood War. Breaking away from standard melee map frameworks, it challenges players to maximize production efficiency and master precise unit control through close cooperation with teammates under specific conditions. Set against a desert tileset, the terrain organically connects a central stronghold with outer resource zones, forcing players to tackle the challenge of executing efficient builds and real-time combat maneuvers within constrained spaces. Classified under the mini-game genre, this map is ideal for team-based matches where players can devise meticulous tactics to secure victory rather than casual, lightweight gaming. The progression style is fundamentally based on resource gathering and unit production, yet it encourages focus on individual unit movement and engagement timing over sheer numbers. Examining the overall map layout, entry points and defensive positions are distributed around the player start locations, making cooperative movement and coordination with allies essential while preparing for enemy harassment and attacks. True to its direct title emphasizing production and control, the ability to optimally allocate resources while minimizing losses during skirmishes serves as the decisive factor determining victory or defeat. Demanding swift decision-making and mechanical execution, it offers a refreshing experience for players who enjoy standard melee games or control-practice custom maps. Before playing this map, coordinating role distribution and strategic direction with teammates in advance is crucial. Depending on whether a player focuses on production or leads early control skirmishes, the flow of the game can change dramatically. It is highly recommended for users who prefer cooperative play and want to test their skills while synchronizing with friends. Because players must master both precise control and production timing, they will find joy in discovering their own optimized builds and combat know-how through repeated playthroughs.
생산과 컨트롤 (Make & Control (3vs3) ver-1.0)
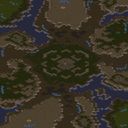
스타크래프트 브루드워 유즈맵 '생산과 컨트롤 (Make & Control (3vs3) ver-1.0)'은 6인용 팀 대전 맵으로, 두 명의 '생산자(Maker)'와 네 명의 '조종자(Controller)'가 역할을 분담해 3대3 전투를 펼치는 독특한 구조를 지닙니다. 플레이어 1번과 4번이 각각 팀의 자원과 유닛 생산을 전담하고, 나머지 2, 3, 5, 6번은 생산된 유닛을 직접 조종하며 전술적 운영을 맡습니다. 맵 파일명은 '생산과컨트롤(3vs3)ver노스캔.scx'로, 노스캔 버전 표기가 포함되어 있으며, 내부 설명에 따라 1, 4번이 생산, 2,3,5,6번이 조종을 맡는 고정 팀 구성이 적용됩니다. 사막 타일셋의 128×128 크기 맵은 양 진영이 대칭적으로 배치되어 있어 밸런스 잡힌 대결이 가능하며, 생산자는 효율적인 빌드 오더와 자원 관리로 아군 조종자에게 적절한 병력을 공급해야 하고, 조종자는 마이크로 컨트롤과 상황 판단으로 전황을 주도해야 합니다. 일반적인 밀리와 달리 역할이 고정되어 있어 팀워크와 의사소통이 승패를 가르는 핵심 요소이며, 초보자는 생산자보다는 조종자 역할로 게임 감각을 익히기 좋습니다. 생산자는 본진에서 넥서스/커맨드/해처리 등 종족별 생산 건물을 운영하며, 조종자는 별도의 시작 위치에서 유닛을 받아 전투를 수행합니다. 이 구조는 종족 조합에 따른 시너지 연구와 실시간 자원 공유 전략을 유도합니다. 3대3 팀전 특성상 한 명의 실수가 팀 전체에 영향을 미치므로 신중한 플레이가 요구되며, 게임 시간은 보통 20~40분 내외로 진행됩니다. 맵 크기가 표준 밀리와 동일해 익숙한 지형 감각을 활용할 수 있고, 사막 타일셋 특유의 시인성도 괜찮은 편입니다. 트리거로 구현된 생산-조종 분리는 색다른 협동 경험을 제공하며, 버전 1.0 기준으로 큰 버그 없이 안정적으로 플레이됩니다. 별도의 승리 조건 트리거는 적 전원 섬멸 또는 본진 건물 파괴로 추정되며, 옵저버 모드 없이도 관전이 용이합니다. 팀 단위 전략 연습이나 색다른 유즈맵을 찾는 유저에게 추천합니다. The StarCraft Brood War UMS map 'Make & Control (3vs3) ver-1.0' is a 6-player team battle map where two 'Makers' and four 'Controllers' share roles to fight 3v3. Players 1 and 4 handle resource gathering and unit production for their teams, while players 2, 3, 5, and 6 directly control the produced units for tactical operations. The filename '생산과컨트롤(3vs3)ver노스캔.scx' includes a NothScan version note, and the internal description confirms the fixed team setup with players 1 and 4 as makers and 2, 3, 5, 6 as controllers. The 128x128 desert tileset map features symmetrical bases for balanced gameplay. Makers must manage efficient build orders and economy to supply allies, while controllers rely on micro-control and decision-making. Unlike standard melee, fixed roles make teamwork and communication decisive; beginners may prefer the controller role to learn game sense. Makers operate race-specific production buildings at the main base, controllers receive units at separate starting locations, encouraging race synergy research and real-time resource sharing. A single mistake can cost the team, so careful play is required; matches typically last 20-40 minutes. The standard melee map size allows familiar terrain usage, and desert tileset visibility is decent. The trigger-based maker-controller split offers a fresh cooperative experience, and version 1.0 runs stably without major bugs. Victory likely requires eliminating all enemy units or destroying main structures, and spectating is easy even without observer mode. Recommended for players seeking team strategy practice or a unique UMS experience.
최근 등록된 맵
새로 추가된 파일과 버전을 확인하세요.
생산과 컨트롤 (Make & Control (3vs3) ver-1.0)
스타크래프트 브루드워 유즈맵 '생산과 컨트롤 (Make & Control (3vs3) ver-1.0)'은 6인용 팀 대전 맵으로, 두 명의 '생산자(Maker)'와 네 명의 '조종자(Controller)'가 역할을 분담해 3대3 전투를 펼치는 독특한 구조를 지닙니다. 플레이어 1번과 4번이 각각 팀의 자원과 유닛 생산을 전담하고, 나머지 2, 3, 5, 6번은 생산된 유닛을 직접 조종하며 전술적 운영을 맡습니다. 맵 파일명은 '생산과컨트롤(3vs3)ver노스캔.scx'로, 노스캔 버전 표기가 포함되어 있으며, 내부 설명에 따라 1, 4번이 생산, 2,3,5,6번이 조종을 맡는 고정 팀 구성이 적용됩니다. 사막 타일셋의 128×128 크기 맵은 양 진영이 대칭적으로 배치되어 있어 밸런스 잡힌 대결이 가능하며, 생산자는 효율적인 빌드 오더와 자원 관리로 아군 조종자에게 적절한 병력을 공급해야 하고, 조종자는 마이크로 컨트롤과 상황 판단으로 전황을 주도해야 합니다. 일반적인 밀리와 달리 역할이 고정되어 있어 팀워크와 의사소통이 승패를 가르는 핵심 요소이며, 초보자는 생산자보다는 조종자 역할로 게임 감각을 익히기 좋습니다. 생산자는 본진에서 넥서스/커맨드/해처리 등 종족별 생산 건물을 운영하며, 조종자는 별도의 시작 위치에서 유닛을 받아 전투를 수행합니다. 이 구조는 종족 조합에 따른 시너지 연구와 실시간 자원 공유 전략을 유도합니다. 3대3 팀전 특성상 한 명의 실수가 팀 전체에 영향을 미치므로 신중한 플레이가 요구되며, 게임 시간은 보통 20~40분 내외로 진행됩니다. 맵 크기가 표준 밀리와 동일해 익숙한 지형 감각을 활용할 수 있고, 사막 타일셋 특유의 시인성도 괜찮은 편입니다. 트리거로 구현된 생산-조종 분리는 색다른 협동 경험을 제공하며, 버전 1.0 기준으로 큰 버그 없이 안정적으로 플레이됩니다. 별도의 승리 조건 트리거는 적 전원 섬멸 또는 본진 건물 파괴로 추정되며, 옵저버 모드 없이도 관전이 용이합니다. 팀 단위 전략 연습이나 색다른 유즈맵을 찾는 유저에게 추천합니다. The StarCraft Brood War UMS map 'Make & Control (3vs3) ver-1.0' is a 6-player team battle map where two 'Makers' and four 'Controllers' share roles to fight 3v3. Players 1 and 4 handle resource gathering and unit production for their teams, while players 2, 3, 5, and 6 directly control the produced units for tactical operations. The filename '생산과컨트롤(3vs3)ver노스캔.scx' includes a NothScan version note, and the internal description confirms the fixed team setup with players 1 and 4 as makers and 2, 3, 5, 6 as controllers. The 128x128 desert tileset map features symmetrical bases for balanced gameplay. Makers must manage efficient build orders and economy to supply allies, while controllers rely on micro-control and decision-making. Unlike standard melee, fixed roles make teamwork and communication decisive; beginners may prefer the controller role to learn game sense. Makers operate race-specific production buildings at the main base, controllers receive units at separate starting locations, encouraging race synergy research and real-time resource sharing. A single mistake can cost the team, so careful play is required; matches typically last 20-40 minutes. The standard melee map size allows familiar terrain usage, and desert tileset visibility is decent. The trigger-based maker-controller split offers a fresh cooperative experience, and version 1.0 runs stably without major bugs. Victory likely requires eliminating all enemy units or destroying main structures, and spectating is easy even without observer mode. Recommended for players seeking team strategy practice or a unique UMS experience.
2vs2생산과 컨트롤
스타크래프트 브루드워 맵인 2vs2생산과 컨트롤(2vs2 Production and Control)은 전략과 유닛 조작 능력을 동시에 시험할 수 있도록 디자인된 독특한 유즈맵이다. 일반적인 밀리 전장의 틀에서 벗어나, 정해진 조건 속에서 팀원과의 협력을 바탕으로 생산 능력을 극대화하고 소수 병력의 세밀한 컨트롤을 겨루도록 구성되어 있다. 사막 타일셋을 바탕으로 중앙의 거점과 외곽의 자원 구역이 유기적으로 연결된 지형 구조를 보여주며, 플레이어들은 제한된 공간 속에서 효율적인 빌드와 실시간 전투 조작을 동시에 해내야 하는 도전적인 과제를 마주하게 된다. 미니게임 장르에 속하는 이 맵은 다수의 인원이 모여 가볍게 즐기기보다는, 팀 대항전 형태로 치밀한 전술을 나누며 승부를 가리기에 적합하다. 이 맵의 진행 방식은 기본적으로 자원 채취와 유닛 생산을 바탕으로 하되, 단순한 물량전보다는 개별 유닛의 움직임과 교전 타이밍에 집중하도록 유도한다. 맵 전체의 구조를 살펴보면 플레이어들이 배치되는 거점 주변으로 진입로와 방어 포인트가 나뉘어 있어, 상대 팀의 견제와 공격에 대비하는 동시에 아군과의 유기적인 동선 합의가 필수적이다. 특히 생산과 컨트롤이라는 제목의 직관적인 주제에 걸맞게, 자원을 최적으로 배분하면서 교전 시 손해를 최소화하는 유닛 운용 능력이 승패를 가르는 결정적인 요인으로 작용한다. 빠른 판단력과 손놀림을 요구하는 만큼, 평소 밀리 게임이나 컨트롤 연습용 유즈맵을 즐겨 찾는 플레이어들에게 색다른 재미를 선사한다. 이 맵을 플레이하기 전에는 팀원 간의 역할 분담과 전략적 방향성을 미리 조율하는 것이 매우 중요하다. 생산에 집중할 것인지, 혹은 초반 컨트롤 교전을 주도할 것인지에 따라 게임의 양상이 크게 달라지기 때문이다. 협동 플레이를 선호하고 친구들과 함께 손발을 맞춰가며 실력을 겨루고 싶은 유저들에게 추천할 만한 스타크래프트 맵이다. 정교한 컨트롤과 생산 타이밍이라는 두 가지 요소를 모두 잡아야 하는 만큼, 반복 플레이를 통해 자신만의 최적화된 빌드와 교전 노하우를 찾아가는 재미를 느낄 수 있을 것이다. 2vs2 Production and Control is a unique custom map designed to test strategy and unit micro-management skills simultaneously in StarCraft: Brood War. Breaking away from standard melee map frameworks, it challenges players to maximize production efficiency and master precise unit control through close cooperation with teammates under specific conditions. Set against a desert tileset, the terrain organically connects a central stronghold with outer resource zones, forcing players to tackle the challenge of executing efficient builds and real-time combat maneuvers within constrained spaces. Classified under the mini-game genre, this map is ideal for team-based matches where players can devise meticulous tactics to secure victory rather than casual, lightweight gaming. The progression style is fundamentally based on resource gathering and unit production, yet it encourages focus on individual unit movement and engagement timing over sheer numbers. Examining the overall map layout, entry points and defensive positions are distributed around the player start locations, making cooperative movement and coordination with allies essential while preparing for enemy harassment and attacks. True to its direct title emphasizing production and control, the ability to optimally allocate resources while minimizing losses during skirmishes serves as the decisive factor determining victory or defeat. Demanding swift decision-making and mechanical execution, it offers a refreshing experience for players who enjoy standard melee games or control-practice custom maps. Before playing this map, coordinating role distribution and strategic direction with teammates in advance is crucial. Depending on whether a player focuses on production or leads early control skirmishes, the flow of the game can change dramatically. It is highly recommended for users who prefer cooperative play and want to test their skills while synchronizing with friends. Because players must master both precise control and production timing, they will find joy in discovering their own optimized builds and combat know-how through repeated playthroughs.
맵 선택 가이드
태그는 맵의 핵심 특징을 빠르게 설명하지만 제작 버전마다 규칙이 다를 수 있습니다. 상세 설명에서 권장 인원, 난이도, 플레이 시간과 버전을 함께 확인한 뒤 다운로드하세요.