
리소스 전쟁 스타크래프트 맵 모음
'리소스 전쟁' 태그가 등록된 맵을 모았습니다. 장르 하나로 찾기 어려운 플레이 방식, 난이도와 특징을 중심으로 인기 맵과 최신 맵을 비교해 보세요.
- 등록 맵
- 2개
- 누적 다운로드
- 0
- 누적 조회
- 64
인기 맵
다운로드와 조회 반응이 높은 맵입니다.
망가진 황무지의 노움 (Mangy Desert Gnomes)
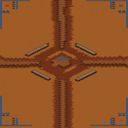
스타크래프트 브루드워의 4인용 밀리 맵 '망가진 황무지의 노움(Mangy Desert Gnomes)'은 황량한 사막 지형을 배경으로 한 경쟁형 맵으로, 플레이어 간Resource 기반 경쟁과 전략적 위치 선정이 핵심인 재미를 제공합니다. 맵의 중앙에는 거대한 오아시스가 자리 잡고 있으며, 각 플레이어의 시작 지점은 사막의 가장자리를 따라 배치되어 있습니다. 맵의 특징은 넓은 개활지와 제한된 mineral field 분포로,Resource 확보를 둘러싼 긴장감이 throughout gameplay 내내 지속됩니다. 시작 지점 주변의 미네랄과 가스 채취장소는 상대방과의 Resource 전쟁에서 유리한 위치를 점하기 위해 빠른 판단과 이동이 요구됩니다. 또한, 맵의 중앙 오아시스는 strategic choke point 역할을 하며,Resource 확보와 동시에 상대방을 견제할 수 있는 요충지가 됩니다. 초반에는Resource 확보와 유닛 생산에 집중해야 하지만, 중반으로 접어들수록 상대방의Resource 채취를 방해하거나 방어선을 구축하는 등 다양한 전략이 요구됩니다. 맵의 균형 잡힌 구조는 초보자와 숙련자 모두에게 공정한 경쟁을 제공하며,Resource 관리와 위치 선정의 중요성이 돋보이는 classic한 4인용 밀리 맵입니다. 특히Resource 확보 경쟁과 함께Resource를 둘러싼 전략적 플레이가 가능한 점이 이 맵의 큰 매력이라 할 수 있습니다. 초보자도 쉽게 접근할 수 있지만,Resource 관리와 위치 선정을 얼마나 잘하느냐에 따라 승패가 갈릴 수 있는 depth 있는 맵입니다. 플레이 전에는Resource 분포와 각 시작 지점의 입구 형태를 반드시 확인하고,Resource 확보를 위한 초반 전략을 미리 세워두는 것이 좋습니다. 또한,중앙 오아시스를 둘러싼 지형이 유닛 이동에 미치는 영향을 숙지하고,Resource 확보와 방어선을 어떻게 구축할 것인지에 대한 계획을 미리 세워두면 보다 수월한 플레이가 가능합니다. StarCraft: Brood War’s four-player melee map "Mangy Desert Gnomes" is a competitive map set in a desolate desert landscape, offering fun through player resource competition and strategic positioning. At its center lies a massive oasis, while each player’s starting position is arranged along the desert’s edge. The map’s defining traits—a vast open area and sparsely distributed mineral fields—keep the tension over resource control alive throughout the entire game. Quick decisions and movement are required to secure the minerals and gas geysers near your starting base, as they become key battlegrounds in the early resource war. The central oasis also serves as a strategic choke point, acting as a vital hub where you can contest resources while pressuring opponents. Early on, focus on gathering resources and producing units, but as the game progresses, you’ll need to disrupt enemy resource gathering or fortify defensive lines with varied tactics. The map’s balanced design ensures fair competition for both beginners and veterans, highlighting the importance of resource management and positioning in this classic four-player melee map. Its standout appeal lies in combining resource competition with strategic plays centered around those resources. While accessible to newcomers, victory hinges on how well you handle resource control and positioning, giving the map real depth. Before playing, check the resource distribution and the shape of each starting base’s entrance, and prepare an early-game strategy for securing resources. Familiarize yourself with how the terrain around the central oasis affects unit movement, and plan ahead for both resource gathering and defensive line construction to make your gameplay smoother.
튜고워 파이널 (Build TuG-O-WaR FinaL)
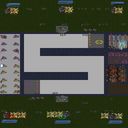
스타크래프트 브루드워의 유즈맵 〈Build TuG-O-WaR FinaL〉은 리소스 경쟁과 건설, 전투가 혼합된 독특한 장르의 맵으로, 플레이어는 초반 자원 수집을 통해 본진을 확장하고 병력을 양성해야 한다. 맵은 거대한 평야 위에 흩어진 미네랄 멀티와 가스 멀티를 중심으로 구성되어 있으며, 중앙에는 다양한 진영의 병력이 배치되어 있어 초반부터 빈번한 전투가 유발된다. 특히 건물 건설 속도가 빠르고, 자원 채취 효율도 높아 빠르게 병력을 모아 공격할 수 있는 구조로 설계되어 있다. 게임의 핵심은 ‘Build’를 통한 발전과 ‘TuG(당기기)’라는 전투 시스템에 있다. 플레이어는 초반에 자원을 확보한 후, 본진을 방어하는 동시에 멀티를 확보해야 하며, 상대방의 멀티를 점령하거나 파괴하는 것이 승리 조건으로 추정된다. 맵 곳곳에 배치된 중립 건물을 점령할 경우 추가 자원과 병력 생산이 가능해지며, 특히 중앙의 대형 건물을 차지하면 전황을 뒤집을 수 있는 전략적 이점을 제공한다. 전투는 주로 지상 유닛 위주로 진행되며, 공중 유닛도 일부 배치되어 있어 공중 방어와 대공 유닛 생산도 중요하다. 초보자의 경우 빠르게 멀티를 확보하고 방어 타워를 건설하는 것이 중요하며, 중수 이상은 상대방의 멀티를 공격하거나 중앙의 대형 건물을 선점하는 전략을 구사해야 한다. 맵의 밸런스는Resource와 Build의 조합으로 인해 상당히 복잡해질 수 있어, 초반 자원 확보와 멀티 관리 능력이 승패를 좌우할 가능성이 크다. 또한, 건물 건설 제한이나 자원 제한 같은 특수 규칙이 있는지는 명확하지 않지만, 빠른 진행을 위해선 자원 효율성을 높이는 것이 중요하다. 이 맵은 특히 건설과 전투가 동시에 진행되는 독특한 재미를 제공하며, 초반부터 끊임없이 몰아치는 전투와 본진 방어가 인상적이다. 플레이어는 자원 관리와 전략적 건물 점거를 동시에 수행해야 하므로, 멀티태스킹 능력이 요구된다. 맵의 디자인 또한 넓은 평야와 중립 건물의 배치로 인해 전략적 깊이를 더하며, 한 번의 실수가 치명적일 수 있어 신중한 플레이가 필요하다. 초보자보다는 중수 이상의 플레이어에게 추천되는 맵으로, 전략적 사고와 빠른 판단력이 요구되는 하드코어한 유즈맵이라고 할 수 있다. 플레이 전 확인해야 할 점은 맵 곳곳의 중립 건물을 점령할 경우 얻을 수 있는 추가 자원과 병력 생산 가능 여부, 그리고 상대방의 멀티를 파괴하는 것이 승리 조건인지 여부다. 또한, 건물 건설 속도나 자원 채취 효율 같은 밸런스 요소도 미리 확인해 두는 것이 좋다. 맵의 난이도는 다소 높지만, 그만큼 전략적 재미와 긴장감이 뛰어난 맵으로, 여러 번 플레이해 볼 만한 가치가 있다. StarCraft: Brood War's custom map *Build TuG-O-WaR FinaL* blends resource competition, construction, and combat into a unique genre. Players must gather resources early to expand their bases and train armies. The map features scattered mineral and gas expansions across a vast plain, with central forces from multiple factions triggering frequent early skirmishes. Designed for rapid building construction and efficient resource gathering, it allows players to quickly amass forces for attacks. The core gameplay revolves around progression through "Build" mechanics and the "TuG" (tug-of-war) combat system. Players secure resources early, defend their bases, and capture expansions while aiming to seize or destroy enemy multi-bases—likely the victory condition. Neutral buildings scattered across the map provide additional resources and unit production when occupied, with control of the central large structure offering a decisive strategic advantage. Battles primarily involve ground units, though some air units are present, making air defense and anti-air production crucial. Beginners should prioritize securing expansions and building defensive towers, while intermediate to advanced players can employ strategies like attacking enemy expansions or seizing the central large structure. The map's balance, heavily influenced by resource and construction mechanics, can become complex, with early resource control and expansion management often determining the outcome. While special rules like construction or resource limits aren't explicitly mentioned, optimizing resource efficiency is key for fast-paced play. This map uniquely combines construction and combat, delivering an engaging experience with relentless early assaults and base defense. Players must juggle resource management and strategic building control, requiring strong multitasking skills. The design—featuring wide open plains and neutral structures—adds depth, making even small mistakes costly and demanding careful play. It’s best suited for intermediate to advanced players, offering a hardcore experience that demands strategic thinking and quick decisions. Before playing, check whether occupying neutral buildings grants extra resources and unit production, and confirm if destroying enemy expansions is the victory condition. Also verify balance factors like building speed and resource gathering efficiency. While challenging, the map excels in strategic depth and tension, making it worth multiple playthroughs.
최근 등록된 맵
새로 추가된 파일과 버전을 확인하세요.
튜고워 파이널 (Build TuG-O-WaR FinaL)
스타크래프트 브루드워의 유즈맵 〈Build TuG-O-WaR FinaL〉은 리소스 경쟁과 건설, 전투가 혼합된 독특한 장르의 맵으로, 플레이어는 초반 자원 수집을 통해 본진을 확장하고 병력을 양성해야 한다. 맵은 거대한 평야 위에 흩어진 미네랄 멀티와 가스 멀티를 중심으로 구성되어 있으며, 중앙에는 다양한 진영의 병력이 배치되어 있어 초반부터 빈번한 전투가 유발된다. 특히 건물 건설 속도가 빠르고, 자원 채취 효율도 높아 빠르게 병력을 모아 공격할 수 있는 구조로 설계되어 있다. 게임의 핵심은 ‘Build’를 통한 발전과 ‘TuG(당기기)’라는 전투 시스템에 있다. 플레이어는 초반에 자원을 확보한 후, 본진을 방어하는 동시에 멀티를 확보해야 하며, 상대방의 멀티를 점령하거나 파괴하는 것이 승리 조건으로 추정된다. 맵 곳곳에 배치된 중립 건물을 점령할 경우 추가 자원과 병력 생산이 가능해지며, 특히 중앙의 대형 건물을 차지하면 전황을 뒤집을 수 있는 전략적 이점을 제공한다. 전투는 주로 지상 유닛 위주로 진행되며, 공중 유닛도 일부 배치되어 있어 공중 방어와 대공 유닛 생산도 중요하다. 초보자의 경우 빠르게 멀티를 확보하고 방어 타워를 건설하는 것이 중요하며, 중수 이상은 상대방의 멀티를 공격하거나 중앙의 대형 건물을 선점하는 전략을 구사해야 한다. 맵의 밸런스는Resource와 Build의 조합으로 인해 상당히 복잡해질 수 있어, 초반 자원 확보와 멀티 관리 능력이 승패를 좌우할 가능성이 크다. 또한, 건물 건설 제한이나 자원 제한 같은 특수 규칙이 있는지는 명확하지 않지만, 빠른 진행을 위해선 자원 효율성을 높이는 것이 중요하다. 이 맵은 특히 건설과 전투가 동시에 진행되는 독특한 재미를 제공하며, 초반부터 끊임없이 몰아치는 전투와 본진 방어가 인상적이다. 플레이어는 자원 관리와 전략적 건물 점거를 동시에 수행해야 하므로, 멀티태스킹 능력이 요구된다. 맵의 디자인 또한 넓은 평야와 중립 건물의 배치로 인해 전략적 깊이를 더하며, 한 번의 실수가 치명적일 수 있어 신중한 플레이가 필요하다. 초보자보다는 중수 이상의 플레이어에게 추천되는 맵으로, 전략적 사고와 빠른 판단력이 요구되는 하드코어한 유즈맵이라고 할 수 있다. 플레이 전 확인해야 할 점은 맵 곳곳의 중립 건물을 점령할 경우 얻을 수 있는 추가 자원과 병력 생산 가능 여부, 그리고 상대방의 멀티를 파괴하는 것이 승리 조건인지 여부다. 또한, 건물 건설 속도나 자원 채취 효율 같은 밸런스 요소도 미리 확인해 두는 것이 좋다. 맵의 난이도는 다소 높지만, 그만큼 전략적 재미와 긴장감이 뛰어난 맵으로, 여러 번 플레이해 볼 만한 가치가 있다. StarCraft: Brood War's custom map *Build TuG-O-WaR FinaL* blends resource competition, construction, and combat into a unique genre. Players must gather resources early to expand their bases and train armies. The map features scattered mineral and gas expansions across a vast plain, with central forces from multiple factions triggering frequent early skirmishes. Designed for rapid building construction and efficient resource gathering, it allows players to quickly amass forces for attacks. The core gameplay revolves around progression through "Build" mechanics and the "TuG" (tug-of-war) combat system. Players secure resources early, defend their bases, and capture expansions while aiming to seize or destroy enemy multi-bases—likely the victory condition. Neutral buildings scattered across the map provide additional resources and unit production when occupied, with control of the central large structure offering a decisive strategic advantage. Battles primarily involve ground units, though some air units are present, making air defense and anti-air production crucial. Beginners should prioritize securing expansions and building defensive towers, while intermediate to advanced players can employ strategies like attacking enemy expansions or seizing the central large structure. The map's balance, heavily influenced by resource and construction mechanics, can become complex, with early resource control and expansion management often determining the outcome. While special rules like construction or resource limits aren't explicitly mentioned, optimizing resource efficiency is key for fast-paced play. This map uniquely combines construction and combat, delivering an engaging experience with relentless early assaults and base defense. Players must juggle resource management and strategic building control, requiring strong multitasking skills. The design—featuring wide open plains and neutral structures—adds depth, making even small mistakes costly and demanding careful play. It’s best suited for intermediate to advanced players, offering a hardcore experience that demands strategic thinking and quick decisions. Before playing, check whether occupying neutral buildings grants extra resources and unit production, and confirm if destroying enemy expansions is the victory condition. Also verify balance factors like building speed and resource gathering efficiency. While challenging, the map excels in strategic depth and tension, making it worth multiple playthroughs.
망가진 황무지의 노움 (Mangy Desert Gnomes)
스타크래프트 브루드워의 4인용 밀리 맵 '망가진 황무지의 노움(Mangy Desert Gnomes)'은 황량한 사막 지형을 배경으로 한 경쟁형 맵으로, 플레이어 간Resource 기반 경쟁과 전략적 위치 선정이 핵심인 재미를 제공합니다. 맵의 중앙에는 거대한 오아시스가 자리 잡고 있으며, 각 플레이어의 시작 지점은 사막의 가장자리를 따라 배치되어 있습니다. 맵의 특징은 넓은 개활지와 제한된 mineral field 분포로,Resource 확보를 둘러싼 긴장감이 throughout gameplay 내내 지속됩니다. 시작 지점 주변의 미네랄과 가스 채취장소는 상대방과의 Resource 전쟁에서 유리한 위치를 점하기 위해 빠른 판단과 이동이 요구됩니다. 또한, 맵의 중앙 오아시스는 strategic choke point 역할을 하며,Resource 확보와 동시에 상대방을 견제할 수 있는 요충지가 됩니다. 초반에는Resource 확보와 유닛 생산에 집중해야 하지만, 중반으로 접어들수록 상대방의Resource 채취를 방해하거나 방어선을 구축하는 등 다양한 전략이 요구됩니다. 맵의 균형 잡힌 구조는 초보자와 숙련자 모두에게 공정한 경쟁을 제공하며,Resource 관리와 위치 선정의 중요성이 돋보이는 classic한 4인용 밀리 맵입니다. 특히Resource 확보 경쟁과 함께Resource를 둘러싼 전략적 플레이가 가능한 점이 이 맵의 큰 매력이라 할 수 있습니다. 초보자도 쉽게 접근할 수 있지만,Resource 관리와 위치 선정을 얼마나 잘하느냐에 따라 승패가 갈릴 수 있는 depth 있는 맵입니다. 플레이 전에는Resource 분포와 각 시작 지점의 입구 형태를 반드시 확인하고,Resource 확보를 위한 초반 전략을 미리 세워두는 것이 좋습니다. 또한,중앙 오아시스를 둘러싼 지형이 유닛 이동에 미치는 영향을 숙지하고,Resource 확보와 방어선을 어떻게 구축할 것인지에 대한 계획을 미리 세워두면 보다 수월한 플레이가 가능합니다. StarCraft: Brood War’s four-player melee map "Mangy Desert Gnomes" is a competitive map set in a desolate desert landscape, offering fun through player resource competition and strategic positioning. At its center lies a massive oasis, while each player’s starting position is arranged along the desert’s edge. The map’s defining traits—a vast open area and sparsely distributed mineral fields—keep the tension over resource control alive throughout the entire game. Quick decisions and movement are required to secure the minerals and gas geysers near your starting base, as they become key battlegrounds in the early resource war. The central oasis also serves as a strategic choke point, acting as a vital hub where you can contest resources while pressuring opponents. Early on, focus on gathering resources and producing units, but as the game progresses, you’ll need to disrupt enemy resource gathering or fortify defensive lines with varied tactics. The map’s balanced design ensures fair competition for both beginners and veterans, highlighting the importance of resource management and positioning in this classic four-player melee map. Its standout appeal lies in combining resource competition with strategic plays centered around those resources. While accessible to newcomers, victory hinges on how well you handle resource control and positioning, giving the map real depth. Before playing, check the resource distribution and the shape of each starting base’s entrance, and prepare an early-game strategy for securing resources. Familiarize yourself with how the terrain around the central oasis affects unit movement, and plan ahead for both resource gathering and defensive line construction to make your gameplay smoother.
맵 선택 가이드
태그는 맵의 핵심 특징을 빠르게 설명하지만 제작 버전마다 규칙이 다를 수 있습니다. 상세 설명에서 권장 인원, 난이도, 플레이 시간과 버전을 함께 확인한 뒤 다운로드하세요.