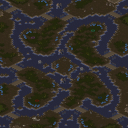
브릿지 앤 브릿지 (Bridge and Bridge)
스타크래프트 브루드워의 ‘Untitled Scenario’는 4인용 밀리 맵으로, 사막 타일셋을 배경으로 한 좁은 다리 구조가 특징적인 맵이다. 맵의 이름은 파일명과 내부 제목이 모두 ‘Untitled Scenario’이지만, 구조상 ‘브릿지 앤 브릿지’라는 파일명의 특징을 고려하면 다리 형태가 맵의 핵심 디자인 요소임을 유추할 수 있다. 내부 설명에서 ‘모든 적 건물 파괴’를 목표로 제시하고 있어, 기본적인 밀리 전투가 주 목표임을 알 수 있다. 이 맵의 가장 큰 특징은 좁고 긴 다리 구조로, 플레이어들은 시작 지점에서 출발해 중앙의 좁은 다리를 통해 적과 조우하게 된다. 다리 양쪽에는 소량의 미네랄과 가스가 배치되어 있어 초반 자원 확보가 가능하며, 다리 중앙에는 일종의 ‘분기점’이 존재하는데, 여기서는 맵의 구조상 우회로가 없으므로 자연스럽게 전투가 발생한다. 맵의 크기는 4096x4096으로 넓은 편이지만, 좁은 다리 구조로 인해 전투는 비교적 밀집된 형태로 진행된다. 플레이 방식은 기본적인 밀리 전투에 가까우며, 다리 위에서 벌어지는 전투는 시야가 제한되지 않지만, 좁은IDTH로 인해 유닛의 기동성이 제한된다. 따라서 테란의 경우 시즈 탱크나 골리앗 같은 дальних 공격 유닛이 유리할 수 있으며, 저그와 프로토스는 다리 위에서 다수 유닛을 활용한 컨트롤이 중요해진다. 맵의 밸런스는 다리 구조상 중앙 교두보를 누가 먼저 차지하느냐에 따라 승부가 갈릴 가능성이 높으며, 초반 러시나 조이기 전략이 유효하게 작용할 수 있다. 추천 대상은 스타크래프트 브루드워의 밀리 맵을 즐기는 플레이어들로, 좁은IDTH에서 벌어지는 전투가 주는 긴장감과 전략적 선택을 좋아하는 유저들에게 적합하다. 특히 다리 위에서 벌어지는 전투는 기동성과 유닛 컨트롤이 중요한데, 초보자는 어려울 수 있으나 중간 이상의 유저라면 즐길 수 있는 구조다. 또한, 맵의 디자인 자체가 단순하면서도 전략적인 선택을 강제하기 때문에, 밀리 맵의 기본기를 다지며 플레이하고 싶은 유저들에게 추천할 만하다. 플레이 전 확인해야 할 포인트는 맵의 중앙 교두보 위치와 다리 양쪽의 자원 배치, serta 다리 구조상 우회로가 없다는 점이다. 이 맵에서는 초반 자원 확보와 동시에 다리의 통제권을 누가 먼저 점유하는지가 승패를 좌우할 수 있으므로, 시작 직후의 전략적 움직임이 중요하다. This StarCraft: Brood War map, titled 'Untitled Scenario' (file name: Bridge and Bridge.scm), is a 4-player melee map set against a desert tileset, featuring a narrow bridge structure as its defining design. While the internal title and display name both read 'Untitled Scenario,' the file name implies that the bridge layout is the core visual and strategic element of the map. The internal description states 'Destroy all enemy buildings,' confirming that the primary objective aligns with standard melee combat. The most distinctive feature of this map is its elongated bridge layout, which forces players to traverse a narrow path to reach opponents. Each starting position is connected by a single bridge, with minimal mineral and gas deposits scattered along the sides for initial resource gathering. The central section of the bridge appears to have a slight widening, though no alternative routes exist—meaning all encounters occur in a constrained space. Gameplay revolves around standard melee mechanics, but the tight bridge structure significantly impacts unit mobility and positioning. Terran players may find Siege Tanks or Goliaths advantageous due to their ranged capabilities, while Zerg and Protoss players will need to rely on coordinated unit control to navigate the constrained battlefield. Map balance hinges heavily on control of the central bridgehead, as securing this position early can dictate the flow of battle. Early rushes or choke-point strategies are likely to be effective here. This map is ideal for players who enjoy StarCraft: Brood War melee maps, particularly those who appreciate the strategic depth and heightened tension of combat in narrow corridors. While the bridge design is simple, it forces players to make critical decisions about unit positioning and resource management. Beginners might find the tight space challenging, but intermediate and advanced players will appreciate the tactical depth. Before playing, check the central bridgehead location, resource distribution near the bridge, and confirm the absence of alternative routes. Early control of the bridge and immediate strategic decisions will heavily influence the match's outcome.
다운로드 0 · 조회 15 · 댓글 0