
난이도 극악 스타크래프트 맵 모음
'난이도 극악' 태그가 등록된 맵을 모았습니다. 장르 하나로 찾기 어려운 플레이 방식, 난이도와 특징을 중심으로 인기 맵과 최신 맵을 비교해 보세요.
- 등록 맵
- 2개
- 누적 다운로드
- 0
- 누적 조회
- 85
인기 맵
다운로드와 조회 반응이 높은 맵입니다.
썬큰 디펜스 10웨이 14.9 임파서블 (SunkenD 10Way 14.9 Impossible)
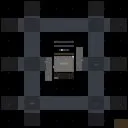
스타크래프트 브루드워의 유즈맵 장르 중에서도 어려운 난이도로 정평이 난 디펜스형 맵 ‘썬큰 디펜스 10웨이 14.9 임파서블(SunkenD 10Way 14.9 Impossible)’은 여섯 명의 플레이어가 한 팀으로 뭉쳐 상대를 몰아붙이는 ‘컴퓨터 상대 디펜스’ 유형의 맵이다. 이 맵은 총 스물다섯 개의 레벨을 제공하며, 후반부로 갈수록 난이도가 급격히 상승하는 구조로 구성되어 있다. 초반에는 비교적 손쉽게 넘길 수 있는 웨이브들이 등장하지만, 중반부부터는 ‘MidImpossible’이라는 설명이 말해주듯 중급자도 버겁기 시작하며, 후반부에서는 ‘Backwash’라도 살아남을 수 없을 정도의 극악한 상황에 직면하게 된다. 맵의 중앙부는 넓은 평지로 펼쳐져 있으며, 외곽을 따라 방어 건물을 배치할 수 있는 공간이 마련되어 있다. 플레이어들은 이 공간을 활용해 방어선을 구축하고, 끊임없이 몰려오는 적들을 상대로 버티며 레벨을 클리어해야 한다. 맵의 분위기는 우주 테마로 설정되어 있으며, 어두운 배경에 빛나는 지형지물이 어우러져 atmospherically한 분위기를 연출한다. 이 맵은 초보가 쉽게 접근할 수 있는 난이도는 아니며, 적어도 중간 정도의 실력을 갖춘 플레이어들이 도전해야만 제 궤도에 오를 수 있다. 특히 방어 건물의 배치와 자원 관리에 신경을 써야 하며, 각 레벨의 특징을 숙지하고 대응 전략을 세우는 것이 관건이다. 초반에는 자원을 넉넉히 확보해 방어 건물과 유닛을 빠르게 확보하는 것이 중요하며, 중반부부터는 적의 웨이브 패턴을 분석해 방어 라인을 효율적으로 조정해야 한다. 이 맵은 디펜스 매니아뿐만 아니라, 스타크래프트의 전략적 깊이를 경험하고 싶은 플레이어들에게도 추천할 만한佳作이다. 다만, 이 맵은 난이도가 상당히 높기 때문에 처음 도전하는 플레이어는 낮은 레벨부터 시작해 점차 실력을 쌓아나가는 것이 좋다. 맵의 구조상 중앙 평지가 넓기 때문에 방어 건물의 배치에 따라 난이도가 크게 달라질 수 있으므로, 각 레벨의 특성을 잘 살려 전략을 세우는 것이 필수적이다. StarCraft: Brood War's custom map genre includes "Sunken Defense 10Way 14.9 Impossible," a notoriously difficult defense-style map where six players team up to fend off relentless waves of enemies. The map features 25 levels, with difficulty escalating sharply as you progress. Early waves are manageable, but mid-game introduces "MidImpossible" waves that even intermediate players struggle with, while late-game pushes reach "Backwash" levels of brutality. The central area is a vast open plain, flanked by outer zones where defensive structures can be placed to build your perimeter. Set in a cosmic theme, the map’s dark backdrop and glowing terrain create an atmospheric experience. This isn’t a beginner-friendly challenge—players need at least intermediate skill to tackle it effectively. Success hinges on smart building placement, resource management, and adapting to each wave’s patterns. Early levels demand securing resources quickly to reinforce defenses, while later stages require analyzing enemy attack routes to optimize your lines. A standout title for defense enthusiasts and those seeking deeper strategic challenges in StarCraft, it’s best approached gradually. The wide central plain means defensive setups can make or break your run, so tailoring strategies to each level’s quirks is essential.
레벨컴까기 후반극악 1.2 (Level Compucker Extreme Final Stage 1.2)
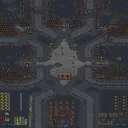
스타크래프트 브루드워의 인기 장르 중 하나인 ‘컴까기’ 유즈맵 중에서도 어려운 난이도로 정평이 난 ‘레벨컴까기후반극악 1.2 (100업)’은, 이름 그대로 후반부로 접어들수록 극악의 난이도를 자랑하는 맵이다. 맵의 전체적인 구도는 중앙에 위치한 본진과 그 주변을 에워싼 수많은 적의 멀티와 입구, 그리고 곳곳에 배치된 방어 건물과 자원 지역으로 구성되어 있다. 플레이어는 5명의 유저로 진행되며, 각자 독자적인 기지 운영과 방어 전략을 펼쳐야 한다. 맵의 특징은 후반부로 갈수록 쏟아지는 링링, 저글링, 뮤탈리스크, 울트라리스크 등 다양한 종류의 적군 조합과 함께, 순간적인 피지컬과 전략적 판단이 요구된다는 점이다. 특히 초반 안정화와 중반 자원 확보가 후반 극악의 난이도를 결정짓는 핵심 요소로 보인다. 또한, 맵의 배경은 우주 테마로 설정되어 있어, 시야 확보와 입구 관리 면에서 추가적인 신경이 필요한 구조로 설계된 듯하다. 이 맵은 기본적인 디펜스 장르의 틀을 유지하면서도, ‘레벨’과 ‘업그레이드’ 시스템을 접목시켜 플레이어의 성장을 직접 체감할 수 있도록 만든 점이 특징이다. 초보자는 물론, 숙련자도 쉽게 осво기 어려운 난이도와 긴 플레이 시간으로 인해, 일종의 ‘도전 과제’ 같은 매력이 있는 맵으로 평가된다. 본진 주변의 입구 수와 건물 배치, 적군의 물량 증가 패턴 등을 미리 숙지하고, 효율적인 자원 운용과 방어 건물 배치 전략을 수립하는 것이 성공의 열쇠가 될 것이다. This StarCraft: Brood War custom map, ‘레벨컴까기후반극악 1.2 (100업)’, stands out as one of the most challenging ‘compete against AI’ (compucker) maps in the genre. The layout features a central player base surrounded by dense enemy expansions and choke points, with scattered resource clusters and defensive structures. Designed for five players, each must manage their economy, upgrades, and defenses while facing increasingly brutal AI waves. The map’s difficulty ramps up significantly in the latter stages, where players must deal with relentless swarms of Zerglings, Hydralisks, Mutalisks, and Ultralisks—requiring sharp micro-management and adaptive strategies. The space-themed background adds a layer of complexity, as vision control and choke point defense become critical. Unlike typical UMS defense maps, this title incorporates a leveling and upgrade system, rewarding players’ progression with stronger units and abilities. While the extreme difficulty and prolonged playtime make it inaccessible for beginners, it offers a rewarding challenge for experienced players seeking a true test of skill. Success hinges on early-game stability, smart resource allocation, and anticipating the AI’s evolving attack patterns, especially at higher levels where waves become denser and more diverse.
최근 등록된 맵
새로 추가된 파일과 버전을 확인하세요.
썬큰 디펜스 10웨이 14.9 임파서블 (SunkenD 10Way 14.9 Impossible)
스타크래프트 브루드워의 유즈맵 장르 중에서도 어려운 난이도로 정평이 난 디펜스형 맵 ‘썬큰 디펜스 10웨이 14.9 임파서블(SunkenD 10Way 14.9 Impossible)’은 여섯 명의 플레이어가 한 팀으로 뭉쳐 상대를 몰아붙이는 ‘컴퓨터 상대 디펜스’ 유형의 맵이다. 이 맵은 총 스물다섯 개의 레벨을 제공하며, 후반부로 갈수록 난이도가 급격히 상승하는 구조로 구성되어 있다. 초반에는 비교적 손쉽게 넘길 수 있는 웨이브들이 등장하지만, 중반부부터는 ‘MidImpossible’이라는 설명이 말해주듯 중급자도 버겁기 시작하며, 후반부에서는 ‘Backwash’라도 살아남을 수 없을 정도의 극악한 상황에 직면하게 된다. 맵의 중앙부는 넓은 평지로 펼쳐져 있으며, 외곽을 따라 방어 건물을 배치할 수 있는 공간이 마련되어 있다. 플레이어들은 이 공간을 활용해 방어선을 구축하고, 끊임없이 몰려오는 적들을 상대로 버티며 레벨을 클리어해야 한다. 맵의 분위기는 우주 테마로 설정되어 있으며, 어두운 배경에 빛나는 지형지물이 어우러져 atmospherically한 분위기를 연출한다. 이 맵은 초보가 쉽게 접근할 수 있는 난이도는 아니며, 적어도 중간 정도의 실력을 갖춘 플레이어들이 도전해야만 제 궤도에 오를 수 있다. 특히 방어 건물의 배치와 자원 관리에 신경을 써야 하며, 각 레벨의 특징을 숙지하고 대응 전략을 세우는 것이 관건이다. 초반에는 자원을 넉넉히 확보해 방어 건물과 유닛을 빠르게 확보하는 것이 중요하며, 중반부부터는 적의 웨이브 패턴을 분석해 방어 라인을 효율적으로 조정해야 한다. 이 맵은 디펜스 매니아뿐만 아니라, 스타크래프트의 전략적 깊이를 경험하고 싶은 플레이어들에게도 추천할 만한佳作이다. 다만, 이 맵은 난이도가 상당히 높기 때문에 처음 도전하는 플레이어는 낮은 레벨부터 시작해 점차 실력을 쌓아나가는 것이 좋다. 맵의 구조상 중앙 평지가 넓기 때문에 방어 건물의 배치에 따라 난이도가 크게 달라질 수 있으므로, 각 레벨의 특성을 잘 살려 전략을 세우는 것이 필수적이다. StarCraft: Brood War's custom map genre includes "Sunken Defense 10Way 14.9 Impossible," a notoriously difficult defense-style map where six players team up to fend off relentless waves of enemies. The map features 25 levels, with difficulty escalating sharply as you progress. Early waves are manageable, but mid-game introduces "MidImpossible" waves that even intermediate players struggle with, while late-game pushes reach "Backwash" levels of brutality. The central area is a vast open plain, flanked by outer zones where defensive structures can be placed to build your perimeter. Set in a cosmic theme, the map’s dark backdrop and glowing terrain create an atmospheric experience. This isn’t a beginner-friendly challenge—players need at least intermediate skill to tackle it effectively. Success hinges on smart building placement, resource management, and adapting to each wave’s patterns. Early levels demand securing resources quickly to reinforce defenses, while later stages require analyzing enemy attack routes to optimize your lines. A standout title for defense enthusiasts and those seeking deeper strategic challenges in StarCraft, it’s best approached gradually. The wide central plain means defensive setups can make or break your run, so tailoring strategies to each level’s quirks is essential.
레벨컴까기 후반극악 1.2 (Level Compucker Extreme Final Stage 1.2)
스타크래프트 브루드워의 인기 장르 중 하나인 ‘컴까기’ 유즈맵 중에서도 어려운 난이도로 정평이 난 ‘레벨컴까기후반극악 1.2 (100업)’은, 이름 그대로 후반부로 접어들수록 극악의 난이도를 자랑하는 맵이다. 맵의 전체적인 구도는 중앙에 위치한 본진과 그 주변을 에워싼 수많은 적의 멀티와 입구, 그리고 곳곳에 배치된 방어 건물과 자원 지역으로 구성되어 있다. 플레이어는 5명의 유저로 진행되며, 각자 독자적인 기지 운영과 방어 전략을 펼쳐야 한다. 맵의 특징은 후반부로 갈수록 쏟아지는 링링, 저글링, 뮤탈리스크, 울트라리스크 등 다양한 종류의 적군 조합과 함께, 순간적인 피지컬과 전략적 판단이 요구된다는 점이다. 특히 초반 안정화와 중반 자원 확보가 후반 극악의 난이도를 결정짓는 핵심 요소로 보인다. 또한, 맵의 배경은 우주 테마로 설정되어 있어, 시야 확보와 입구 관리 면에서 추가적인 신경이 필요한 구조로 설계된 듯하다. 이 맵은 기본적인 디펜스 장르의 틀을 유지하면서도, ‘레벨’과 ‘업그레이드’ 시스템을 접목시켜 플레이어의 성장을 직접 체감할 수 있도록 만든 점이 특징이다. 초보자는 물론, 숙련자도 쉽게 осво기 어려운 난이도와 긴 플레이 시간으로 인해, 일종의 ‘도전 과제’ 같은 매력이 있는 맵으로 평가된다. 본진 주변의 입구 수와 건물 배치, 적군의 물량 증가 패턴 등을 미리 숙지하고, 효율적인 자원 운용과 방어 건물 배치 전략을 수립하는 것이 성공의 열쇠가 될 것이다. This StarCraft: Brood War custom map, ‘레벨컴까기후반극악 1.2 (100업)’, stands out as one of the most challenging ‘compete against AI’ (compucker) maps in the genre. The layout features a central player base surrounded by dense enemy expansions and choke points, with scattered resource clusters and defensive structures. Designed for five players, each must manage their economy, upgrades, and defenses while facing increasingly brutal AI waves. The map’s difficulty ramps up significantly in the latter stages, where players must deal with relentless swarms of Zerglings, Hydralisks, Mutalisks, and Ultralisks—requiring sharp micro-management and adaptive strategies. The space-themed background adds a layer of complexity, as vision control and choke point defense become critical. Unlike typical UMS defense maps, this title incorporates a leveling and upgrade system, rewarding players’ progression with stronger units and abilities. While the extreme difficulty and prolonged playtime make it inaccessible for beginners, it offers a rewarding challenge for experienced players seeking a true test of skill. Success hinges on early-game stability, smart resource allocation, and anticipating the AI’s evolving attack patterns, especially at higher levels where waves become denser and more diverse.
맵 선택 가이드
태그는 맵의 핵심 특징을 빠르게 설명하지만 제작 버전마다 규칙이 다를 수 있습니다. 상세 설명에서 권장 인원, 난이도, 플레이 시간과 버전을 함께 확인한 뒤 다운로드하세요.