
광물 채굴 스타크래프트 맵 모음
'광물 채굴' 태그가 등록된 맵을 모았습니다. 장르 하나로 찾기 어려운 플레이 방식, 난이도와 특징을 중심으로 인기 맵과 최신 맵을 비교해 보세요.
- 등록 맵
- 4개
- 누적 다운로드
- 0
- 누적 조회
- 80
인기 맵
다운로드와 조회 반응이 높은 맵입니다.
마인크래프트 (MineCraft)
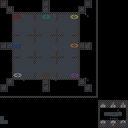
스타크래프트의 유즈맵 중 하나인 <마인크래프트>는 이름에서 유추할 수 있듯이 광물 채굴과 전략적 요소를 결합한 디펜스 형식의 맵이다. 맵 상단에는 거대한 광물 광맥이 펼쳐져 있으며, 중앙에는 광물을 채굴할 수 있는 장소가 배치되어 있다. 플레이어는 채굴한 광물을 바탕으로 방어 시설과 유닛을 업그레이드하거나 건설하여 적의 공격을 방어해야 한다. 이미지에서 확인되는 빨간색 원 안의 광물 광맥은 채굴의 핵심 포인트로 보이며, 주변의 여러 보라색, 파란색, 초록색, 노란색 등 다양한 색상의 원들은 각각의 주요 자원 포인트나 방어 거점 역할을 추정할 수 있다. 맵의 구조는 중앙을 중심으로 대칭을 이루며, 양쪽 끝의 좁은 통로는 상대방의 진입로를 제한하는 역할을 한다. 이러한 구조는 방어 전략을 세우는 데 중점을 두도록 유도하며, 팀워크가 중요한 요소가 된다. 맵의 진행 방식은 채굴한 광물을 바탕으로 방어塔를 건설하고 유닛을 생산하여 적을 제압하는 방식으로 보인다. 특히, 광물 채굴의 중요성이 강조되어 있어Resource Management(자원 관리)와 Positioning(위치 선점)이 승리의 열쇠가 될 것이다. 초보 플레이어의 경우 광물의 채굴 속도와 방어 시설의 건설 타이밍을 놓치지 않도록 주의해야 하며, 숙련된 플레이어는 자원 우위를 바탕으로 다각적인 전략을 펼쳐야 한다. 맵의 분위기는 SF풍의 우주 타일셋으로 구성되어 있어, 과학적이고 미래적인 분위기가 느껴진다. 맵의 전체적인 밸런스는 채굴과 방어의 균형을 맞추는 데 중점을 두고 있으며, 팀 간의 협동과 통제가 필수적이다. recommandedPlayerCount가 6인 것으로 보아 1:1 대결보다는 3:3 또는 2:2:2 팀전 형태로 진행될 가능성이 높다. 맵의 난이도는 자원 관리와 방어 전략의 중요성에 따라 보통 수준으로 예상되며, 초보자의 경우 적응하는 데 시간이 다소 소요될 수 있다. One of the custom maps in StarCraft, *Minecraft*, combines resource mining and strategic elements in a defense-style format, as suggested by its name. The top of the map features a massive mineral vein, with central locations designated for mining resources. Players must use mined minerals to upgrade or build defensive structures and units to fend off enemy attacks. The red-circled mineral vein in the image appears to be the key mining point, while the surrounding purple, blue, green, and yellow circles likely represent major resource points or defensive strongholds. The map’s structure is symmetrical around the center, with narrow paths at both ends restricting enemy access, encouraging players to focus on defensive strategies and teamwork. The gameplay revolves around constructing defensive towers and producing units using mined resources to overpower opponents. Resource management and positioning are critical, as the map emphasizes the importance of mining speed and the timing of defense construction. Beginners should avoid missing mining efficiency and construction timing, while experienced players can leverage resource advantages to deploy diverse strategies. The map adopts an SF-themed space tileset, creating a futuristic and scientific atmosphere. Its balance prioritizes the equilibrium between mining and defense, requiring strong team coordination and control. With a recommended player count of six, the map is likely designed for team-based formats like 3:3 or 2:2:2 rather than 1v1 matches. The difficulty is moderate, depending on resource management and defense strategy, and beginners may need time to adapt.
![[NEW] 고양이 대 쥐: 광석 전쟁 V11 (Cat vs Mouse: Ore Wars V11) 맵 미리보기](https://cdn-star-data.huzy.net/thumbnail_a3e9e0d88afb4b829e685fdff244aed7.jpg)
[NEW] 고양이 대 쥐: 광석 전쟁 V11 (Cat vs Mouse: Ore Wars V11)
이 맵은 스타크래프트 브루드워의 유즈맵으로, ‘고양이 vs 쥐’ 컨셉의 디펜스 게임입니다. 플레이어는 쥐 무리를 조종해 광물을 채굴하고, 적대적인 고양이와 새끼 고양이, 독수리들을 처치하며 생존을 도모해야 합니다. 중앙에 위치한 광물 지대를 중심으로 맵이 구성되어 있으며, 광물을 채굴할수록 보상을 획득해 아이템을 구매하거나 전력을 강화할 수 있습니다. 적 몬스터들은 일정 주기로 스폰되어 플레이어 기지를 공격해 오며, 이를 효과적으로 방어하지 못하면 기지가 파괴되고 게임이 종료됩니다. 맵의 좌측과 우측에는 플레이어의 본진이 배치되어 있으며, 각 본진은 좁은 길로 연결되어 있어 전략적인 진형 구축이 중요합니다. 특히, 좁은 길목을 활용한 입구막기 전략이 핵심으로, 플레이어는 몬스터의 물량을 어떻게 막아내느냐에 따라 생존 여부가 결정됩니다. 아이템 시스템도 존재하는데, 맵 곳곳에 숨겨진 상자나 특정 조건을 만족하면 얻을 수 있는 아이템을 통해 전투력을 강화하거나 방어 수단을 확보할 수 있습니다. 다만, 아이템의 종류나 사용법에 대한 설명은 맵 내에서 명확히 제공되지 않기 때문에, 처음 플레이하는 유저는 방법을 익히는 데 다소 시간이 걸릴 수 있습니다. 맵의 분위기는 밝고 경쾌한 편이지만, 긴장감 있는 전투가 지속되는 만큼 집중력을 요합니다. 초보자의 경우 몬스터의 패턴을 파악하고, 본진 방어에 중점을 두는 것이 좋습니다. 반면, 숙련된 플레이어는 아이템을 적극 활용해 몬스터를 몰아내거나, 광물 채굴을 통해 경제력을 키우는 등 다양한 전략을 펼쳐볼 수 있습니다. 맵의 난이도는 몬스터의 스폰 속도와 강도에 따라 조절할 수 있도록 설계되어 있으며, 팀 플레이를 지원하지 않는 싱글 플레이 중심의 구조입니다. 전체적으로 ‘생존과Resource 관리’를 중시하는 디펜스 장르의 유즈맵으로, 끊임없는 전투와 전략적 판단이 요구되는 흥미로운 경험을 제공합니다. 광물 채굴과 몬스터 방어의 밸런스가 맵의 핵심으로, 이 두 요소를 어떻게 조율하느냐가 승부의 관건입니다. This map is a StarCraft: Brood War custom game with a "Cat vs. Mouse" defense concept. Players control a group of mice, mining minerals and fighting off hostile cats, kittens, and eagles to survive. The map centers around a mineral-rich area where players can harvest resources to purchase items or upgrade their forces. Enemies spawn periodically and attack the player's base; failing to defend effectively will result in the base being destroyed and the game ending. The player's main bases are located on the left and right sides of the map, connected by narrow paths that require strategic formation-building. Blocking enemy waves at these choke points is crucial, as survival depends on how well players manage incoming attacks. The map also features an item system, with hidden crates or special conditions granting power-ups to enhance combat or defense. However, the map does not clearly explain the types or uses of items, so new players may need time to figure them out. The overall atmosphere is bright and cheerful, but the constant, tense battles demand focus. Beginners should prioritize learning enemy patterns and defending their bases, while experienced players can experiment with item usage, economic expansion through mining, and other advanced strategies. The difficulty can be adjusted based on enemy spawn rates and strength, and the map is designed for single-player rather than team play. Overall, this is a survival and resource-management-focused defense custom map where continuous combat and strategic decisions determine victory. Balancing mineral gathering and enemy defense is key, as how players coordinate these elements decides the outcome.
황금산가서 황금 캐기 (Golden Mountain Gold Mining)
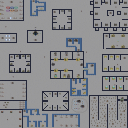
스타크래프트 브루드워의 유즈맵 ‘황금산가서 황금 캐기’는 디펜스 장르에 속하는 컴까기형 맵으로, 플레이어들이 광물을 채굴하는 동시에 끊임없이 몰려오는 적을 방어하는 전략적 재미를 제공합니다. 맵 중앙의 광물 지대에서 자원이 생성되며, 이를 채굴한 플레이어는 본진을 지키면서 동시에 공격력과 방어력을 강화할 수 있습니다. 맵 구조는 대칭형으로 설계되어 공정 경쟁을 유도하며, 적의 공격 패턴은 단계적으로 강화되어 후반으로 갈수록 더 까다로운 난이도를 자랑합니다. 특히 광물 채굴과 동시에 벌어지는 전투는 멀티태스킹 능력을 요구하며, 자원 관리와 병력 운용의 밸런스를 맞춰야 합니다. 초반에는 소수의 적을 상대하지만, 게임이 진행될수록 대규모의 공격이 끊임없이 이어지며, 이를 극복하기 위한 전략적 선택이 필요합니다. 맵 곳곳에 배치된 방어 건물과 업그레이드 시설은 플레이어의 생존을 좌우하는 핵심 요소로, 적절한 타이밍에 업그레이드를 진행하지 않으면 순식간에 패색이 짙어질 수 있습니다. 또한, 맵의 중앙에 위치한 광물 지대는 경쟁의 핵심 지역으로, 이곳을 차지하는 플레이어가 자원 우위를 점할 수 있어 게임의 승패를 가르는 중요한 포인트가 됩니다. 추천 대상은 전략적 사고와 멀티태스킹 능력이 뛰어난 플레이어이며, 특히 디펜스와 컴까기 장르를 좋아하는 유저들에게 적합합니다. 플레이 전 반드시 확인해야 할 부분은 맵의 주요 자원 지대와 방어 건물의 배치, 그리고 적의 공격 루트입니다. 이를 숙지하지 않으면 초반부터 큰 손실을 입을 위험이 있으니 주의가 필요합니다. 맵의 난이도는 대체로 보통 수준으로 설정되어 있지만, 후반부로 갈수록 급격히 어려워지기 때문에 꾸준한 전략 수정이 요구됩니다. 이 맵은 스타크래프트 유즈맵의 정수라고 할 수 있는 전략성과 긴장감을 동시에 제공하며, 반복 플레이를 통해 더욱 깊은 전략을 즐길 수 있습니다. StarCraft: Brood War’s custom map “Golden Mountain Gold Rush” falls under the defense genre as a *compkki* (compilation + killing) style map, offering strategic fun as players mine minerals while defending against endless waves of enemies. Resources spawn in the central mineral field, which players harvest to strengthen their base’s offense and defense. The map’s symmetrical design fosters fair competition, and enemy attack patterns escalate in difficulty as the game progresses. The blend of mining and combat demands strong multitasking skills, requiring players to balance resource management with troop deployment. Early on, you face small groups, but as time passes, relentless large-scale assaults test your strategic decisions. Defense structures and upgrade facilities scattered across the map are vital to survival—skip timely upgrades, and defeat looms. The central mineral deposit is the battleground for resource dominance, often deciding the match’s outcome. Ideal for players with sharp strategic minds and multitasking prowess, it especially suits fans of defense and *compkki* gameplay. Before playing, study key resource zones, defense placements, and enemy attack routes; neglecting these risks heavy losses from the start. While the map’s overall difficulty is moderate, it ramps up sharply in the late game, demanding constant tactical adjustments. A quintessential *StarCraft* custom map, it delivers both strategic depth and nail-biting tension, rewarding repeated plays with ever-deeper strategies.
BTS - 2968 맵 (BTS - 2968)
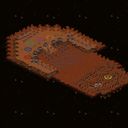
BTS - 2968은 황혼 타일셋을 활용한 1024x1024 크기의 유즈맵으로, 내부 설명에 나오는 'Mines & Flyers'처럼 광물 채굴과 공중 유닛 생산을 핵심으로 삼는다. 플레이어는 시작 위치에서 기본적인 지상 건물을 지어 자원을 채취하고, 동시에 공중 전용 생산 시설을 건설하여 전투기를 비롯한 다양한 flyer 유닛을 양성한다. 광물은 맵 곳곳에散在한 광물 필드에서 채취할 수 있으며, 채취 속도는 기본 건물의 업그레이드에 따라 증가한다. 생산된 flyer 유닛은 적의 기지를 공중에서 정찰하거나 직접 공격할 수 있고, 지상 유닛과의 협공을 통해 시너지를 내는 전략이 중요하다. 트리거는 복잡하지 않아 초보자도 금방 규칙을 이해할 수 있지만, 자원 배분과 시점별 생산 타이밍을 조절하는 부분에서 숙련된 플레이어에게도 깊이 있는 판단이 요구된다. 승리 조건은 보통 상대 팀의 모든 건물을 파괴하거나 정해진 시간 내에 더 많은 flyer를 생산하는 형태로, map 자체에서는 자유전투 방식이 기본이며 팀 플레이 역시 가능하도록 설계돼 있다. 따라서 이 맵은 자원 관리와 공중 전투에 관심이 있는 유저뿐 아니라, 빠른 교전을 즐기는 밀리 플레이어에게도 추천한다. 플레이 전에는 타이밍에 맞춘 생산 건물을 미리 배치하고, 광물 채취 경로를 최적화하는 연습을 하는 것이 좋으며, 맵 크기가 넓기 때문에 미니맵을 활발히 이용해 적의 동向을 파악하는 습관이 승리에 큰 영향을 준다. BTS - 2968 is a 1024x1024 UMS map using the Twilight tileset, centered on mineral mining and flying unit production as suggested by its internal description "Mines & Flyers". Players begin by constructing basic ground buildings to gather resources while also building air‑specific production facilities to train various flyer units such as fighters. Minerals are scattered across the map in mineral fields, and gathering speed increases with upgrades to the basic structures. Produced flyer units can scout or attack enemy bases from the air, and coordinating them with ground units creates important synergies. The triggers are simple enough for beginners to grasp quickly, yet managing resource allocation and production timing offers depth for experienced players. Victory conditions typically involve destroying all enemy structures or producing more flyers than the opponent within a set time; the map defaults to a free‑for‑all style but also supports team play. It is recommended for users interested in resource management and air combat, as well as for those who enjoy fast‑paced mil‑style engagements. Before playing, it is helpful to pre‑place production buildings according to timing, practice optimizing mineral‑gathering routes, and actively use the minimap to track enemy movements, which greatly influences success on the large map.
최근 등록된 맵
새로 추가된 파일과 버전을 확인하세요.
BTS - 2968 맵 (BTS - 2968)
BTS - 2968은 황혼 타일셋을 활용한 1024x1024 크기의 유즈맵으로, 내부 설명에 나오는 'Mines & Flyers'처럼 광물 채굴과 공중 유닛 생산을 핵심으로 삼는다. 플레이어는 시작 위치에서 기본적인 지상 건물을 지어 자원을 채취하고, 동시에 공중 전용 생산 시설을 건설하여 전투기를 비롯한 다양한 flyer 유닛을 양성한다. 광물은 맵 곳곳에散在한 광물 필드에서 채취할 수 있으며, 채취 속도는 기본 건물의 업그레이드에 따라 증가한다. 생산된 flyer 유닛은 적의 기지를 공중에서 정찰하거나 직접 공격할 수 있고, 지상 유닛과의 협공을 통해 시너지를 내는 전략이 중요하다. 트리거는 복잡하지 않아 초보자도 금방 규칙을 이해할 수 있지만, 자원 배분과 시점별 생산 타이밍을 조절하는 부분에서 숙련된 플레이어에게도 깊이 있는 판단이 요구된다. 승리 조건은 보통 상대 팀의 모든 건물을 파괴하거나 정해진 시간 내에 더 많은 flyer를 생산하는 형태로, map 자체에서는 자유전투 방식이 기본이며 팀 플레이 역시 가능하도록 설계돼 있다. 따라서 이 맵은 자원 관리와 공중 전투에 관심이 있는 유저뿐 아니라, 빠른 교전을 즐기는 밀리 플레이어에게도 추천한다. 플레이 전에는 타이밍에 맞춘 생산 건물을 미리 배치하고, 광물 채취 경로를 최적화하는 연습을 하는 것이 좋으며, 맵 크기가 넓기 때문에 미니맵을 활발히 이용해 적의 동向을 파악하는 습관이 승리에 큰 영향을 준다. BTS - 2968 is a 1024x1024 UMS map using the Twilight tileset, centered on mineral mining and flying unit production as suggested by its internal description "Mines & Flyers". Players begin by constructing basic ground buildings to gather resources while also building air‑specific production facilities to train various flyer units such as fighters. Minerals are scattered across the map in mineral fields, and gathering speed increases with upgrades to the basic structures. Produced flyer units can scout or attack enemy bases from the air, and coordinating them with ground units creates important synergies. The triggers are simple enough for beginners to grasp quickly, yet managing resource allocation and production timing offers depth for experienced players. Victory conditions typically involve destroying all enemy structures or producing more flyers than the opponent within a set time; the map defaults to a free‑for‑all style but also supports team play. It is recommended for users interested in resource management and air combat, as well as for those who enjoy fast‑paced mil‑style engagements. Before playing, it is helpful to pre‑place production buildings according to timing, practice optimizing mineral‑gathering routes, and actively use the minimap to track enemy movements, which greatly influences success on the large map.
마인크래프트 (MineCraft)
스타크래프트의 유즈맵 중 하나인 <마인크래프트>는 이름에서 유추할 수 있듯이 광물 채굴과 전략적 요소를 결합한 디펜스 형식의 맵이다. 맵 상단에는 거대한 광물 광맥이 펼쳐져 있으며, 중앙에는 광물을 채굴할 수 있는 장소가 배치되어 있다. 플레이어는 채굴한 광물을 바탕으로 방어 시설과 유닛을 업그레이드하거나 건설하여 적의 공격을 방어해야 한다. 이미지에서 확인되는 빨간색 원 안의 광물 광맥은 채굴의 핵심 포인트로 보이며, 주변의 여러 보라색, 파란색, 초록색, 노란색 등 다양한 색상의 원들은 각각의 주요 자원 포인트나 방어 거점 역할을 추정할 수 있다. 맵의 구조는 중앙을 중심으로 대칭을 이루며, 양쪽 끝의 좁은 통로는 상대방의 진입로를 제한하는 역할을 한다. 이러한 구조는 방어 전략을 세우는 데 중점을 두도록 유도하며, 팀워크가 중요한 요소가 된다. 맵의 진행 방식은 채굴한 광물을 바탕으로 방어塔를 건설하고 유닛을 생산하여 적을 제압하는 방식으로 보인다. 특히, 광물 채굴의 중요성이 강조되어 있어Resource Management(자원 관리)와 Positioning(위치 선점)이 승리의 열쇠가 될 것이다. 초보 플레이어의 경우 광물의 채굴 속도와 방어 시설의 건설 타이밍을 놓치지 않도록 주의해야 하며, 숙련된 플레이어는 자원 우위를 바탕으로 다각적인 전략을 펼쳐야 한다. 맵의 분위기는 SF풍의 우주 타일셋으로 구성되어 있어, 과학적이고 미래적인 분위기가 느껴진다. 맵의 전체적인 밸런스는 채굴과 방어의 균형을 맞추는 데 중점을 두고 있으며, 팀 간의 협동과 통제가 필수적이다. recommandedPlayerCount가 6인 것으로 보아 1:1 대결보다는 3:3 또는 2:2:2 팀전 형태로 진행될 가능성이 높다. 맵의 난이도는 자원 관리와 방어 전략의 중요성에 따라 보통 수준으로 예상되며, 초보자의 경우 적응하는 데 시간이 다소 소요될 수 있다. One of the custom maps in StarCraft, *Minecraft*, combines resource mining and strategic elements in a defense-style format, as suggested by its name. The top of the map features a massive mineral vein, with central locations designated for mining resources. Players must use mined minerals to upgrade or build defensive structures and units to fend off enemy attacks. The red-circled mineral vein in the image appears to be the key mining point, while the surrounding purple, blue, green, and yellow circles likely represent major resource points or defensive strongholds. The map’s structure is symmetrical around the center, with narrow paths at both ends restricting enemy access, encouraging players to focus on defensive strategies and teamwork. The gameplay revolves around constructing defensive towers and producing units using mined resources to overpower opponents. Resource management and positioning are critical, as the map emphasizes the importance of mining speed and the timing of defense construction. Beginners should avoid missing mining efficiency and construction timing, while experienced players can leverage resource advantages to deploy diverse strategies. The map adopts an SF-themed space tileset, creating a futuristic and scientific atmosphere. Its balance prioritizes the equilibrium between mining and defense, requiring strong team coordination and control. With a recommended player count of six, the map is likely designed for team-based formats like 3:3 or 2:2:2 rather than 1v1 matches. The difficulty is moderate, depending on resource management and defense strategy, and beginners may need time to adapt.
황금산가서 황금 캐기 (Golden Mountain Gold Mining)
스타크래프트 브루드워의 유즈맵 ‘황금산가서 황금 캐기’는 디펜스 장르에 속하는 컴까기형 맵으로, 플레이어들이 광물을 채굴하는 동시에 끊임없이 몰려오는 적을 방어하는 전략적 재미를 제공합니다. 맵 중앙의 광물 지대에서 자원이 생성되며, 이를 채굴한 플레이어는 본진을 지키면서 동시에 공격력과 방어력을 강화할 수 있습니다. 맵 구조는 대칭형으로 설계되어 공정 경쟁을 유도하며, 적의 공격 패턴은 단계적으로 강화되어 후반으로 갈수록 더 까다로운 난이도를 자랑합니다. 특히 광물 채굴과 동시에 벌어지는 전투는 멀티태스킹 능력을 요구하며, 자원 관리와 병력 운용의 밸런스를 맞춰야 합니다. 초반에는 소수의 적을 상대하지만, 게임이 진행될수록 대규모의 공격이 끊임없이 이어지며, 이를 극복하기 위한 전략적 선택이 필요합니다. 맵 곳곳에 배치된 방어 건물과 업그레이드 시설은 플레이어의 생존을 좌우하는 핵심 요소로, 적절한 타이밍에 업그레이드를 진행하지 않으면 순식간에 패색이 짙어질 수 있습니다. 또한, 맵의 중앙에 위치한 광물 지대는 경쟁의 핵심 지역으로, 이곳을 차지하는 플레이어가 자원 우위를 점할 수 있어 게임의 승패를 가르는 중요한 포인트가 됩니다. 추천 대상은 전략적 사고와 멀티태스킹 능력이 뛰어난 플레이어이며, 특히 디펜스와 컴까기 장르를 좋아하는 유저들에게 적합합니다. 플레이 전 반드시 확인해야 할 부분은 맵의 주요 자원 지대와 방어 건물의 배치, 그리고 적의 공격 루트입니다. 이를 숙지하지 않으면 초반부터 큰 손실을 입을 위험이 있으니 주의가 필요합니다. 맵의 난이도는 대체로 보통 수준으로 설정되어 있지만, 후반부로 갈수록 급격히 어려워지기 때문에 꾸준한 전략 수정이 요구됩니다. 이 맵은 스타크래프트 유즈맵의 정수라고 할 수 있는 전략성과 긴장감을 동시에 제공하며, 반복 플레이를 통해 더욱 깊은 전략을 즐길 수 있습니다. StarCraft: Brood War’s custom map “Golden Mountain Gold Rush” falls under the defense genre as a *compkki* (compilation + killing) style map, offering strategic fun as players mine minerals while defending against endless waves of enemies. Resources spawn in the central mineral field, which players harvest to strengthen their base’s offense and defense. The map’s symmetrical design fosters fair competition, and enemy attack patterns escalate in difficulty as the game progresses. The blend of mining and combat demands strong multitasking skills, requiring players to balance resource management with troop deployment. Early on, you face small groups, but as time passes, relentless large-scale assaults test your strategic decisions. Defense structures and upgrade facilities scattered across the map are vital to survival—skip timely upgrades, and defeat looms. The central mineral deposit is the battleground for resource dominance, often deciding the match’s outcome. Ideal for players with sharp strategic minds and multitasking prowess, it especially suits fans of defense and *compkki* gameplay. Before playing, study key resource zones, defense placements, and enemy attack routes; neglecting these risks heavy losses from the start. While the map’s overall difficulty is moderate, it ramps up sharply in the late game, demanding constant tactical adjustments. A quintessential *StarCraft* custom map, it delivers both strategic depth and nail-biting tension, rewarding repeated plays with ever-deeper strategies.
[NEW] 고양이 대 쥐: 광석 전쟁 V11 (Cat vs Mouse: Ore Wars V11)
이 맵은 스타크래프트 브루드워의 유즈맵으로, ‘고양이 vs 쥐’ 컨셉의 디펜스 게임입니다. 플레이어는 쥐 무리를 조종해 광물을 채굴하고, 적대적인 고양이와 새끼 고양이, 독수리들을 처치하며 생존을 도모해야 합니다. 중앙에 위치한 광물 지대를 중심으로 맵이 구성되어 있으며, 광물을 채굴할수록 보상을 획득해 아이템을 구매하거나 전력을 강화할 수 있습니다. 적 몬스터들은 일정 주기로 스폰되어 플레이어 기지를 공격해 오며, 이를 효과적으로 방어하지 못하면 기지가 파괴되고 게임이 종료됩니다. 맵의 좌측과 우측에는 플레이어의 본진이 배치되어 있으며, 각 본진은 좁은 길로 연결되어 있어 전략적인 진형 구축이 중요합니다. 특히, 좁은 길목을 활용한 입구막기 전략이 핵심으로, 플레이어는 몬스터의 물량을 어떻게 막아내느냐에 따라 생존 여부가 결정됩니다. 아이템 시스템도 존재하는데, 맵 곳곳에 숨겨진 상자나 특정 조건을 만족하면 얻을 수 있는 아이템을 통해 전투력을 강화하거나 방어 수단을 확보할 수 있습니다. 다만, 아이템의 종류나 사용법에 대한 설명은 맵 내에서 명확히 제공되지 않기 때문에, 처음 플레이하는 유저는 방법을 익히는 데 다소 시간이 걸릴 수 있습니다. 맵의 분위기는 밝고 경쾌한 편이지만, 긴장감 있는 전투가 지속되는 만큼 집중력을 요합니다. 초보자의 경우 몬스터의 패턴을 파악하고, 본진 방어에 중점을 두는 것이 좋습니다. 반면, 숙련된 플레이어는 아이템을 적극 활용해 몬스터를 몰아내거나, 광물 채굴을 통해 경제력을 키우는 등 다양한 전략을 펼쳐볼 수 있습니다. 맵의 난이도는 몬스터의 스폰 속도와 강도에 따라 조절할 수 있도록 설계되어 있으며, 팀 플레이를 지원하지 않는 싱글 플레이 중심의 구조입니다. 전체적으로 ‘생존과Resource 관리’를 중시하는 디펜스 장르의 유즈맵으로, 끊임없는 전투와 전략적 판단이 요구되는 흥미로운 경험을 제공합니다. 광물 채굴과 몬스터 방어의 밸런스가 맵의 핵심으로, 이 두 요소를 어떻게 조율하느냐가 승부의 관건입니다. This map is a StarCraft: Brood War custom game with a "Cat vs. Mouse" defense concept. Players control a group of mice, mining minerals and fighting off hostile cats, kittens, and eagles to survive. The map centers around a mineral-rich area where players can harvest resources to purchase items or upgrade their forces. Enemies spawn periodically and attack the player's base; failing to defend effectively will result in the base being destroyed and the game ending. The player's main bases are located on the left and right sides of the map, connected by narrow paths that require strategic formation-building. Blocking enemy waves at these choke points is crucial, as survival depends on how well players manage incoming attacks. The map also features an item system, with hidden crates or special conditions granting power-ups to enhance combat or defense. However, the map does not clearly explain the types or uses of items, so new players may need time to figure them out. The overall atmosphere is bright and cheerful, but the constant, tense battles demand focus. Beginners should prioritize learning enemy patterns and defending their bases, while experienced players can experiment with item usage, economic expansion through mining, and other advanced strategies. The difficulty can be adjusted based on enemy spawn rates and strength, and the map is designed for single-player rather than team play. Overall, this is a survival and resource-management-focused defense custom map where continuous combat and strategic decisions determine victory. Balancing mineral gathering and enemy defense is key, as how players coordinate these elements decides the outcome.
맵 선택 가이드
태그는 맵의 핵심 특징을 빠르게 설명하지만 제작 버전마다 규칙이 다를 수 있습니다. 상세 설명에서 권장 인원, 난이도, 플레이 시간과 버전을 함께 확인한 뒤 다운로드하세요.