
관문 스타크래프트 맵 모음
'관문' 태그가 등록된 맵을 모았습니다. 장르 하나로 찾기 어려운 플레이 방식, 난이도와 특징을 중심으로 인기 맵과 최신 맵을 비교해 보세요.
- 등록 맵
- 2개
- 누적 다운로드
- 0
- 누적 조회
- 95
인기 맵
다운로드와 조회 반응이 높은 맵입니다.
헤븐 앤 헬 2 (Heaven and Hell 2)
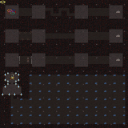
「헤븐 앤 헬 2」는 스타크래프트 브루드워의 유즈맵으로, 플레이어가 지옥에서 천국으로 통하는 관문을 향해 탈출하는 여정을 펼치는 디펜스 장르의 맵이다. 맵의 핵심은 복잡한 함정과 장애물로 가득한 지옥 지대를 통과하는 것이며, 플레이어는 자신의 유닛과 전략을 활용해 traps와 적들을 피해가며 목표를 달성해야 한다. 맵의 구조는 세로로 긴 통로와 여러 갈래 길로 나뉘어져 있으며, 각 구간마다 함정이 설치되어 있어 신중한 진행이 요구된다. 특히, 관문까지 도달하는 데 성공하더라도 함정이나 적의 공격으로 인해 추가적인 위협이 발생할 수 있어, 미처 다 제거하지 못한 적이나 함정을 재빨리 처리하는 것이 중요하다. «Hèàv£ñ ßöÚñл «2»의 특징은 맵의 분위기다. 정글 타일셋을 기반으로 한 어두운 색감과 붉은 빛의 함정 효과가 조화를 이루며, 플레이어에게 긴장감을 더한다. 또한, 맵의 이름에서 유추할 수 있듯이 천국과 지옥의 대비를 느낄 수 있는 디자인 요소들이 곳곳에 배치되어 있어, 단순한 탈출 게임을 넘어 신화적 스토리를 간접적으로 체험할 수 있는 장치로도 작용한다. 이 맵은 초보자와 숙련자 모두에게 접근 가능한 난이도를 가지고 있으며, 특히 팀 플레이를 강조하지는 않지만, 6명의 플레이어가 각각의 길을 탐색하며 협력하거나 경쟁할 수 있는 구조로 설계되어 있다. 플레이 전에는 맵의 함정 분포와 관문의 위치를 미리 숙지하는 것이 필수이며, 통로의 폭이 좁고 함정이 밀집된 구간이 많기 때문에 속도와 정확성이 관건이다. 또한, 유닛의 종류나 스킬에 따라 진행 방식이 달라질 수 있으므로, 자신의 플레이 스타일에 맞는 전략을 세우는 것이 중요하다. «Hèàv£ñ ßöÚñл «2»는 디펜스와 피하기 요소가 결합된 유즈맵으로, 긴장감 넘치는 진행과 아름다운 맵 디자인으로 스타크래프트 유저들에게 인기 있는 맵 중 하나다. 이 맵을 즐기기 위해서는 맵의 구조를 충분히 이해하고, 함정을 피하거나 제거하는 데 집중해야 한다. 또한, 관문까지 도달하는 것뿐만 아니라, 도달 후에도 발생할 수 있는 추가적인 위협을 대비해야 하기 때문에, 항상 긴장감을 유지하며 플레이하는 것이 중요하다. «Hèàv£ñ ßöÚñл «2»는 혼자 플레이해도 즐겁지만, 팀원들과 협력하거나 경쟁하며 플레이할 때 더욱 재미를 느낄 수 있는 맵이다. "Hell and Heaven 2" is a custom map in *StarCraft: Brood War* where players embark on a defensive journey, escaping from hell toward a gateway to heaven. The core challenge lies in navigating a hellish terrain filled with intricate traps and obstacles, requiring players to use their units and strategies to evade both traps and enemies to reach their goal. The map features a vertically elongated corridor split into multiple branching paths, each lined with deadly traps that demand careful progression. Even upon reaching the gateway, players aren’t safe—additional threats from lingering enemies or hidden traps can still disrupt their escape, making it crucial to quickly eliminate any remaining foes or hazards. The defining feature of "Hell and Heaven 2" is its atmosphere. Built on a jungle tileset, the map blends dark, somber colors with glowing red trap effects, creating an intense and immersive experience. The name itself hints at the thematic contrast between heaven and hell, reinforced by design elements scattered throughout the map that evoke a mythical narrative beyond a simple escape challenge. The difficulty is balanced to appeal to both beginners and veterans, though team play isn’t mandatory. Instead, the map accommodates six players who can explore different paths, cooperate, or compete with one another. Before playing, it’s essential to familiarize yourself with trap locations and the gateway’s position, as narrow corridors and densely packed traps demand both speed and precision. Strategy also varies depending on unit types and abilities, so tailoring your approach to your playstyle is key. "Hell and Heaven 2" blends defense and evasion mechanics into a tense, engaging experience, supported by striking map design that has earned it popularity among *StarCraft* players. To fully enjoy it, you must master the layout, prioritize avoiding or dismantling traps, and stay alert even after reaching the gateway—because danger doesn’t end there. Whether played solo or with others, the map offers excitement, especially when teaming up or competing with friends.
P3) 젤나가의 유산(ex:)
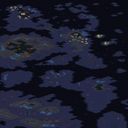
「P3) 젤나가의 유산(ex:)」은 스타크래프트 브루드워의 유즈맵으로, 사쿠라스 관문에 펼쳐진 저그와의 전쟁 속에서 칼라이의 보급로를 지키며 네라짐의 대모 라자갈이 언급한 숨은 힘을 찾는 이야기를 담은 디펜스형 맵이다. 맵 중앙에는 거대한 관문이 자리 잡고 있으며, 주변으로 좁고 복잡한 길목이 펼쳐져 있어 저그 병력이 몰려오는 방향을 예상하며 방어전을 펼치게 된다. 플레이어는 프로토스의 유닛들을 배치하거나 자원을 활용해 방어선을 구축하며, 맵 곳곳에 위치한 관문과 보급로의 위치를 살피며 전략적으로 대처해야 한다. 특히 좁은 통로와 다수의 적 기지 구조는 방어의 난이도를 높이며, 맵의 해상도가 4096x6144로 넓은 만큼 맵을 넓게 활용한 배치와 기습 공격을 대비해야 한다. 내부의 설명에 따르면 칼라이의 보급물자를 지키며 저그를 몰아내는 것이 주요 목표로 보이며, 이는 단순한 디펜스가 아니라 전략적 자원 관리와 위치 선정이 중요한 요소로 느껴진다. 맵의 분위기는 어둡고 긴장감 넘치며, 화산 타일셋을 사용해 적대적인 환경을 강조한다. 초보자는 방어선의 중요성을 인지하고 자원을 효율적으로 배분하는 데 어려움을 느낄 수 있으며, 경험 있는 플레이어는 복잡한 길목을 활용한 유닛 배치를 통해 더 효율적인 방어를 구상할 수 있다. 맵의 구조상 플레이어 간 협력이 중요해 보이며, 특히 팀플레이가 가능한 UMS 맵이라면 협동 방어 전략이 필수적일 것으로 예상된다. 또한 맵의 넓이와 복잡한 길목은 플레이 시간이 다소 길어질 수 있음을 시사한다. 이 맵은 디펜스와 전략적 자원 관리에 관심이 있는 플레이어, 그리고 프로토스의 스토리를 좋아하는 팬들에게 추천할 만하다. 사전 준비 없이 임한다면 예상치 못한 저그의 공격에 당황할 수 있으니, 맵을 여러 번 플레이하며 길목과 관문의 위치를 숙지하는 것이 중요하다. 또한, 맵의 해상도와 타일셋이 큰 만큼, 시스템 사양이 낮다면 렉이 발생할 수 있으니 주의가 필요하다. 「P3) 젤나가의 유산(ex:)」 is a custom map from StarCraft: Brood War where players defend the Protoss supply routes during a war against the Zerg in the Sakuras Gate, following the Nerazim Matriarch Raszagal’s search for hidden power. The map features a massive gate at its center, surrounded by narrow, winding paths that force players to anticipate Zerg advances and strategically position their defenses. Players deploy Protoss units and manage resources to build defensive lines, while keeping an eye on gate and supply route locations for tactical responses. The tight corridors and multiple enemy base structures heighten the challenge, and with a high resolution of 4096x6144, players must utilize the vast map space for formations and prepare for surprise attacks. According to the in-game description, the main objective is to protect the Protoss supply materials and drive off the Zerg, making resource management and positioning as crucial as pure defense. The map’s dark, tense atmosphere is reinforced by its volcanic tileset, which underscores the hostile environment. Beginners may struggle with recognizing defensive priorities and allocating resources efficiently, while experienced players can leverage the maze-like paths to optimize unit placements. The map’s design suggests that cooperation between players is vital, especially in team-play UMS modes where coordinated defensive strategies are essential. Additionally, the map’s scale and intricate pathways imply longer playtimes. This map is ideal for players interested in defense and strategic resource management, as well as fans of Protoss lore. Without prior preparation, unexpected Zerg assaults can catch players off guard, so it’s important to familiarize yourself with the gates and paths through repeated play. Given its high resolution and detailed tileset, players with lower system specs may experience lag, so caution is advised.
최근 등록된 맵
새로 추가된 파일과 버전을 확인하세요.
P3) 젤나가의 유산(ex:)
「P3) 젤나가의 유산(ex:)」은 스타크래프트 브루드워의 유즈맵으로, 사쿠라스 관문에 펼쳐진 저그와의 전쟁 속에서 칼라이의 보급로를 지키며 네라짐의 대모 라자갈이 언급한 숨은 힘을 찾는 이야기를 담은 디펜스형 맵이다. 맵 중앙에는 거대한 관문이 자리 잡고 있으며, 주변으로 좁고 복잡한 길목이 펼쳐져 있어 저그 병력이 몰려오는 방향을 예상하며 방어전을 펼치게 된다. 플레이어는 프로토스의 유닛들을 배치하거나 자원을 활용해 방어선을 구축하며, 맵 곳곳에 위치한 관문과 보급로의 위치를 살피며 전략적으로 대처해야 한다. 특히 좁은 통로와 다수의 적 기지 구조는 방어의 난이도를 높이며, 맵의 해상도가 4096x6144로 넓은 만큼 맵을 넓게 활용한 배치와 기습 공격을 대비해야 한다. 내부의 설명에 따르면 칼라이의 보급물자를 지키며 저그를 몰아내는 것이 주요 목표로 보이며, 이는 단순한 디펜스가 아니라 전략적 자원 관리와 위치 선정이 중요한 요소로 느껴진다. 맵의 분위기는 어둡고 긴장감 넘치며, 화산 타일셋을 사용해 적대적인 환경을 강조한다. 초보자는 방어선의 중요성을 인지하고 자원을 효율적으로 배분하는 데 어려움을 느낄 수 있으며, 경험 있는 플레이어는 복잡한 길목을 활용한 유닛 배치를 통해 더 효율적인 방어를 구상할 수 있다. 맵의 구조상 플레이어 간 협력이 중요해 보이며, 특히 팀플레이가 가능한 UMS 맵이라면 협동 방어 전략이 필수적일 것으로 예상된다. 또한 맵의 넓이와 복잡한 길목은 플레이 시간이 다소 길어질 수 있음을 시사한다. 이 맵은 디펜스와 전략적 자원 관리에 관심이 있는 플레이어, 그리고 프로토스의 스토리를 좋아하는 팬들에게 추천할 만하다. 사전 준비 없이 임한다면 예상치 못한 저그의 공격에 당황할 수 있으니, 맵을 여러 번 플레이하며 길목과 관문의 위치를 숙지하는 것이 중요하다. 또한, 맵의 해상도와 타일셋이 큰 만큼, 시스템 사양이 낮다면 렉이 발생할 수 있으니 주의가 필요하다. 「P3) 젤나가의 유산(ex:)」 is a custom map from StarCraft: Brood War where players defend the Protoss supply routes during a war against the Zerg in the Sakuras Gate, following the Nerazim Matriarch Raszagal’s search for hidden power. The map features a massive gate at its center, surrounded by narrow, winding paths that force players to anticipate Zerg advances and strategically position their defenses. Players deploy Protoss units and manage resources to build defensive lines, while keeping an eye on gate and supply route locations for tactical responses. The tight corridors and multiple enemy base structures heighten the challenge, and with a high resolution of 4096x6144, players must utilize the vast map space for formations and prepare for surprise attacks. According to the in-game description, the main objective is to protect the Protoss supply materials and drive off the Zerg, making resource management and positioning as crucial as pure defense. The map’s dark, tense atmosphere is reinforced by its volcanic tileset, which underscores the hostile environment. Beginners may struggle with recognizing defensive priorities and allocating resources efficiently, while experienced players can leverage the maze-like paths to optimize unit placements. The map’s design suggests that cooperation between players is vital, especially in team-play UMS modes where coordinated defensive strategies are essential. Additionally, the map’s scale and intricate pathways imply longer playtimes. This map is ideal for players interested in defense and strategic resource management, as well as fans of Protoss lore. Without prior preparation, unexpected Zerg assaults can catch players off guard, so it’s important to familiarize yourself with the gates and paths through repeated play. Given its high resolution and detailed tileset, players with lower system specs may experience lag, so caution is advised.
헤븐 앤 헬 2 (Heaven and Hell 2)
「헤븐 앤 헬 2」는 스타크래프트 브루드워의 유즈맵으로, 플레이어가 지옥에서 천국으로 통하는 관문을 향해 탈출하는 여정을 펼치는 디펜스 장르의 맵이다. 맵의 핵심은 복잡한 함정과 장애물로 가득한 지옥 지대를 통과하는 것이며, 플레이어는 자신의 유닛과 전략을 활용해 traps와 적들을 피해가며 목표를 달성해야 한다. 맵의 구조는 세로로 긴 통로와 여러 갈래 길로 나뉘어져 있으며, 각 구간마다 함정이 설치되어 있어 신중한 진행이 요구된다. 특히, 관문까지 도달하는 데 성공하더라도 함정이나 적의 공격으로 인해 추가적인 위협이 발생할 수 있어, 미처 다 제거하지 못한 적이나 함정을 재빨리 처리하는 것이 중요하다. «Hèàv£ñ ßöÚñл «2»의 특징은 맵의 분위기다. 정글 타일셋을 기반으로 한 어두운 색감과 붉은 빛의 함정 효과가 조화를 이루며, 플레이어에게 긴장감을 더한다. 또한, 맵의 이름에서 유추할 수 있듯이 천국과 지옥의 대비를 느낄 수 있는 디자인 요소들이 곳곳에 배치되어 있어, 단순한 탈출 게임을 넘어 신화적 스토리를 간접적으로 체험할 수 있는 장치로도 작용한다. 이 맵은 초보자와 숙련자 모두에게 접근 가능한 난이도를 가지고 있으며, 특히 팀 플레이를 강조하지는 않지만, 6명의 플레이어가 각각의 길을 탐색하며 협력하거나 경쟁할 수 있는 구조로 설계되어 있다. 플레이 전에는 맵의 함정 분포와 관문의 위치를 미리 숙지하는 것이 필수이며, 통로의 폭이 좁고 함정이 밀집된 구간이 많기 때문에 속도와 정확성이 관건이다. 또한, 유닛의 종류나 스킬에 따라 진행 방식이 달라질 수 있으므로, 자신의 플레이 스타일에 맞는 전략을 세우는 것이 중요하다. «Hèàv£ñ ßöÚñл «2»는 디펜스와 피하기 요소가 결합된 유즈맵으로, 긴장감 넘치는 진행과 아름다운 맵 디자인으로 스타크래프트 유저들에게 인기 있는 맵 중 하나다. 이 맵을 즐기기 위해서는 맵의 구조를 충분히 이해하고, 함정을 피하거나 제거하는 데 집중해야 한다. 또한, 관문까지 도달하는 것뿐만 아니라, 도달 후에도 발생할 수 있는 추가적인 위협을 대비해야 하기 때문에, 항상 긴장감을 유지하며 플레이하는 것이 중요하다. «Hèàv£ñ ßöÚñл «2»는 혼자 플레이해도 즐겁지만, 팀원들과 협력하거나 경쟁하며 플레이할 때 더욱 재미를 느낄 수 있는 맵이다. "Hell and Heaven 2" is a custom map in *StarCraft: Brood War* where players embark on a defensive journey, escaping from hell toward a gateway to heaven. The core challenge lies in navigating a hellish terrain filled with intricate traps and obstacles, requiring players to use their units and strategies to evade both traps and enemies to reach their goal. The map features a vertically elongated corridor split into multiple branching paths, each lined with deadly traps that demand careful progression. Even upon reaching the gateway, players aren’t safe—additional threats from lingering enemies or hidden traps can still disrupt their escape, making it crucial to quickly eliminate any remaining foes or hazards. The defining feature of "Hell and Heaven 2" is its atmosphere. Built on a jungle tileset, the map blends dark, somber colors with glowing red trap effects, creating an intense and immersive experience. The name itself hints at the thematic contrast between heaven and hell, reinforced by design elements scattered throughout the map that evoke a mythical narrative beyond a simple escape challenge. The difficulty is balanced to appeal to both beginners and veterans, though team play isn’t mandatory. Instead, the map accommodates six players who can explore different paths, cooperate, or compete with one another. Before playing, it’s essential to familiarize yourself with trap locations and the gateway’s position, as narrow corridors and densely packed traps demand both speed and precision. Strategy also varies depending on unit types and abilities, so tailoring your approach to your playstyle is key. "Hell and Heaven 2" blends defense and evasion mechanics into a tense, engaging experience, supported by striking map design that has earned it popularity among *StarCraft* players. To fully enjoy it, you must master the layout, prioritize avoiding or dismantling traps, and stay alert even after reaching the gateway—because danger doesn’t end there. Whether played solo or with others, the map offers excitement, especially when teaming up or competing with friends.
맵 선택 가이드
태그는 맵의 핵심 특징을 빠르게 설명하지만 제작 버전마다 규칙이 다를 수 있습니다. 상세 설명에서 권장 인원, 난이도, 플레이 시간과 버전을 함께 확인한 뒤 다운로드하세요.