
고대 신전 스타크래프트 맵 모음
'고대 신전' 태그가 등록된 맵을 모았습니다. 장르 하나로 찾기 어려운 플레이 방식, 난이도와 특징을 중심으로 인기 맵과 최신 맵을 비교해 보세요.
- 등록 맵
- 2개
- 누적 다운로드
- 0
- 누적 조회
- 76
인기 맵
다운로드와 조회 반응이 높은 맵입니다.
템플 디스트럭션 (Temple Destruction)
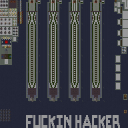
스타크래프트 브루드워의 컴까기(컴퓨터 상대 디펜스) 장르 유즈맵인 〈템플 디스트럭션〉은 플레이어가 오버마인드를 방어하면서 고대 신전의 파괴를 저지하는 전략적 목표를 달성하는 맵이다. 맵의 왼쪽 중앙에 위치한 오버마인드와 오른쪽 중앙의 고대 신전은 각각 방어와 파괴의 핵심 지점으로, 플레이어는 이 두 곳을 중심으로 자원 관리와 유닛 생산, 그리고 전략적 판단력을 발휘해야 한다. 맵의 전체적인 구조는 중앙을 가로지르는 협곡 형태로, 양 측이 접근하기 용이한 지형을 제공하면서도 각자 방어와 공격에 최적화된 위치를 차지할 수 있도록 배치되어 있다. 오른쪽에 위치한 고대 신전은 네 개의 입구를 통해 접근할 수 있으며, 각 입구에는 방어 시설을 구축할 수 있는 공간이 마련되어 있어 적의 공격을 효과적으로 차단할 수 있다. 반면, 왼쪽에 위치한 오버마인드는 좁은 통로로 방어하기 용이하지만, 다수의 적군이 한꺼번에 몰려올 경우 대응이 쉽지 않으므로 신중한 유닛 배치와 자원 관리가 필수적이다. 맵의_NAME_은 '템플 디스트럭션'으로, 고대 신전의 파괴를 뜻하며, 플레이어는 이를 저지하기 위해 최선을 다해야 한다. 맵의 진행 방식은 크게 세 가지로 나뉠 수 있는데, 첫째는 초반 자원 수집과 방어 시설 확충, 둘째는 중반에 걸쳐 오버마인드 주변의 적군을 정리하고 신전 방어선을 강화하는 단계, 셋째는 후반에 접어들어 고대 신전 주변의 적군을 소탕하고 최종 방어전을 펼치는 것이다. 이 과정에서 플레이어는 저글링, 히드라리스크, 뮤탈리스크 등 다양한 저그 유닛을 생산하여 적절한 조합으로 전투에 임해야 하며, 특히 초반에는 저글링 위주로 생산하여 오버마인드를 방어하는 데 주력하는 것이 중요하다. 중반 이후에는 히드라리스크나 뮤탈리스크를 조합하여 신전 주변의 적군을 공격하거나 방어하는 전략을 구사할 수 있다. 또한, 맵의 특정 지점에 배치된 스페셜 유닛이나 아이템을 활용하여 전투력을 강화할 수도 있는데, 이는 맵의 진행을 보다 수월하게 만드는 핵심 요소 중 하나다. 〈템플 디스트럭션〉은 이러한 구조와 진행 방식을 바탕으로, 초보자부터 숙련자까지 폭넓은 플레이어들에게 적합한 맵으로 평가된다. 초보자의 경우, 저글링 위주의 단순한 조합으로도 충분히 방어에 성공할 수 있지만, 숙련자의 경우 다양한 유닛 조합과 전략을 구사하여 보다 높은 난이도의 적군을 상대할 수 있다. 특히, 팀 플레이가 가능한 경우, 팀원 간의 협력과 역할 분담이 게임의 승패를 좌우할 수 있으므로, 팀원과의 원활한 소통이 중요하다. 플레이 전에는 맵의 구조와 입구 위치를 숙지하여 오버마인드와 신전 주변의 방어선을 어떻게 배치할 것인지 미리 계획을 세우는 것이 좋다. 또한, 자원 수집 속도와 유닛 생산 타이밍을 조절하여 적의 공격 타이밍에 맞춰 대응할 수 있도록 준비해야 한다. 마지막으로, 맵의_NAME_을 정확히 이해하고, '오버마인드 방어'와 '고대 신전 파괴 저지'라는 두 가지 핵심 목표를 잊지 않도록 주의해야 한다. 이러한 점들을 고려한다면 〈템플 디스트럭션〉은 스타크래프트 브루드워의 유즈맵 가운데에서도 손꼽히는 재미와 전략적 깊이를 지닌 맵으로 즐길 수 있을 것이다. Temple Destruction is a UMS (Use Map Settings) computer vs player defense map in StarCraft: Brood War, where players must defend their Overmind while preventing the destruction of an ancient temple. The map features a central canyon structure, with the Overmind positioned on the left and the ancient temple on the right, each serving as a critical focal point for defense and offense. The temple, located on the right side, has four accessible entrances, each offering spaces to build defensive structures, while the Overmind on the left is protected by narrow pathways that are easier to defend but require careful unit placement to counter concentrated enemy attacks. The map's title, 'Temple Destruction,' hints at the core objective: preventing the temple's destruction while defending the Overmind. The gameplay is divided into three main phases: early-game resource gathering and base expansion, mid-game clearing enemy units around the Overmind and reinforcing temple defenses, and late-game eliminating enemy forces near the temple while executing a final defense strategy. Players must produce a balanced mix of Zerg units such as Zerglings, Hydralisks, and Mutalisks to adapt to different combat scenarios. Early-game strategies should focus on Zergling production to protect the Overmind, while mid-to-late game allows for more versatile unit combinations like Hydralisks or Mutalisks to attack or defend the temple. Special units or items scattered across the map can also enhance combat effectiveness, adding depth to the gameplay. Temple Destruction is suitable for both beginners and experienced players, offering a balanced challenge. Beginners can succeed with simple Zergling-based strategies, while advanced players can experiment with complex unit compositions and tactics to tackle higher difficulty enemy waves. Team play is highly recommended, as coordination and role distribution among teammates significantly influence the outcome. Before starting, players should study the map layout and entrance positions to plan defensive structures around the Overmind and temple. Efficient resource management and timely unit production are crucial to counter enemy attacks. Understanding the dual objectives—defending the Overmind and preventing the temple's destruction—is key to mastering this map. With these considerations in mind, Temple Destruction stands out as one of the most engaging and strategically rich UMS maps in StarCraft: Brood War.
템플 시즈 1.4M3.2 (Temple Siege 1.4M3.2)
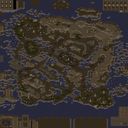
‘템플 시즈 1.4M3.2(Temple Siege 1.4M3.2)’는 스타크래프트: 브루드워의 유즈맵으로, 6명의 플레이어가 섬세한 맵 구조와 다양한 전략을 요구하는 디펜스 장르에 도전하는 작품이다. 게임의 무대는 사막 지형을 재현한 거대한 맵으로, 중앙에 위치한 고대 신전 주변으로 적의Wave가 끊임없이 몰려오며 플레이어는 이를 방어해야 한다. 맵 중앙의 신전은 핵심이 되는 구조물로, 파괴되지 않도록 보호하는 동시에 적을 효과적으로 저지해야 한다. 공격과 방어의 균형을 맞추기 위해 플레이어는 강력한 마법과 유닛을 활용할 수 있으며, 특히 ‘Minecaping’과 ‘Assault/Spec Ops’ 스펠이 원작의 특징을 살려 재구현되어 전략의 깊이를 더한다. 맵의 디자인에서 주목할 점은 중앙 신전 주변의 지형이 복잡한 언덕과 협곡으로 이루어져 있어, 유닛 배치와 방어선 구축에 전략적인 사고가 요구된다는 것이다. 또한, 초기 버전의 버그 수정과 밸런스 패치가 포함되어 있어, 플레이어는 보다 안정적인 환경을 제공받을 수 있다. 이 맵은 특히 다인 플레이 환경에서 팀워크와 개인의 전략적 판단력이 요구되며, 초보자와 숙련자 모두에게 흥미로운 도전 과제를 제공한다. 플레이 전에는 맵의 구조와 스펠의 효과를 숙지하는 것이 중요하며, 중앙 신전을 중심으로 한 방어 전략과 보조 병력의 운용에 신경을 써야 한다. ‘템플 시즈 1.4M3.2’는 디펜스 장르의 진수를 느낄 수 있는 유즈맵으로, 사막 지형의 아름다움과 전략적 깊이가 조화를 이룬 작품이다. Temple Siege 1.4M3.2 is a custom map for StarCraft: Brood War, where six players must defend a central ancient temple against endless waves of enemies in a desert-themed defense genre. The massive map features a central temple surrounded by intricate terrain, including hills and canyons, which adds depth to unit positioning and defensive strategies. Players must balance offensive and defensive tactics, utilizing powerful spells and units to hold the line. The map reintroduces unique spells like Minecaping and Assault/Spec Ops from the original versions, enhancing strategic variety. The updated balance and bug fixes from earlier versions ensure a more stable and engaging experience. This map demands strong teamwork and individual decision-making, making it appealing to both beginners and experienced players. Before playing, it's crucial to understand the map's layout and spell effects. Focusing on defensive strategies centered around the temple and managing auxiliary forces will be key to success. Temple Siege 1.4M3.2 stands out as a top-tier defense custom map, blending the aesthetics of a desert landscape with deep strategic gameplay.
최근 등록된 맵
새로 추가된 파일과 버전을 확인하세요.
템플 시즈 1.4M3.2 (Temple Siege 1.4M3.2)
‘템플 시즈 1.4M3.2(Temple Siege 1.4M3.2)’는 스타크래프트: 브루드워의 유즈맵으로, 6명의 플레이어가 섬세한 맵 구조와 다양한 전략을 요구하는 디펜스 장르에 도전하는 작품이다. 게임의 무대는 사막 지형을 재현한 거대한 맵으로, 중앙에 위치한 고대 신전 주변으로 적의Wave가 끊임없이 몰려오며 플레이어는 이를 방어해야 한다. 맵 중앙의 신전은 핵심이 되는 구조물로, 파괴되지 않도록 보호하는 동시에 적을 효과적으로 저지해야 한다. 공격과 방어의 균형을 맞추기 위해 플레이어는 강력한 마법과 유닛을 활용할 수 있으며, 특히 ‘Minecaping’과 ‘Assault/Spec Ops’ 스펠이 원작의 특징을 살려 재구현되어 전략의 깊이를 더한다. 맵의 디자인에서 주목할 점은 중앙 신전 주변의 지형이 복잡한 언덕과 협곡으로 이루어져 있어, 유닛 배치와 방어선 구축에 전략적인 사고가 요구된다는 것이다. 또한, 초기 버전의 버그 수정과 밸런스 패치가 포함되어 있어, 플레이어는 보다 안정적인 환경을 제공받을 수 있다. 이 맵은 특히 다인 플레이 환경에서 팀워크와 개인의 전략적 판단력이 요구되며, 초보자와 숙련자 모두에게 흥미로운 도전 과제를 제공한다. 플레이 전에는 맵의 구조와 스펠의 효과를 숙지하는 것이 중요하며, 중앙 신전을 중심으로 한 방어 전략과 보조 병력의 운용에 신경을 써야 한다. ‘템플 시즈 1.4M3.2’는 디펜스 장르의 진수를 느낄 수 있는 유즈맵으로, 사막 지형의 아름다움과 전략적 깊이가 조화를 이룬 작품이다. Temple Siege 1.4M3.2 is a custom map for StarCraft: Brood War, where six players must defend a central ancient temple against endless waves of enemies in a desert-themed defense genre. The massive map features a central temple surrounded by intricate terrain, including hills and canyons, which adds depth to unit positioning and defensive strategies. Players must balance offensive and defensive tactics, utilizing powerful spells and units to hold the line. The map reintroduces unique spells like Minecaping and Assault/Spec Ops from the original versions, enhancing strategic variety. The updated balance and bug fixes from earlier versions ensure a more stable and engaging experience. This map demands strong teamwork and individual decision-making, making it appealing to both beginners and experienced players. Before playing, it's crucial to understand the map's layout and spell effects. Focusing on defensive strategies centered around the temple and managing auxiliary forces will be key to success. Temple Siege 1.4M3.2 stands out as a top-tier defense custom map, blending the aesthetics of a desert landscape with deep strategic gameplay.
템플 디스트럭션 (Temple Destruction)
스타크래프트 브루드워의 컴까기(컴퓨터 상대 디펜스) 장르 유즈맵인 〈템플 디스트럭션〉은 플레이어가 오버마인드를 방어하면서 고대 신전의 파괴를 저지하는 전략적 목표를 달성하는 맵이다. 맵의 왼쪽 중앙에 위치한 오버마인드와 오른쪽 중앙의 고대 신전은 각각 방어와 파괴의 핵심 지점으로, 플레이어는 이 두 곳을 중심으로 자원 관리와 유닛 생산, 그리고 전략적 판단력을 발휘해야 한다. 맵의 전체적인 구조는 중앙을 가로지르는 협곡 형태로, 양 측이 접근하기 용이한 지형을 제공하면서도 각자 방어와 공격에 최적화된 위치를 차지할 수 있도록 배치되어 있다. 오른쪽에 위치한 고대 신전은 네 개의 입구를 통해 접근할 수 있으며, 각 입구에는 방어 시설을 구축할 수 있는 공간이 마련되어 있어 적의 공격을 효과적으로 차단할 수 있다. 반면, 왼쪽에 위치한 오버마인드는 좁은 통로로 방어하기 용이하지만, 다수의 적군이 한꺼번에 몰려올 경우 대응이 쉽지 않으므로 신중한 유닛 배치와 자원 관리가 필수적이다. 맵의_NAME_은 '템플 디스트럭션'으로, 고대 신전의 파괴를 뜻하며, 플레이어는 이를 저지하기 위해 최선을 다해야 한다. 맵의 진행 방식은 크게 세 가지로 나뉠 수 있는데, 첫째는 초반 자원 수집과 방어 시설 확충, 둘째는 중반에 걸쳐 오버마인드 주변의 적군을 정리하고 신전 방어선을 강화하는 단계, 셋째는 후반에 접어들어 고대 신전 주변의 적군을 소탕하고 최종 방어전을 펼치는 것이다. 이 과정에서 플레이어는 저글링, 히드라리스크, 뮤탈리스크 등 다양한 저그 유닛을 생산하여 적절한 조합으로 전투에 임해야 하며, 특히 초반에는 저글링 위주로 생산하여 오버마인드를 방어하는 데 주력하는 것이 중요하다. 중반 이후에는 히드라리스크나 뮤탈리스크를 조합하여 신전 주변의 적군을 공격하거나 방어하는 전략을 구사할 수 있다. 또한, 맵의 특정 지점에 배치된 스페셜 유닛이나 아이템을 활용하여 전투력을 강화할 수도 있는데, 이는 맵의 진행을 보다 수월하게 만드는 핵심 요소 중 하나다. 〈템플 디스트럭션〉은 이러한 구조와 진행 방식을 바탕으로, 초보자부터 숙련자까지 폭넓은 플레이어들에게 적합한 맵으로 평가된다. 초보자의 경우, 저글링 위주의 단순한 조합으로도 충분히 방어에 성공할 수 있지만, 숙련자의 경우 다양한 유닛 조합과 전략을 구사하여 보다 높은 난이도의 적군을 상대할 수 있다. 특히, 팀 플레이가 가능한 경우, 팀원 간의 협력과 역할 분담이 게임의 승패를 좌우할 수 있으므로, 팀원과의 원활한 소통이 중요하다. 플레이 전에는 맵의 구조와 입구 위치를 숙지하여 오버마인드와 신전 주변의 방어선을 어떻게 배치할 것인지 미리 계획을 세우는 것이 좋다. 또한, 자원 수집 속도와 유닛 생산 타이밍을 조절하여 적의 공격 타이밍에 맞춰 대응할 수 있도록 준비해야 한다. 마지막으로, 맵의_NAME_을 정확히 이해하고, '오버마인드 방어'와 '고대 신전 파괴 저지'라는 두 가지 핵심 목표를 잊지 않도록 주의해야 한다. 이러한 점들을 고려한다면 〈템플 디스트럭션〉은 스타크래프트 브루드워의 유즈맵 가운데에서도 손꼽히는 재미와 전략적 깊이를 지닌 맵으로 즐길 수 있을 것이다. Temple Destruction is a UMS (Use Map Settings) computer vs player defense map in StarCraft: Brood War, where players must defend their Overmind while preventing the destruction of an ancient temple. The map features a central canyon structure, with the Overmind positioned on the left and the ancient temple on the right, each serving as a critical focal point for defense and offense. The temple, located on the right side, has four accessible entrances, each offering spaces to build defensive structures, while the Overmind on the left is protected by narrow pathways that are easier to defend but require careful unit placement to counter concentrated enemy attacks. The map's title, 'Temple Destruction,' hints at the core objective: preventing the temple's destruction while defending the Overmind. The gameplay is divided into three main phases: early-game resource gathering and base expansion, mid-game clearing enemy units around the Overmind and reinforcing temple defenses, and late-game eliminating enemy forces near the temple while executing a final defense strategy. Players must produce a balanced mix of Zerg units such as Zerglings, Hydralisks, and Mutalisks to adapt to different combat scenarios. Early-game strategies should focus on Zergling production to protect the Overmind, while mid-to-late game allows for more versatile unit combinations like Hydralisks or Mutalisks to attack or defend the temple. Special units or items scattered across the map can also enhance combat effectiveness, adding depth to the gameplay. Temple Destruction is suitable for both beginners and experienced players, offering a balanced challenge. Beginners can succeed with simple Zergling-based strategies, while advanced players can experiment with complex unit compositions and tactics to tackle higher difficulty enemy waves. Team play is highly recommended, as coordination and role distribution among teammates significantly influence the outcome. Before starting, players should study the map layout and entrance positions to plan defensive structures around the Overmind and temple. Efficient resource management and timely unit production are crucial to counter enemy attacks. Understanding the dual objectives—defending the Overmind and preventing the temple's destruction—is key to mastering this map. With these considerations in mind, Temple Destruction stands out as one of the most engaging and strategically rich UMS maps in StarCraft: Brood War.
맵 선택 가이드
태그는 맵의 핵심 특징을 빠르게 설명하지만 제작 버전마다 규칙이 다를 수 있습니다. 상세 설명에서 권장 인원, 난이도, 플레이 시간과 버전을 함께 확인한 뒤 다운로드하세요.