스타휴지 StarCraft HUZY 스타크래프트 유즈맵 맵 다운로드 커뮤니티
한국어

건물 점령 스타크래프트 맵 모음

'건물 점령' 태그가 등록된 맵을 모았습니다. 장르 하나로 찾기 어려운 플레이 방식, 난이도와 특징을 중심으로 인기 맵과 최신 맵을 비교해 보세요.

등록 맵
1
누적 다운로드
0
누적 조회
42

인기 맵

다운로드와 조회 반응이 높은 맵입니다.

전체 보기
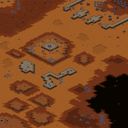
오퍼레이션: 부랴 в пустыне (Operation: Bury v Pustyne) 맵 미리보기

오퍼레이션: 부랴 в пустыне (Operation: Bury v Pustyne)

‘오퍼레이션: 부랴 в пустыне’는 스타크래프트: 브루드워의 유즈맵으로, 한 명의 플레이어가 광활한 사막 지형을 배경으로 펼쳐지는 전투에 도전하는 스타일이 인상적인 작품이다. 맵은 사막 지형과 산악 지대, 그리고 곳곳에 흩어져 있는 잔해와 오아시스가 특징적으로 배치되어 있어, 건물을 짓고 자원을 모으는 동시에 적의 공격을 방어하거나 선제공격을 펼치는 전략적 선택이 강제된다. 내부 설명에 따르면 ‘레이너가 코랄의 사막 지역을 점령하기 위해 특수 부대를 파견한다’는 스토리 설정 하에, 플레이어는 맵 중앙에 위치한 본진을 지키며 주변의 적 건물을 제압하거나, 반대로 적의 핵심 건물을 공격하는 두 가지 방향의 전략을 구사할 수 있는 것으로 보인다. 맵의 구조는 비교적 넓고 개방되어 있어, 유닛의 이동과 시야 확보가 중요해진다. 특히 사막 지형의 경우 시야가 제한되는 경우가 많아, 정찰 유닛이나 센서가 필수적이며, 오아시스 지역은 자원 수집과 방어 거점으로 활용할 수 있는 전략적 요충지다. 맵 곳곳에 배치된 잔해는 자연스러운 장애물 역할을 하면서도, 일부는 건물 배치나 방어선 구축에 활용할 수 있는 유연성을 제공한다. 또한 맵의 중앙과 가장자리에 위치한 고지대는 시야 확보와 포격 유닛의 배치에 유리한 지점으로, 전투의 승패를 좌우할 수 있는 핵심 지역으로 작용한다. 플레이어는 초반 자원 수집과 건물을 건설하는 동시에, 적의 공격 패턴을 분석하여 방어선을 구축하거나, 반대로 빠른 타이밍에 적 본진을 노리는 агре시브한 전략을 펼칠 수 있다. 맵의 난이도는 주로 적의 공격 빈도와 강도에 따라 결정되며, 일부 구간에서는 적의 대규모 병력이 몰려오는 경우 방어가 필요할 수 있다. 또한 맵의 광활한 크기와 개방적인 구조상, 유닛의 컨트롤과 멀티태스킹 능력이 요구되는 경우가 많아, 초보 플레이어보다는 중급 이상의 숙련자를 대상으로 하는 것이 이상적이다. 맵의 진행은 주로 적 건물을 모두 파괴하거나, 모든 적 유닛을 섬멸하는 방식으로 마무리되는 것으로 추정되며, 승리 조건은 내부 설명이나 맵의 구조상 ‘코랄의 사막 지역을 점령’하는 데 성공하는 것으로 보인다. 이 맵을 즐기기 위해서는 사막 지형과 산악 지대의 특성을 충분히 이해하고, 자원 관리와 유닛 컨트롤에 대한 기본적인 숙련이 필요하다. 또한 맵의 광활한 크기상, 빠른 시야 확보와 정찰이 게임의 승패를 가르는 핵심 요소로 작용할 수 있으므로, 초반 정찰을 소홀히 하지 않도록 주의해야 한다. 맵의 분위기는 전쟁과 사막의 황량한 beauty가 어우러져 있어, 전략적인 전투와 함께 몰입감 있는 플레이 경험을 제공한다. 특히 건물을 짓고 방어선을 구축하는 디펜스 요소와, 적 본진을 공격하는 오프ensive 요소가 균형 있게 배치되어 있어, 다양한 전략적 선택을 즐길 수 있는 것이 이 맵의 큰 장점이다. ‘Operation: Burrow in the Desert’ is a custom map for *StarCraft: Brood War* where a single player faces off against a vast desert battlefield, offering a style of play that stands out. The map features a desert terrain interspersed with mountainous regions, scattered debris, and oases, forcing players to balance building structures, gathering resources, and either defending against or launching preemptive strikes. According to its internal lore, the map is set in a scenario where "Raynor dispatches a special forces unit to secure the desert region of Korhal," and players must either protect their central base or push outward to destroy enemy structures—or even assault the enemy’s core buildings. The map’s layout is relatively open and expansive, making unit mobility and vision control critical. The desert terrain often restricts visibility, making scouting units or sensor-based detection essential. Oases serve as key strategic points for resource collection and defensive outposts, while the debris scattered across the map acts as natural obstacles that can also be leveraged for building placement or fortifying defenses. High ground near the center and edges of the map provides superior sightlines and ideal positioning for artillery units, making these areas pivotal to the outcome of battles. Players must gather initial resources and construct buildings while analyzing enemy attack patterns to either fortify their defenses or adopt an aggressive strategy by striking the enemy base early. The difficulty is largely determined by the frequency and intensity of enemy assaults, with some sections requiring preparedness for large-scale enemy advances. Given the map’s vast scale and open design, strong unit control and multitasking skills are essential—making it better suited for intermediate to advanced players rather than beginners. The match concludes when all enemy structures are destroyed or every enemy unit is eliminated, with victory ultimately hinging on "securing the desert region of Korhal," as implied by the map’s lore and structure. To fully enjoy this map, players should grasp the unique characteristics of the desert and mountainous terrain, along with solid resource management and unit control. The map’s sheer size means that early scouting and vision control can decide the game’s outcome, so neglecting reconnaissance in the opening stages is a risk. The atmosphere blends the harsh beauty of war and the desert, delivering an immersive experience where strategic combat and deep engagement go hand in hand. The map strikes a balance between defensive elements—building and fortifying—and offensive pressure, allowing players to experiment with a variety of tactics and enjoy diverse strategic choices.

다운로드 0 · 조회 42 · 댓글 0

최근 등록된 맵

새로 추가된 파일과 버전을 확인하세요.

오퍼레이션: 부랴 в пустыне (Operation: Bury v Pustyne) 맵 미리보기

오퍼레이션: 부랴 в пустыне (Operation: Bury v Pustyne)

‘오퍼레이션: 부랴 в пустыне’는 스타크래프트: 브루드워의 유즈맵으로, 한 명의 플레이어가 광활한 사막 지형을 배경으로 펼쳐지는 전투에 도전하는 스타일이 인상적인 작품이다. 맵은 사막 지형과 산악 지대, 그리고 곳곳에 흩어져 있는 잔해와 오아시스가 특징적으로 배치되어 있어, 건물을 짓고 자원을 모으는 동시에 적의 공격을 방어하거나 선제공격을 펼치는 전략적 선택이 강제된다. 내부 설명에 따르면 ‘레이너가 코랄의 사막 지역을 점령하기 위해 특수 부대를 파견한다’는 스토리 설정 하에, 플레이어는 맵 중앙에 위치한 본진을 지키며 주변의 적 건물을 제압하거나, 반대로 적의 핵심 건물을 공격하는 두 가지 방향의 전략을 구사할 수 있는 것으로 보인다. 맵의 구조는 비교적 넓고 개방되어 있어, 유닛의 이동과 시야 확보가 중요해진다. 특히 사막 지형의 경우 시야가 제한되는 경우가 많아, 정찰 유닛이나 센서가 필수적이며, 오아시스 지역은 자원 수집과 방어 거점으로 활용할 수 있는 전략적 요충지다. 맵 곳곳에 배치된 잔해는 자연스러운 장애물 역할을 하면서도, 일부는 건물 배치나 방어선 구축에 활용할 수 있는 유연성을 제공한다. 또한 맵의 중앙과 가장자리에 위치한 고지대는 시야 확보와 포격 유닛의 배치에 유리한 지점으로, 전투의 승패를 좌우할 수 있는 핵심 지역으로 작용한다. 플레이어는 초반 자원 수집과 건물을 건설하는 동시에, 적의 공격 패턴을 분석하여 방어선을 구축하거나, 반대로 빠른 타이밍에 적 본진을 노리는 агре시브한 전략을 펼칠 수 있다. 맵의 난이도는 주로 적의 공격 빈도와 강도에 따라 결정되며, 일부 구간에서는 적의 대규모 병력이 몰려오는 경우 방어가 필요할 수 있다. 또한 맵의 광활한 크기와 개방적인 구조상, 유닛의 컨트롤과 멀티태스킹 능력이 요구되는 경우가 많아, 초보 플레이어보다는 중급 이상의 숙련자를 대상으로 하는 것이 이상적이다. 맵의 진행은 주로 적 건물을 모두 파괴하거나, 모든 적 유닛을 섬멸하는 방식으로 마무리되는 것으로 추정되며, 승리 조건은 내부 설명이나 맵의 구조상 ‘코랄의 사막 지역을 점령’하는 데 성공하는 것으로 보인다. 이 맵을 즐기기 위해서는 사막 지형과 산악 지대의 특성을 충분히 이해하고, 자원 관리와 유닛 컨트롤에 대한 기본적인 숙련이 필요하다. 또한 맵의 광활한 크기상, 빠른 시야 확보와 정찰이 게임의 승패를 가르는 핵심 요소로 작용할 수 있으므로, 초반 정찰을 소홀히 하지 않도록 주의해야 한다. 맵의 분위기는 전쟁과 사막의 황량한 beauty가 어우러져 있어, 전략적인 전투와 함께 몰입감 있는 플레이 경험을 제공한다. 특히 건물을 짓고 방어선을 구축하는 디펜스 요소와, 적 본진을 공격하는 오프ensive 요소가 균형 있게 배치되어 있어, 다양한 전략적 선택을 즐길 수 있는 것이 이 맵의 큰 장점이다. ‘Operation: Burrow in the Desert’ is a custom map for *StarCraft: Brood War* where a single player faces off against a vast desert battlefield, offering a style of play that stands out. The map features a desert terrain interspersed with mountainous regions, scattered debris, and oases, forcing players to balance building structures, gathering resources, and either defending against or launching preemptive strikes. According to its internal lore, the map is set in a scenario where "Raynor dispatches a special forces unit to secure the desert region of Korhal," and players must either protect their central base or push outward to destroy enemy structures—or even assault the enemy’s core buildings. The map’s layout is relatively open and expansive, making unit mobility and vision control critical. The desert terrain often restricts visibility, making scouting units or sensor-based detection essential. Oases serve as key strategic points for resource collection and defensive outposts, while the debris scattered across the map acts as natural obstacles that can also be leveraged for building placement or fortifying defenses. High ground near the center and edges of the map provides superior sightlines and ideal positioning for artillery units, making these areas pivotal to the outcome of battles. Players must gather initial resources and construct buildings while analyzing enemy attack patterns to either fortify their defenses or adopt an aggressive strategy by striking the enemy base early. The difficulty is largely determined by the frequency and intensity of enemy assaults, with some sections requiring preparedness for large-scale enemy advances. Given the map’s vast scale and open design, strong unit control and multitasking skills are essential—making it better suited for intermediate to advanced players rather than beginners. The match concludes when all enemy structures are destroyed or every enemy unit is eliminated, with victory ultimately hinging on "securing the desert region of Korhal," as implied by the map’s lore and structure. To fully enjoy this map, players should grasp the unique characteristics of the desert and mountainous terrain, along with solid resource management and unit control. The map’s sheer size means that early scouting and vision control can decide the game’s outcome, so neglecting reconnaissance in the opening stages is a risk. The atmosphere blends the harsh beauty of war and the desert, delivering an immersive experience where strategic combat and deep engagement go hand in hand. The map strikes a balance between defensive elements—building and fortifying—and offensive pressure, allowing players to experiment with a variety of tactics and enjoy diverse strategic choices.

다운로드 0 · 조회 42 · 댓글 0
맵 선택 가이드

태그는 맵의 핵심 특징을 빠르게 설명하지만 제작 버전마다 규칙이 다를 수 있습니다. 상세 설명에서 권장 인원, 난이도, 플레이 시간과 버전을 함께 확인한 뒤 다운로드하세요.