
10웨이 디펜스 スタークラフト マップコレクション
「10웨이 디펜스」タグが登録されたマップを集めました。ジャンルだけでは見つけにくいプレイ方式、難易度、特徴を中心に、人気のマップと最新マップを比較してみてください。
- 登録マップ
- 2個
- 累計ダウンロード
- 0
- 累計閲覧
- 57
人気マップ
ダウンロードと閲覧の反応が高いマップです。
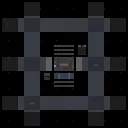
캐논/서든 10웨이 스택 (Cannon/Sunken D10-Way STACK)
스타크래프트 브루드워의 대표적인 디펜스 장르 유즈맵인 ‘Cannon/Sunken D10-Way STACK’의 구조와 특징을 자세히 살펴보자. 이 맵은 이름에서 알 수 있듯이 캐논과 서든을 조합한 10방향 디펜스 구조가 특징으로, 중앙 기지 보호와 병력 소모를 최소화하는 전략적 플레이가 요구된다. 맵 중앙에는 본진이 위치하며, 외곽을 따라 10개의 주요 방어 지점이 배치되어 있어 다방향 공격을 방어해야 한다. 각 방어 지점은 캐논과 서든, 그리고 미사일 터렛으로 구성되어 있으며, 적의 공격 루트를 분산시키는 동시에 강력한 화력으로 제압할 수 있도록 설계되었다. 맵의 테두리에는 추가 방어 시설이 배치되어 있어, 중앙 기지가 뚫릴 경우를 대비한 보험 역할을 한다. 플레이어는 제한된 자원으로 끊임없는 적 웨이브를 상대해야 하며, 효율적인 자원 관리와 타이밍을 맞추는 것이 승리의 핵심이다. 특히 10방향에서 동시에 공격이 들어오기 때문에, 방어 라인을 적절히 보강하고 병력을 효율적으로 배치해야 한다. 맵의 symmetrical한 구조 덕분에 초보자와 숙련자 모두에게 공정한 경쟁을 제공하며, 반복 플레이를 통해 최적의 전략을 개발할 수 있다. 또한, 맵의 난이도는 단계적으로 상승하는 구조로 되어 있어, 점차적인 적응이 가능하다는 장점이 있다. 이 맵은 디펜스 장르에 익숙한 플레이어뿐만 아니라, 새로운 전략을 시도해 보고 싶은 유저에게도 좋은 선택지가 될 것이다. 다만, 방어 라인의 중요성을 간과하거나 자원 관리를 소홀히 하면 금방 밀리기 때문에, 신중한 플레이가 요구된다. 맵을 플레이하기 전에는 방어 시설의 배치와 병력 생산 우선순위를 미리 숙지하고, 각 방어 지점의 역할을 이해하는 것이 중요하다. 또한, 맵의 symmetrical한 특성을 활용해 상대방의 약점을 노리는 전략도 고려해 볼 만하다. 초보자의 경우, 낮은 난이도에서 기본적인 방어 루틴을 익힌 뒤 점차 난이도를 높이는 것이 좋다. 이 맵은 디펜스 장르의 정수를 느낄 수 있는 작품으로, 스타크래프트 유즈맵 among the best에 속하는 작품 중 하나로 꼽힌다. 특히 10방향 디펜스는 여러 디펜스 맵 중에서도Unique한 특징을 가지고 있으며, 그 복잡성과 재미가 뛰어난 작품이다. Let’s take a close look at *Cannon/Sunken D10-Way STACK*, a classic defense-style custom map from *StarCraft: Brood War*. As the name suggests, this map features a 10-direction defense layout combining cannons and sunkens, emphasizing strategic play that minimizes resource waste and troop losses while protecting the main base. At the center lies the player’s starting base, surrounded by ten key defensive points arranged along the outer perimeter, forcing the player to defend against attacks coming from multiple directions simultaneously. Each defensive point is equipped with cannons, sunkens, and missile turrets, designed to split enemy attack routes and overwhelm them with concentrated firepower. Additional defensive structures line the map’s edges, acting as a safety net in case the central base is breached. Players must hold off endless enemy waves with limited resources, making efficient resource management and precise timing critical to victory. Since attacks can strike from all ten directions at once, reinforcing defensive lines and deploying forces strategically are essential. The map’s symmetrical design ensures fair competition for both beginners and experienced players, allowing strategies to be refined through repeated play. The difficulty scales progressively, making it easier to adapt over time. Whether you're a seasoned defense player or someone looking to experiment with new tactics, this map offers a solid challenge. However, overlooking the importance of defensive lines or neglecting resource management can lead to quick defeats, so careful play is required. Before jumping in, study the placement of defensive structures and prioritize unit production accordingly. Understanding the role of each defensive point is crucial. Leveraging the map’s symmetrical layout to exploit an opponent’s weaknesses is also a viable strategy. Beginners should start on lower difficulties to master basic defensive routines before gradually increasing the challenge. *Cannon/Sunken D10-Way STACK* stands as a quintessential defense experience and is widely regarded as one of the best custom maps in *StarCraft*. Its 10-direction defense system is unique even among similar maps, offering exceptional complexity and replayability that make it a standout title in the genre.
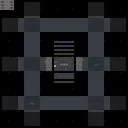
Sunken Defense 10-Way V 4.0!
스타크래프트 브루드워의 대표적인 디펜스 유즈맵인 'Sunken Defense 10-Way V 4.0!'은 중앙에 위치한 방어 포인트를 중심으로 10방향에서 끊임없이 몰려오는 적을 상대로 아군을 지켜내는 것이 목표인 맵이다. 맵의 이름에서 알 수 있듯이 'Sunken'이라는 이름에 걸맞게 맵 전체가 물로 둘러싸인 구조를 가지고 있으며, 중앙에 있는 방어 기지 주변으로 좁은 통로가 뚫려 있어 Hereos of the Storm의 'Hanamura Temple'처럼 전략적인 범위 공격을 활용한 방어가 핵심이다. 플레이어는 미네랄과 가스를 확보해 병력을 꾸준히 생산하고, 방어 타워나 특수 유닛을 배치해 적의 공격을 막아내야 한다. 맵의 특징인 10방향에서 동시에 공격이 들어오기 때문에, 한쪽으로만 병력을 집중하면 순식간에 방어선이 무너질 위험이 크므로 균형 잡힌 자원 관리와 병력 운용이 무엇보다 중요하다. 또한, 맵 곳곳에 배치된 리소스 위치와 미네랄 멀티는 자원을 두고 경쟁할 수밖에 없게 만들어 전략의 깊이를 더한다. 초보 플레이어는 적의 공격 패턴을 익히고, 중급 이상은 다채로운 병력 조합과 타워 배치로 방어 효율을 극대화하는 테크닉을 연마할 수 있는 좋은 연습용 맵으로 추천된다. 특히, 유닛의 특성상 방사 피해가 중요한 이 맵에서 스카웃이나 골리앗, 사이언스 베슬의 활용은 필수라고 할 수 있다. 마지막으로, 맵의 난이도는 버전에 따라 다르지만, 4.0 버전은 비교적 균형 잡힌 난이도를 제공하므로 자신에게 맞는 전략을 찾는 재미가 쏠쏠하다. 플레이 전에는 맵의 지형을 충분히 숙지하고, 방어 타워의 위치와 리소스 멀티의 위치를 미리 확인해 두는 것이 좋다. 또한, 팀 플레이가 중요하므로 팀원과의 협력도 맵의 성공 여부를 좌우할 중요한 요소다. 이 맵을 즐기기 위해서는 무엇보다도 꾸준한 연습과 전략적 사고가 뒷받침되어야 한다. Sunken Defense 10-Way V 4.0! is a classic defense-style custom map in StarCraft: Brood War, where players must protect a central base from relentless waves of enemies approaching from 10 different directions. The map's name 'Sunken' reflects its design, featuring a base surrounded by water with narrow pathways leading to it, reminiscent of Hanamura Temple in Heroes of the Storm. Players must gather resources to build armies and strategically place defensive towers or units to fend off attacks. The challenge lies in managing attacks from all directions simultaneously, as neglecting any one path can lead to a swift collapse. The map's resource nodes and mineral patches scattered around create a competitive environment for resource control, adding depth to the gameplay. Beginners can use this map to learn attack patterns and basic strategies, while intermediate and advanced players can refine their tactics by experimenting with unit combinations and tower placements. Units with splash damage, such as Scouts, Goliaths, and Science Vessels, are particularly effective here. The difficulty varies by version, but version 4.0 offers a balanced challenge, making it a great choice for honing strategic thinking. Before playing, it's essential to familiarize yourself with the map's terrain, tower placements, and resource node locations. Teamwork is crucial, so coordinating with teammates can significantly impact your success. Consistency and strategic planning are key to enjoying and mastering this map.
最近登録されたマップ
新たに追加されたファイルとバージョンをご確認ください。
Sunken Defense 10-Way V 4.0!
스타크래프트 브루드워의 대표적인 디펜스 유즈맵인 'Sunken Defense 10-Way V 4.0!'은 중앙에 위치한 방어 포인트를 중심으로 10방향에서 끊임없이 몰려오는 적을 상대로 아군을 지켜내는 것이 목표인 맵이다. 맵의 이름에서 알 수 있듯이 'Sunken'이라는 이름에 걸맞게 맵 전체가 물로 둘러싸인 구조를 가지고 있으며, 중앙에 있는 방어 기지 주변으로 좁은 통로가 뚫려 있어 Hereos of the Storm의 'Hanamura Temple'처럼 전략적인 범위 공격을 활용한 방어가 핵심이다. 플레이어는 미네랄과 가스를 확보해 병력을 꾸준히 생산하고, 방어 타워나 특수 유닛을 배치해 적의 공격을 막아내야 한다. 맵의 특징인 10방향에서 동시에 공격이 들어오기 때문에, 한쪽으로만 병력을 집중하면 순식간에 방어선이 무너질 위험이 크므로 균형 잡힌 자원 관리와 병력 운용이 무엇보다 중요하다. 또한, 맵 곳곳에 배치된 리소스 위치와 미네랄 멀티는 자원을 두고 경쟁할 수밖에 없게 만들어 전략의 깊이를 더한다. 초보 플레이어는 적의 공격 패턴을 익히고, 중급 이상은 다채로운 병력 조합과 타워 배치로 방어 효율을 극대화하는 테크닉을 연마할 수 있는 좋은 연습용 맵으로 추천된다. 특히, 유닛의 특성상 방사 피해가 중요한 이 맵에서 스카웃이나 골리앗, 사이언스 베슬의 활용은 필수라고 할 수 있다. 마지막으로, 맵의 난이도는 버전에 따라 다르지만, 4.0 버전은 비교적 균형 잡힌 난이도를 제공하므로 자신에게 맞는 전략을 찾는 재미가 쏠쏠하다. 플레이 전에는 맵의 지형을 충분히 숙지하고, 방어 타워의 위치와 리소스 멀티의 위치를 미리 확인해 두는 것이 좋다. 또한, 팀 플레이가 중요하므로 팀원과의 협력도 맵의 성공 여부를 좌우할 중요한 요소다. 이 맵을 즐기기 위해서는 무엇보다도 꾸준한 연습과 전략적 사고가 뒷받침되어야 한다. Sunken Defense 10-Way V 4.0! is a classic defense-style custom map in StarCraft: Brood War, where players must protect a central base from relentless waves of enemies approaching from 10 different directions. The map's name 'Sunken' reflects its design, featuring a base surrounded by water with narrow pathways leading to it, reminiscent of Hanamura Temple in Heroes of the Storm. Players must gather resources to build armies and strategically place defensive towers or units to fend off attacks. The challenge lies in managing attacks from all directions simultaneously, as neglecting any one path can lead to a swift collapse. The map's resource nodes and mineral patches scattered around create a competitive environment for resource control, adding depth to the gameplay. Beginners can use this map to learn attack patterns and basic strategies, while intermediate and advanced players can refine their tactics by experimenting with unit combinations and tower placements. Units with splash damage, such as Scouts, Goliaths, and Science Vessels, are particularly effective here. The difficulty varies by version, but version 4.0 offers a balanced challenge, making it a great choice for honing strategic thinking. Before playing, it's essential to familiarize yourself with the map's terrain, tower placements, and resource node locations. Teamwork is crucial, so coordinating with teammates can significantly impact your success. Consistency and strategic planning are key to enjoying and mastering this map.
캐논/서든 10웨이 스택 (Cannon/Sunken D10-Way STACK)
스타크래프트 브루드워의 대표적인 디펜스 장르 유즈맵인 ‘Cannon/Sunken D10-Way STACK’의 구조와 특징을 자세히 살펴보자. 이 맵은 이름에서 알 수 있듯이 캐논과 서든을 조합한 10방향 디펜스 구조가 특징으로, 중앙 기지 보호와 병력 소모를 최소화하는 전략적 플레이가 요구된다. 맵 중앙에는 본진이 위치하며, 외곽을 따라 10개의 주요 방어 지점이 배치되어 있어 다방향 공격을 방어해야 한다. 각 방어 지점은 캐논과 서든, 그리고 미사일 터렛으로 구성되어 있으며, 적의 공격 루트를 분산시키는 동시에 강력한 화력으로 제압할 수 있도록 설계되었다. 맵의 테두리에는 추가 방어 시설이 배치되어 있어, 중앙 기지가 뚫릴 경우를 대비한 보험 역할을 한다. 플레이어는 제한된 자원으로 끊임없는 적 웨이브를 상대해야 하며, 효율적인 자원 관리와 타이밍을 맞추는 것이 승리의 핵심이다. 특히 10방향에서 동시에 공격이 들어오기 때문에, 방어 라인을 적절히 보강하고 병력을 효율적으로 배치해야 한다. 맵의 symmetrical한 구조 덕분에 초보자와 숙련자 모두에게 공정한 경쟁을 제공하며, 반복 플레이를 통해 최적의 전략을 개발할 수 있다. 또한, 맵의 난이도는 단계적으로 상승하는 구조로 되어 있어, 점차적인 적응이 가능하다는 장점이 있다. 이 맵은 디펜스 장르에 익숙한 플레이어뿐만 아니라, 새로운 전략을 시도해 보고 싶은 유저에게도 좋은 선택지가 될 것이다. 다만, 방어 라인의 중요성을 간과하거나 자원 관리를 소홀히 하면 금방 밀리기 때문에, 신중한 플레이가 요구된다. 맵을 플레이하기 전에는 방어 시설의 배치와 병력 생산 우선순위를 미리 숙지하고, 각 방어 지점의 역할을 이해하는 것이 중요하다. 또한, 맵의 symmetrical한 특성을 활용해 상대방의 약점을 노리는 전략도 고려해 볼 만하다. 초보자의 경우, 낮은 난이도에서 기본적인 방어 루틴을 익힌 뒤 점차 난이도를 높이는 것이 좋다. 이 맵은 디펜스 장르의 정수를 느낄 수 있는 작품으로, 스타크래프트 유즈맵 among the best에 속하는 작품 중 하나로 꼽힌다. 특히 10방향 디펜스는 여러 디펜스 맵 중에서도Unique한 특징을 가지고 있으며, 그 복잡성과 재미가 뛰어난 작품이다. Let’s take a close look at *Cannon/Sunken D10-Way STACK*, a classic defense-style custom map from *StarCraft: Brood War*. As the name suggests, this map features a 10-direction defense layout combining cannons and sunkens, emphasizing strategic play that minimizes resource waste and troop losses while protecting the main base. At the center lies the player’s starting base, surrounded by ten key defensive points arranged along the outer perimeter, forcing the player to defend against attacks coming from multiple directions simultaneously. Each defensive point is equipped with cannons, sunkens, and missile turrets, designed to split enemy attack routes and overwhelm them with concentrated firepower. Additional defensive structures line the map’s edges, acting as a safety net in case the central base is breached. Players must hold off endless enemy waves with limited resources, making efficient resource management and precise timing critical to victory. Since attacks can strike from all ten directions at once, reinforcing defensive lines and deploying forces strategically are essential. The map’s symmetrical design ensures fair competition for both beginners and experienced players, allowing strategies to be refined through repeated play. The difficulty scales progressively, making it easier to adapt over time. Whether you're a seasoned defense player or someone looking to experiment with new tactics, this map offers a solid challenge. However, overlooking the importance of defensive lines or neglecting resource management can lead to quick defeats, so careful play is required. Before jumping in, study the placement of defensive structures and prioritize unit production accordingly. Understanding the role of each defensive point is crucial. Leveraging the map’s symmetrical layout to exploit an opponent’s weaknesses is also a viable strategy. Beginners should start on lower difficulties to master basic defensive routines before gradually increasing the challenge. *Cannon/Sunken D10-Way STACK* stands as a quintessential defense experience and is widely regarded as one of the best custom maps in *StarCraft*. Its 10-direction defense system is unique even among similar maps, offering exceptional complexity and replayability that make it a standout title in the genre.
マップ選択ガイド
태그는 맵의 핵심 특징을 빠르게 설명하지만 제작 버전마다 규칙이 다를 수 있습니다. 상세 설명에서 권장 인원, 난이도, 플레이 시간과 버전을 함께 확인한 뒤 다운로드하세요.