
Collection de cartes StarCraft 능선 전투
Nous avons rassemblé des cartes enregistrées avec le tag '능선 전투'. Comparez les cartes populaires et récentes en vous concentrant sur les styles de jeu, les difficultés et les caractéristiques qui sont difficiles à trouver via un seul genre.
- Cartes enregistrées
- 2éléments
- Téléchargements cumulés
- 0
- Vues cumulées
- 34
Cartes populaires
C'est une carte avec un taux élevé de téléchargements et de consultations.
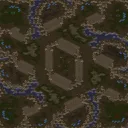
Ridge to Ridge (리짓 투 리지)
이 맵은 스타크래프트 브루드워의 사막 지형을 배경으로 한 4인용 밀리 맵으로, ‘Ridge to Ridge’라는 제목에서 알 수 있듯이 지형의 능선(Ridge)을 중심으로 전투가 펼쳐지는 특징을 가지고 있다. 맵의 중앙지역에는 넓은 평지가 펼쳐져 있으며, 능선 주변으로는 좁은 통로와 고지대가 형성되어 있어 각 플레이어의 시작 위치가 명확히 구분된다. 시작 지점은 사각형 형태로 배치되어 있으며, 각 플레이어의 본진은 능선의 안쪽에 자리 잡고 있어 초반 러시가 활발히 발생할 가능성이 높다. 능선 위의 좁은 길목은 병력 이동의 bottleneck이 될 수 있어, 중앙에서 벌어지는 전투는 물론이고 테란의 벙커링, 프로토스의 질럿 러시, 저그의 러커 전략 등 다양한 전술이 자연스럽게 시도될 수 있도록 설계되어 있다. 특히 능선의 고지대에서 시야가 확보되는 구조이기 때문에, 시야 싸움과 정찰이 중요한 역할을 할 것으로 보인다. 사막 지형의 특성상 Mineral Field가 비교적 멀리 배치되어 있어 자원 관리에도 신경을 써야 하며, 초반 자원 확보가 승패를 좌우할 가능성이 크다. 이 맵은 4인의 플레이어가 각자의 시작 지점에서 중앙 평지를 두고 경쟁하는 구조로, 밀리 맵으로서의 밸런스가 중요하다. 중앙 지역의 Mineral Field와 Gas Geyser의 분포는 비교적 공평하게 배치되어 있어,_resource gathering_에서 유불리가 발생하지 않도록 설계된 것으로 추정된다. 다만, 능선의 높이 차이로 인해 고지대에서 내려다보이는 시야와 이동 경로의 제약이 있을 수 있어, 플레이어는 지형을 최대한 활용한 전략을 세울 필요가 있다. 이 맵을 플레이하기 전에는 사막 지형의 특성을 잘 이해하고, 능선 위의 고지대를 점령하는 것이 중요하다는 점을 염두에 둬야 한다. 또한, 초반 러시 타이밍과 중앙 평지에서 벌어지는 전투의 양상을 잘 조율해야 하므로, 다양한 전략을 연습해보는 것이 좋다. 주로 중수 이상의 플레이어에게 추천되는 맵으로, 능선과 평지 간의 지형적 이점을 얼마나 잘 활용하느냐가 승패를 가를 것이다. This map is a four-player melee map set in the desert terrain of *StarCraft: Brood War*, where battles unfold around ridges, as suggested by its title, *Ridge to Ridge*. The central area features a wide open plain, while the surrounding ridges create narrow passages and elevated positions, clearly separating each player’s starting location. The starting bases are arranged in a square formation, with each player’s main base tucked inside the ridge, making early rushes highly likely. The narrow paths atop the ridges can act as bottlenecks for troop movements, shaping not only the central battles but also enabling Terran bunker rushes, Protoss Zealot rushes, and Zerg Lurker strategies. The elevated ridges provide clear sightlines, making scouting and vision control critical. Given the desert setting, Mineral Fields are spaced relatively far apart, requiring careful resource management—early resource control could heavily influence the outcome. Designed for four players competing over the central plain from their starting positions, balance is key for a competitive melee map. The distribution of Mineral Fields and Vespene Geysers in the center appears fair, avoiding any inherent advantage in resource gathering. However, height differences on the ridges may limit visibility and movement, so players must leverage the terrain strategically. Before playing, it’s important to understand the desert terrain’s nuances and prioritize securing the high ground on the ridges. Early rush timing and coordination in central battles are crucial, so practicing diverse strategies is recommended. Best suited for intermediate to advanced players, this map’s outcome hinges on how effectively players exploit the ridges and plains.
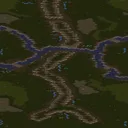
드롯트 숲 능선 (Droht- Forest Ridge)
스타크래프트 브루드워의 고전 맵 'Droht- Forest Ridge'는 독특한 지형과 전략적인 배치로 밀리 유저들에게 memorable한 경험을 제공하는 5인용 맵이다. 맵 중앙을 가로지르는 거대한 숲 능선 'Great Forest Ridge of Droht'가 맵을 양분하면서 각 플레이어의 스타팅 포인트를 분리하고, 이 능선을 둘러싼 좁은 길목과 넓은 평지가 혼합된 구조로 인해 전투는 물론 자원 관리와 멀티 확보 전략이 더욱 중요해진다. 특히 능선을 넘어 진격하거나 방어선을 구축하는 선택이 게임의 승부를 좌우할 수 있으며, 숲의 존재로 인해 시야 확보가 제한되는 구간이 많기 때문에 정찰과 컨트롤의 중요성이 부각된다. 이 맵의 가장 큰 특징은 바로 'Great Forest Ridge'의 중앙 능선으로, 맵의 절반을 차지하는 이 지형은 단순히 장식용이 아니라 전략적 요충지다. 능선 위는 시야가 탁 트여 있지만 접근성이 떨어지고, 능선 아래 평지는 넓은 시야를 확보하기 어려운 대신 빠른 이동이 가능하다. 초반 러시부터 후반 전투까지 능선의 통제 여부가 승패를 가를 수 있으며, 능선을 넘어가려는 시도를 저지하거나 능선 위에서 방어선을 구축하는 플레이가 핵심 전략이 된다. 또한, 각 스타팅 지역이 완전히 분리되어 있어 초반 자원 확보와 멀티 확장이 독립적으로 이뤄질 수 있지만, 반대로 중앙 능선을 장악하지 못하면 자원 확보가 어려워지는 역설적인 구조도 가지고 있다. 이 맵의 또 다른 특징은 맵의vast한 크기다. 4096x6144라는 거대한 사이즈는 넓은 전장과 긴 전투 거리를 제공하며, 맵의 절반을 차지하는 숲 능선은 시야를 가리는 동시에 지형을 활용한 전략을 가능하게 한다. 이렇듯 복잡한 지형과 넓은 전장은 초보자가 플레이하기에는 다소 어렵지만, 숙련된 유저들에게는 다양한 전략적 선택지와 전술적 깊이를 제공하는 매력적인 맵으로 평가된다. 특히 능선 주변의 좁은 길목이나 평지에서의 전투는 타이밍과 컨트롤이 중요한데, 이를 숙지하고 있다면 이 맵에서 승률을 높일 수 있을 것이다. 추천 대상은 스타크래프트 밀리 플레이어 중에서도 넓은 전장과 복잡한 지형에서의 전투를 즐기는 유저들이다. 특히 능선 주변의 전투와 중앙 장악 전략을 좋아하는 플레이어라면 이 맵에서 큰 재미를 느낄 수 있을 것이다. 또한, 초보자의 경우 능선의 중요성과 시야 확보의 어려움을 충분히 숙지한 뒤 플레이하는 것이 좋다. 맵의vast한 크기와 복잡한 지형은 초보자에게는 진입 장벽이 될 수 있지만, 숙련된 유저에게는 새로운 전략적 깊이를 제공하는 훌륭한 맵이라 할 수 있다. The classic Brood War map *Droht-Forest Ridge* is a memorable 5v5 map known for its unique terrain and strategic layout, offering Mill players a distinctive experience. The map is divided by the massive forest ridge "Great Forest Ridge of Droht," which separates each player's starting positions while creating a mix of narrow chokepoints and wide open plains around it. This structure forces players to carefully manage resources, secure expansions, and plan their battles, as the choice to attack across the ridge or fortify defenses often decides the game. The dense forest also limits visibility in many areas, emphasizing the importance of scouting and precise control. The central feature of this map is the *Great Forest Ridge*, which dominates half the map and serves as more than just a decorative element—it’s a critical strategic point. The ridge itself offers clear sightlines but is difficult to access, while the flatlands below provide quick movement but poor visibility. Controlling the ridge can determine the outcome of battles from the early rush to the late-game, making it essential to either block enemy advances or establish defensive lines atop it. Additionally, the map’s isolated starting positions allow for independent early resource gathering and expansion, but failing to secure the ridge can paradoxically hinder resource collection. Another defining trait of *Droht-Forest Ridge* is its vast scale. At 4096x6144, the enormous battlefield stretches combat distances and forces long engagements, while the ridge—occupying half the map—obscures vision and enables terrain-based strategies. Though this complex terrain and sprawling design can be daunting for beginners, experienced players appreciate the depth and variety of strategic options it offers. Battles around the ridge’s narrow passages or open plains hinge on timing and micro, so mastering these elements can significantly boost your win rate. This map is best suited for Mill players who enjoy wide battlefields and intricate terrain. Those who favor ridge-side combat and central control strategies will find it particularly engaging. Beginners should familiarize themselves with the ridge’s importance and the challenges of vision control before diving in. While the map’s size and complexity may pose a barrier for new players, for veterans, it delivers exceptional strategic depth and a rewarding experience.
Cartes récemment ajoutées
Vérifiez les fichiers et versions récemment ajoutés.
드롯트 숲 능선 (Droht- Forest Ridge)
스타크래프트 브루드워의 고전 맵 'Droht- Forest Ridge'는 독특한 지형과 전략적인 배치로 밀리 유저들에게 memorable한 경험을 제공하는 5인용 맵이다. 맵 중앙을 가로지르는 거대한 숲 능선 'Great Forest Ridge of Droht'가 맵을 양분하면서 각 플레이어의 스타팅 포인트를 분리하고, 이 능선을 둘러싼 좁은 길목과 넓은 평지가 혼합된 구조로 인해 전투는 물론 자원 관리와 멀티 확보 전략이 더욱 중요해진다. 특히 능선을 넘어 진격하거나 방어선을 구축하는 선택이 게임의 승부를 좌우할 수 있으며, 숲의 존재로 인해 시야 확보가 제한되는 구간이 많기 때문에 정찰과 컨트롤의 중요성이 부각된다. 이 맵의 가장 큰 특징은 바로 'Great Forest Ridge'의 중앙 능선으로, 맵의 절반을 차지하는 이 지형은 단순히 장식용이 아니라 전략적 요충지다. 능선 위는 시야가 탁 트여 있지만 접근성이 떨어지고, 능선 아래 평지는 넓은 시야를 확보하기 어려운 대신 빠른 이동이 가능하다. 초반 러시부터 후반 전투까지 능선의 통제 여부가 승패를 가를 수 있으며, 능선을 넘어가려는 시도를 저지하거나 능선 위에서 방어선을 구축하는 플레이가 핵심 전략이 된다. 또한, 각 스타팅 지역이 완전히 분리되어 있어 초반 자원 확보와 멀티 확장이 독립적으로 이뤄질 수 있지만, 반대로 중앙 능선을 장악하지 못하면 자원 확보가 어려워지는 역설적인 구조도 가지고 있다. 이 맵의 또 다른 특징은 맵의vast한 크기다. 4096x6144라는 거대한 사이즈는 넓은 전장과 긴 전투 거리를 제공하며, 맵의 절반을 차지하는 숲 능선은 시야를 가리는 동시에 지형을 활용한 전략을 가능하게 한다. 이렇듯 복잡한 지형과 넓은 전장은 초보자가 플레이하기에는 다소 어렵지만, 숙련된 유저들에게는 다양한 전략적 선택지와 전술적 깊이를 제공하는 매력적인 맵으로 평가된다. 특히 능선 주변의 좁은 길목이나 평지에서의 전투는 타이밍과 컨트롤이 중요한데, 이를 숙지하고 있다면 이 맵에서 승률을 높일 수 있을 것이다. 추천 대상은 스타크래프트 밀리 플레이어 중에서도 넓은 전장과 복잡한 지형에서의 전투를 즐기는 유저들이다. 특히 능선 주변의 전투와 중앙 장악 전략을 좋아하는 플레이어라면 이 맵에서 큰 재미를 느낄 수 있을 것이다. 또한, 초보자의 경우 능선의 중요성과 시야 확보의 어려움을 충분히 숙지한 뒤 플레이하는 것이 좋다. 맵의vast한 크기와 복잡한 지형은 초보자에게는 진입 장벽이 될 수 있지만, 숙련된 유저에게는 새로운 전략적 깊이를 제공하는 훌륭한 맵이라 할 수 있다. The classic Brood War map *Droht-Forest Ridge* is a memorable 5v5 map known for its unique terrain and strategic layout, offering Mill players a distinctive experience. The map is divided by the massive forest ridge "Great Forest Ridge of Droht," which separates each player's starting positions while creating a mix of narrow chokepoints and wide open plains around it. This structure forces players to carefully manage resources, secure expansions, and plan their battles, as the choice to attack across the ridge or fortify defenses often decides the game. The dense forest also limits visibility in many areas, emphasizing the importance of scouting and precise control. The central feature of this map is the *Great Forest Ridge*, which dominates half the map and serves as more than just a decorative element—it’s a critical strategic point. The ridge itself offers clear sightlines but is difficult to access, while the flatlands below provide quick movement but poor visibility. Controlling the ridge can determine the outcome of battles from the early rush to the late-game, making it essential to either block enemy advances or establish defensive lines atop it. Additionally, the map’s isolated starting positions allow for independent early resource gathering and expansion, but failing to secure the ridge can paradoxically hinder resource collection. Another defining trait of *Droht-Forest Ridge* is its vast scale. At 4096x6144, the enormous battlefield stretches combat distances and forces long engagements, while the ridge—occupying half the map—obscures vision and enables terrain-based strategies. Though this complex terrain and sprawling design can be daunting for beginners, experienced players appreciate the depth and variety of strategic options it offers. Battles around the ridge’s narrow passages or open plains hinge on timing and micro, so mastering these elements can significantly boost your win rate. This map is best suited for Mill players who enjoy wide battlefields and intricate terrain. Those who favor ridge-side combat and central control strategies will find it particularly engaging. Beginners should familiarize themselves with the ridge’s importance and the challenges of vision control before diving in. While the map’s size and complexity may pose a barrier for new players, for veterans, it delivers exceptional strategic depth and a rewarding experience.
Ridge to Ridge (리짓 투 리지)
이 맵은 스타크래프트 브루드워의 사막 지형을 배경으로 한 4인용 밀리 맵으로, ‘Ridge to Ridge’라는 제목에서 알 수 있듯이 지형의 능선(Ridge)을 중심으로 전투가 펼쳐지는 특징을 가지고 있다. 맵의 중앙지역에는 넓은 평지가 펼쳐져 있으며, 능선 주변으로는 좁은 통로와 고지대가 형성되어 있어 각 플레이어의 시작 위치가 명확히 구분된다. 시작 지점은 사각형 형태로 배치되어 있으며, 각 플레이어의 본진은 능선의 안쪽에 자리 잡고 있어 초반 러시가 활발히 발생할 가능성이 높다. 능선 위의 좁은 길목은 병력 이동의 bottleneck이 될 수 있어, 중앙에서 벌어지는 전투는 물론이고 테란의 벙커링, 프로토스의 질럿 러시, 저그의 러커 전략 등 다양한 전술이 자연스럽게 시도될 수 있도록 설계되어 있다. 특히 능선의 고지대에서 시야가 확보되는 구조이기 때문에, 시야 싸움과 정찰이 중요한 역할을 할 것으로 보인다. 사막 지형의 특성상 Mineral Field가 비교적 멀리 배치되어 있어 자원 관리에도 신경을 써야 하며, 초반 자원 확보가 승패를 좌우할 가능성이 크다. 이 맵은 4인의 플레이어가 각자의 시작 지점에서 중앙 평지를 두고 경쟁하는 구조로, 밀리 맵으로서의 밸런스가 중요하다. 중앙 지역의 Mineral Field와 Gas Geyser의 분포는 비교적 공평하게 배치되어 있어,_resource gathering_에서 유불리가 발생하지 않도록 설계된 것으로 추정된다. 다만, 능선의 높이 차이로 인해 고지대에서 내려다보이는 시야와 이동 경로의 제약이 있을 수 있어, 플레이어는 지형을 최대한 활용한 전략을 세울 필요가 있다. 이 맵을 플레이하기 전에는 사막 지형의 특성을 잘 이해하고, 능선 위의 고지대를 점령하는 것이 중요하다는 점을 염두에 둬야 한다. 또한, 초반 러시 타이밍과 중앙 평지에서 벌어지는 전투의 양상을 잘 조율해야 하므로, 다양한 전략을 연습해보는 것이 좋다. 주로 중수 이상의 플레이어에게 추천되는 맵으로, 능선과 평지 간의 지형적 이점을 얼마나 잘 활용하느냐가 승패를 가를 것이다. This map is a four-player melee map set in the desert terrain of *StarCraft: Brood War*, where battles unfold around ridges, as suggested by its title, *Ridge to Ridge*. The central area features a wide open plain, while the surrounding ridges create narrow passages and elevated positions, clearly separating each player’s starting location. The starting bases are arranged in a square formation, with each player’s main base tucked inside the ridge, making early rushes highly likely. The narrow paths atop the ridges can act as bottlenecks for troop movements, shaping not only the central battles but also enabling Terran bunker rushes, Protoss Zealot rushes, and Zerg Lurker strategies. The elevated ridges provide clear sightlines, making scouting and vision control critical. Given the desert setting, Mineral Fields are spaced relatively far apart, requiring careful resource management—early resource control could heavily influence the outcome. Designed for four players competing over the central plain from their starting positions, balance is key for a competitive melee map. The distribution of Mineral Fields and Vespene Geysers in the center appears fair, avoiding any inherent advantage in resource gathering. However, height differences on the ridges may limit visibility and movement, so players must leverage the terrain strategically. Before playing, it’s important to understand the desert terrain’s nuances and prioritize securing the high ground on the ridges. Early rush timing and coordination in central battles are crucial, so practicing diverse strategies is recommended. Best suited for intermediate to advanced players, this map’s outcome hinges on how effectively players exploit the ridges and plains.
Guide de sélection de cartes
태그는 맵의 핵심 특징을 빠르게 설명하지만 제작 버전마다 규칙이 다를 수 있습니다. 상세 설명에서 권장 인원, 난이도, 플레이 시간과 버전을 함께 확인한 뒤 다운로드하세요.