
Colección de mapas de StarCraft 타격
Hemos reunido mapas registrados con la etiqueta '타격'. Compara los mapas populares y los más recientes centrándote en el estilo de juego, la dificultad y las características que son difíciles de encontrar solo por género.
- Mapas registrados
- 2unidades
- Descargas acumuladas
- 0
- Vistas acumuladas
- 121
Mapas populares
Este es un mapa con alta tasa de descargas y visitas.
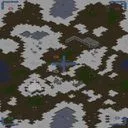
Offensive Strike - Final Beta (공격형 타격 - 최종 베타)
「Offensive Strike - Final Beta」는 스타크래프트: 브루드워의 유즈맵으로, 제한 시간 내에 모든 적 건물을 파괴하는 목표를 지닌 서바이벌 장르의 맵이다. 맵의 핵심은 ‘시간과 적의 반격’이라는 두 가지 압박 속에서 플레이어의 전략적 판단력을 시험하는 데 있다. 맵 중앙에 위치한 넓은 평지는 공격과 수비의 거점이 되며, 플레이어는 이곳을 중심으로 적의 건물을 찾아내 파괴해야 한다. 맵 곳곳에 배치된 적의 건물이 시간이 지나면서 점차 강력해지거나 수비 태세를 갖추기 때문에, 초반의 선제공격이 무엇보다 중요하다. 또한, 맵의 테두리에는 방어 시설이 배치되어 있어 무턱대고 공격을 펼쳤다가는 큰 손실을 입을 수 있다. 따라서 플레이어는 적의 건물을 하나씩 제거해 나가며, 동시에 자신의 기지를 보호하는 균형 잡힌 전략을 구사해야 한다. 이 맵은 특히 ‘Final Beta’라는 이름에 걸맞게 난이도 상승 요소가 뚜렷하다. 맵 설명에 따르면 ‘Each Level gets harder’라는 문구가 확인되며, 이는 맵의 구성이 단계적으로 어려워지는 구조를 갖추고 있음을 의미한다. 예를 들어 초기에는 소수의 건물이 느리게 반응하더라도, 시간이 지나면 적의 건물이 다수 등장하거나 방어 시설이 강화되는 방식으로 진행된다. 이러한 구조는 플레이어에게 끊임없는 긴장감을 제공하며, 단순히 공격만 펼치는 것이 아니라 ‘시간 관리’와 ‘자원 관리’를 동시에 요구한다. 또한, 15/20 Bases라는 설명은 맵 내에 존재하는 적 기지의 수를 암시하며, 이는 맵의 규모가 크고 전략적 깊이가 있음을 시사한다. 이 맵은 초보 플레이어보다는 중급 이상의 플레이어에게 추천된다. 맵의 구조상 빠른 판단력과Micro 컨트롤이 요구되며, 적의 반격을 효과적으로 방어하기 위해서는 맵에 대한 사전 이해가 필수적이다. 또한, 제한 시간 내에 모든 적을 파괴해야 한다는 목표는 플레이어의 실전 감각을 키우는 데 도움이 된다. 추천 전 확인해야 할 포인트는 맵의 중앙 평지 접근성, 적 건물의 배치 패턴, 그리고 방어 시설의 위치와 강도이다. 이러한 요소들을 숙지한 후 플레이한다면, 이 맵은 스타크래프트 유즈맵의 재미와 전략성을 동시에 느낄 수 있는佳作가 될 것이다. "Offensive Strike - Final Beta" is a custom map for *StarCraft: Brood War*, where the objective is to destroy all enemy buildings within a time limit. The core of the map lies in testing players' strategic decision-making under two key pressures: time and enemy counterattacks. The wide open field at the center serves as the focal point for both offense and defense, and players must locate and destroy enemy buildings from this central area. Since enemy buildings scattered across the map grow stronger or reinforce their defenses over time, a proactive early-game offense is crucial. Additionally, defensive structures along the map's edges mean reckless attacks can lead to heavy losses, forcing players to balance clearing enemy buildings one by one with protecting their own base. As the name "Final Beta" suggests, the difficulty escalates noticeably. The map description confirms this with the phrase "Each Level gets harder," indicating a progressive difficulty structure. Early on, enemy buildings may react slowly with few in number, but as time passes, more buildings appear, and defenses strengthen. This design keeps players constantly on edge, demanding not just aggressive play but also careful time and resource management. The mention of "15/20 Bases" hints at the number of enemy bases in the map, suggesting a large scale and deep strategic layers. This map is best suited for intermediate to advanced players. Its design requires quick decision-making and precise micro-management, and understanding the map’s layout is essential for effectively countering enemy responses. The goal of destroying all enemies within the time limit also sharpens players' real-game instincts. Before diving in, players should familiarize themselves with the accessibility of the central field, enemy building placement patterns, and the locations and strengths of defensive structures. With a solid grasp of these elements, this map proves to be an excellent work that delivers both fun and strategic depth in a *StarCraft* custom map.
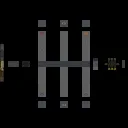
ULTIMATE CANNON DEFENCE (궁극의 캐논 디펜스)
스타크래프트 브루드워의 ULTIMATE CANNON DEFENCE는 포지션과 전략을 요구하는 컴까기 디펜스 유즈맵으로, 플레이어가 포탑과 유닛을 조합해 끊임없이 밀려오는 웨이브를 방어하는 구조를 가지고 있다. 맵 중앙에는 넓은 평지가 펼쳐져 있으며, 이곳을 중심으로 플레이어의 건물이 배치된다. 외부 테두리에는 적 유닛들이 끊임없이 생성되어 공격해 오는데, 이 적들은 포탑과 유닛으로만 저지할 수 있다. 플레이어는 초반에 제공되는 코브라와 같은 강력한 유닛을 적극 활용해 초기 방어선을 구축해야 하며, 이후엔 포탑을 조합해 방어력을 강화하거나 추가 유닛을 생산하는 전략을 세워야 한다. 맵 이미지를 보면 중앙 평지 주변에 포탑과 방어 건물이 배치될 수 있는 공간이 명확히 구분되어 있으며, 외부 테두리에는 적의 공격 루트가 표시되어 있다. 이 맵의 특징은 단순히 방어에 그치지 않고, 적의 공격 패턴과 웨이브 타이밍을 예측해 언제 포탑을 건설하고 유닛을 보충할지를 결정해야 한다는 점이다. 또한, 여러 플레이어가 동시에 방어에 참여할 수 있는 구조로, 팀플레이가 강제되는 요소도 포함되어 있다. 초보자라면 적의 공격 패턴을 익히기 위해 연습 모드로 플레이해 보는 것이 좋으며, 숙련자라면 포탑의 배치와 유닛 조합을 최적화해 더 높은 웨이브를 버텨내는 것을 목표로 삼을 수 있다. 맵의 밸런스는 대략적인 테스트 기준으로는 보통 수준이지만, 특정 포탑 조합에 따라 난이도가 크게 달라질 수 있어 공략법을 숙지하는 것이 중요하다. 마지막으로, 외부 테두리의 적 공격 루트를 분석해 방어 건물을 효율적으로 배치하는 것이 성패의 열쇠다. 이 맵은 디펜스 장르에 익숙한 플레이어뿐만 아니라, 전략적 사고를 즐기는 유저들에게도 적합한 작품이다. 특히, 포탑과 유닛의 조합을 고민하는 재미가 있어 반복 플레이를 유도하는 구조다. Ultimate Cannon Defence in StarCraft: Brood War is a tower-defense-style challenge map that demands precise positioning and strategic thinking. Players must combine turrets and units to fend off relentless enemy waves. The map features a wide central plain where buildings are placed, while enemies continuously spawn along the outer edges and can only be stopped with turrets and units. Early game requires leveraging powerful starting units like the Cobra to establish a defensive line, followed by reinforcing defenses with turrets or producing additional units. The layout clearly marks spaces for turret and defensive structures around the central plain, with enemy attack routes visible along the outer perimeter. What sets this map apart is its emphasis on predicting enemy attack patterns and wave timings to decide when to build turrets or replenish units—not just mindless defense. The design also supports multiple players defending simultaneously, enforcing teamwork as a core mechanic. Beginners should practice in training mode to learn enemy patterns, while advanced players can optimize turret placement and unit compositions to survive higher waves. While the map’s balance is generally moderate, difficulty can vary significantly depending on turret setups, making familiarity with strategies essential. Ultimately, success hinges on efficiently analyzing enemy attack routes along the outer edge to place defensive structures strategically. Suitable for both defense-genre enthusiasts and players who enjoy strategic depth, the map’s blend of turret and unit synergy creates a rewarding loop of experimentation and replayability.
Mapas registrados recientemente
Consulta los archivos y versiones recién añadidos.
Offensive Strike - Final Beta (공격형 타격 - 최종 베타)
「Offensive Strike - Final Beta」는 스타크래프트: 브루드워의 유즈맵으로, 제한 시간 내에 모든 적 건물을 파괴하는 목표를 지닌 서바이벌 장르의 맵이다. 맵의 핵심은 ‘시간과 적의 반격’이라는 두 가지 압박 속에서 플레이어의 전략적 판단력을 시험하는 데 있다. 맵 중앙에 위치한 넓은 평지는 공격과 수비의 거점이 되며, 플레이어는 이곳을 중심으로 적의 건물을 찾아내 파괴해야 한다. 맵 곳곳에 배치된 적의 건물이 시간이 지나면서 점차 강력해지거나 수비 태세를 갖추기 때문에, 초반의 선제공격이 무엇보다 중요하다. 또한, 맵의 테두리에는 방어 시설이 배치되어 있어 무턱대고 공격을 펼쳤다가는 큰 손실을 입을 수 있다. 따라서 플레이어는 적의 건물을 하나씩 제거해 나가며, 동시에 자신의 기지를 보호하는 균형 잡힌 전략을 구사해야 한다. 이 맵은 특히 ‘Final Beta’라는 이름에 걸맞게 난이도 상승 요소가 뚜렷하다. 맵 설명에 따르면 ‘Each Level gets harder’라는 문구가 확인되며, 이는 맵의 구성이 단계적으로 어려워지는 구조를 갖추고 있음을 의미한다. 예를 들어 초기에는 소수의 건물이 느리게 반응하더라도, 시간이 지나면 적의 건물이 다수 등장하거나 방어 시설이 강화되는 방식으로 진행된다. 이러한 구조는 플레이어에게 끊임없는 긴장감을 제공하며, 단순히 공격만 펼치는 것이 아니라 ‘시간 관리’와 ‘자원 관리’를 동시에 요구한다. 또한, 15/20 Bases라는 설명은 맵 내에 존재하는 적 기지의 수를 암시하며, 이는 맵의 규모가 크고 전략적 깊이가 있음을 시사한다. 이 맵은 초보 플레이어보다는 중급 이상의 플레이어에게 추천된다. 맵의 구조상 빠른 판단력과Micro 컨트롤이 요구되며, 적의 반격을 효과적으로 방어하기 위해서는 맵에 대한 사전 이해가 필수적이다. 또한, 제한 시간 내에 모든 적을 파괴해야 한다는 목표는 플레이어의 실전 감각을 키우는 데 도움이 된다. 추천 전 확인해야 할 포인트는 맵의 중앙 평지 접근성, 적 건물의 배치 패턴, 그리고 방어 시설의 위치와 강도이다. 이러한 요소들을 숙지한 후 플레이한다면, 이 맵은 스타크래프트 유즈맵의 재미와 전략성을 동시에 느낄 수 있는佳作가 될 것이다. "Offensive Strike - Final Beta" is a custom map for *StarCraft: Brood War*, where the objective is to destroy all enemy buildings within a time limit. The core of the map lies in testing players' strategic decision-making under two key pressures: time and enemy counterattacks. The wide open field at the center serves as the focal point for both offense and defense, and players must locate and destroy enemy buildings from this central area. Since enemy buildings scattered across the map grow stronger or reinforce their defenses over time, a proactive early-game offense is crucial. Additionally, defensive structures along the map's edges mean reckless attacks can lead to heavy losses, forcing players to balance clearing enemy buildings one by one with protecting their own base. As the name "Final Beta" suggests, the difficulty escalates noticeably. The map description confirms this with the phrase "Each Level gets harder," indicating a progressive difficulty structure. Early on, enemy buildings may react slowly with few in number, but as time passes, more buildings appear, and defenses strengthen. This design keeps players constantly on edge, demanding not just aggressive play but also careful time and resource management. The mention of "15/20 Bases" hints at the number of enemy bases in the map, suggesting a large scale and deep strategic layers. This map is best suited for intermediate to advanced players. Its design requires quick decision-making and precise micro-management, and understanding the map’s layout is essential for effectively countering enemy responses. The goal of destroying all enemies within the time limit also sharpens players' real-game instincts. Before diving in, players should familiarize themselves with the accessibility of the central field, enemy building placement patterns, and the locations and strengths of defensive structures. With a solid grasp of these elements, this map proves to be an excellent work that delivers both fun and strategic depth in a *StarCraft* custom map.
ULTIMATE CANNON DEFENCE (궁극의 캐논 디펜스)
스타크래프트 브루드워의 ULTIMATE CANNON DEFENCE는 포지션과 전략을 요구하는 컴까기 디펜스 유즈맵으로, 플레이어가 포탑과 유닛을 조합해 끊임없이 밀려오는 웨이브를 방어하는 구조를 가지고 있다. 맵 중앙에는 넓은 평지가 펼쳐져 있으며, 이곳을 중심으로 플레이어의 건물이 배치된다. 외부 테두리에는 적 유닛들이 끊임없이 생성되어 공격해 오는데, 이 적들은 포탑과 유닛으로만 저지할 수 있다. 플레이어는 초반에 제공되는 코브라와 같은 강력한 유닛을 적극 활용해 초기 방어선을 구축해야 하며, 이후엔 포탑을 조합해 방어력을 강화하거나 추가 유닛을 생산하는 전략을 세워야 한다. 맵 이미지를 보면 중앙 평지 주변에 포탑과 방어 건물이 배치될 수 있는 공간이 명확히 구분되어 있으며, 외부 테두리에는 적의 공격 루트가 표시되어 있다. 이 맵의 특징은 단순히 방어에 그치지 않고, 적의 공격 패턴과 웨이브 타이밍을 예측해 언제 포탑을 건설하고 유닛을 보충할지를 결정해야 한다는 점이다. 또한, 여러 플레이어가 동시에 방어에 참여할 수 있는 구조로, 팀플레이가 강제되는 요소도 포함되어 있다. 초보자라면 적의 공격 패턴을 익히기 위해 연습 모드로 플레이해 보는 것이 좋으며, 숙련자라면 포탑의 배치와 유닛 조합을 최적화해 더 높은 웨이브를 버텨내는 것을 목표로 삼을 수 있다. 맵의 밸런스는 대략적인 테스트 기준으로는 보통 수준이지만, 특정 포탑 조합에 따라 난이도가 크게 달라질 수 있어 공략법을 숙지하는 것이 중요하다. 마지막으로, 외부 테두리의 적 공격 루트를 분석해 방어 건물을 효율적으로 배치하는 것이 성패의 열쇠다. 이 맵은 디펜스 장르에 익숙한 플레이어뿐만 아니라, 전략적 사고를 즐기는 유저들에게도 적합한 작품이다. 특히, 포탑과 유닛의 조합을 고민하는 재미가 있어 반복 플레이를 유도하는 구조다. Ultimate Cannon Defence in StarCraft: Brood War is a tower-defense-style challenge map that demands precise positioning and strategic thinking. Players must combine turrets and units to fend off relentless enemy waves. The map features a wide central plain where buildings are placed, while enemies continuously spawn along the outer edges and can only be stopped with turrets and units. Early game requires leveraging powerful starting units like the Cobra to establish a defensive line, followed by reinforcing defenses with turrets or producing additional units. The layout clearly marks spaces for turret and defensive structures around the central plain, with enemy attack routes visible along the outer perimeter. What sets this map apart is its emphasis on predicting enemy attack patterns and wave timings to decide when to build turrets or replenish units—not just mindless defense. The design also supports multiple players defending simultaneously, enforcing teamwork as a core mechanic. Beginners should practice in training mode to learn enemy patterns, while advanced players can optimize turret placement and unit compositions to survive higher waves. While the map’s balance is generally moderate, difficulty can vary significantly depending on turret setups, making familiarity with strategies essential. Ultimately, success hinges on efficiently analyzing enemy attack routes along the outer edge to place defensive structures strategically. Suitable for both defense-genre enthusiasts and players who enjoy strategic depth, the map’s blend of turret and unit synergy creates a rewarding loop of experimentation and replayability.
Guía de selección de mapas
태그는 맵의 핵심 특징을 빠르게 설명하지만 제작 버전마다 규칙이 다를 수 있습니다. 상세 설명에서 권장 인원, 난이도, 플레이 시간과 버전을 함께 확인한 뒤 다운로드하세요.