StarCraft HUZY map downloads and community
English

Improved Ban StarCraft Map Collection

We've gathered maps registered with the 'Improved Ban' tag. Compare popular and latest maps focusing on play styles, difficulties, and features that are hard to find through genre alone.

Registered Maps
1items
Total Downloads
0
Total Views
63

Popular Maps

This map has high download and view engagement.

View All
아메이징 TD 섀도우 3.1 (Amazing TD Shadow 3.1) Map Preview

아메이징 TD 섀도우 3.1 (Amazing TD Shadow 3.1)

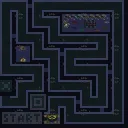
‘Amazing TD Shadow3.1’은 스타크래프트: 브루드워의 대표적인 타워 디펜스(터렛 디펜스) 유즈맵으로, 방어와 전략적 배치에 중점을 둔 플레이가 인상적이다. 맵 중앙을 가로지르는 길목에 배치된 벙커에서 3기의 유닛을 동시에 운용할 수 있으며, 각 웨이브마다 등장하는 적 유닛들은 점점 강해지는 특징을 보인다. 방어선을 구축하는 동시에 자원을 확보하고, 강력한 적들을 상대로 어떻게 효율적으로 대처하느냐가 관건이다. 맵 곳곳에 위치한 특수 구조물이나 보너스 지역이 보이며, 난이도 설정도 제공되어 초보자부터 숙련자까지 폭넓게 즐길 수 있다. 특히 ‘Stronger Foes’라는 설명처럼 후반부로 갈수록 적의 공격력이 급증하므로, 초반 자원 관리와 유닛 배치 계획을 철저히 세워야 한다. 또한 Improved Ban 기능으로 인해 특정 유닛이나 전략이 불리해지는 상황이 발생할 수 있어, 유연한 대처가 필요하다. 이 맵은 주로 1인용 또는 소규모 팀 플레이에 최적화되어 있으며, 디펜스 장르의 핵심 요소인 ‘막아내기’의 재미를 극대화한 작품이다. 플레이는 약 30분 내외로 마무리되며, 반복 플레이를 통해 최적의 전략을 구사할 수 있는 재미도 존재한다. 초보자라면 난이도를 낮춰 천천히 적응하는 것이 좋고, 숙련자라면 최대한의 효율로 자원을 확보해 후반부 공세에 대비해야 한다. 맵을 처음 플레이할 때는 벙커 주변의 지형과 길목을 꼼꼼히 살피는 것이 중요하며, 각 웨이브의 패턴을 익히는 데 집중하는 것이 좋다. 또한 Improved Ban 기능으로 인해 특정 유닛이 제한될 수 있으니, 다양한 조합을 시도해 보는 것도 추천한다. Amazing TD Shadow3.1 is a standout tower defense custom map in StarCraft: Brood War, focusing heavily on strategic placement and defense mechanics. Players control three units simultaneously from bunkers positioned along the central path, with enemy waves growing progressively stronger as the game advances. Effective resource management and tactical unit placement are crucial for survival, especially since the latter stages introduce significantly tougher foes. The map features bonus areas and special structures that can be leveraged for additional advantages, while difficulty settings allow players of all skill levels to enjoy the experience. The Improved Ban system adds another layer of challenge by restricting certain units or strategies, requiring adaptability. Designed primarily for solo play or small team coordination, this map emphasizes the core appeal of defense-based gameplay, delivering a satisfying 30-minute experience that rewards strategic refinement. Beginners should start on lower difficulties to grasp the mechanics, while experienced players can push their limits by optimizing resource allocation for late-game waves. Scouting the terrain around bunkers and understanding enemy wave patterns is essential, and experimenting with different unit combinations helps counter the Improved Ban restrictions effectively.

Download 0 · Views 63 · Comments 0

Recently registered maps

Check newly added files and versions.

아메이징 TD 섀도우 3.1 (Amazing TD Shadow 3.1) Map Preview

아메이징 TD 섀도우 3.1 (Amazing TD Shadow 3.1)

‘Amazing TD Shadow3.1’은 스타크래프트: 브루드워의 대표적인 타워 디펜스(터렛 디펜스) 유즈맵으로, 방어와 전략적 배치에 중점을 둔 플레이가 인상적이다. 맵 중앙을 가로지르는 길목에 배치된 벙커에서 3기의 유닛을 동시에 운용할 수 있으며, 각 웨이브마다 등장하는 적 유닛들은 점점 강해지는 특징을 보인다. 방어선을 구축하는 동시에 자원을 확보하고, 강력한 적들을 상대로 어떻게 효율적으로 대처하느냐가 관건이다. 맵 곳곳에 위치한 특수 구조물이나 보너스 지역이 보이며, 난이도 설정도 제공되어 초보자부터 숙련자까지 폭넓게 즐길 수 있다. 특히 ‘Stronger Foes’라는 설명처럼 후반부로 갈수록 적의 공격력이 급증하므로, 초반 자원 관리와 유닛 배치 계획을 철저히 세워야 한다. 또한 Improved Ban 기능으로 인해 특정 유닛이나 전략이 불리해지는 상황이 발생할 수 있어, 유연한 대처가 필요하다. 이 맵은 주로 1인용 또는 소규모 팀 플레이에 최적화되어 있으며, 디펜스 장르의 핵심 요소인 ‘막아내기’의 재미를 극대화한 작품이다. 플레이는 약 30분 내외로 마무리되며, 반복 플레이를 통해 최적의 전략을 구사할 수 있는 재미도 존재한다. 초보자라면 난이도를 낮춰 천천히 적응하는 것이 좋고, 숙련자라면 최대한의 효율로 자원을 확보해 후반부 공세에 대비해야 한다. 맵을 처음 플레이할 때는 벙커 주변의 지형과 길목을 꼼꼼히 살피는 것이 중요하며, 각 웨이브의 패턴을 익히는 데 집중하는 것이 좋다. 또한 Improved Ban 기능으로 인해 특정 유닛이 제한될 수 있으니, 다양한 조합을 시도해 보는 것도 추천한다. Amazing TD Shadow3.1 is a standout tower defense custom map in StarCraft: Brood War, focusing heavily on strategic placement and defense mechanics. Players control three units simultaneously from bunkers positioned along the central path, with enemy waves growing progressively stronger as the game advances. Effective resource management and tactical unit placement are crucial for survival, especially since the latter stages introduce significantly tougher foes. The map features bonus areas and special structures that can be leveraged for additional advantages, while difficulty settings allow players of all skill levels to enjoy the experience. The Improved Ban system adds another layer of challenge by restricting certain units or strategies, requiring adaptability. Designed primarily for solo play or small team coordination, this map emphasizes the core appeal of defense-based gameplay, delivering a satisfying 30-minute experience that rewards strategic refinement. Beginners should start on lower difficulties to grasp the mechanics, while experienced players can push their limits by optimizing resource allocation for late-game waves. Scouting the terrain around bunkers and understanding enemy wave patterns is essential, and experimenting with different unit combinations helps counter the Improved Ban restrictions effectively.

Download 0 · Views 63 · Comments 0
Map selection guide

태그는 맵의 핵심 특징을 빠르게 설명하지만 제작 버전마다 규칙이 다를 수 있습니다. 상세 설명에서 권장 인원, 난이도, 플레이 시간과 버전을 함께 확인한 뒤 다운로드하세요.